
Scan troubleshooting
Use this section to solve these scan problems:
•
Scan halts
•
Scan fails
•
Scan fails because of insufficient computer memory
•
Scan To menu does not appear
•
Scan To menu does not appear
•
Scanned image is blank
•
Scanned image is incorrectly cropped
•
Scanned image has incorrect page layout
Scan troubleshooting
243

•
Scanned image shows dotted lines instead of text
•
Text format is incorrect
•
Text is incorrect or missing
•
The scan feature does not work
Scan halts
Cause: The computer system resources might be low.
Solution: Turn off the HP All-in-One and then turn it back on. Turn off the computer
and then turn it back on.
If this does not work, try changing the scan to a lower resolution.
Scan fails
Cause: The computer is not turned on.
Solution: Turn on your computer.
Cause: Your computer is not connected to the HP All-in-One by a USB cable.
Solution: Connect your computer to the HP All-in-One with a standard USB cable.
Cause: The HP All-in-One software might not have been installed.
Solution: Insert the HP All-in-One installation CD and install the software.
Cause: The software you installed with the HP All-in-One is not running.
Solution: Open the software you installed with the HP All-in-One and try scanning
again.
Scan fails because of insufficient computer memory
Cause: Too many programs are running on your computer.
Solution: Close all programs that are not in use. This includes programs that run
in the background, such as screen savers and virus checkers. If you turn off your virus
checker, remember to turn it back on after you finish your scan.
If this does not work, it might help to restart your computer. Some programs do not
release memory when you close them. Restarting your computer will clear the
memory.
If this problem occurs frequently, or if you encounter memory problems while using
other programs, you might need to add more memory to your computer. See the user
guide that came with your computer for more information.
Chapter 11
244
Troubleshooting

Scan To
menu does not appear
Cause: The Scan To menu does not appear if:
•
The software that came with the HP All-in-One was not installed or necessary
parts of it are not installed.
•
The HP All-in-One is not connected to the computer.
•
The computer is turned off.
•
You closed the HP Digital Imaging Monitor icon in the Windows system tray on
the taskbar.
Solution:
•
Follow the directions in the Setup Poster to install the software that came with the
HP All-in-One.
•
Make sure that the HP All-in-One is connected to a computer.
•
If the HP All-in-One is directly connected to a computer, make sure the computer
is turned on.
•
Restart the computer or start the software you installed with the HP All-in-One.
Scan To
menu does not appear
Cause: The Scan To menu does not appear if:
•
The software that came with the HP All-in-One was not installed or necessary
parts of it are not installed.
•
The HP All-in-One is not connected to the computer.
•
The computer is turned off.
Solution:
•
Follow the directions in the Setup Poster to install the software that came with the
HP All-in-One.
•
Make sure that the HP All-in-One is connected to a computer.
•
If the HP All-in-One is directly connected to a computer, make sure the computer
is turned on.
•
Restart the computer or start the software you installed with the HP All-in-One.
Scanned image is blank
Cause: The original is placed incorrectly on the glass.
Scan troubleshooting
245
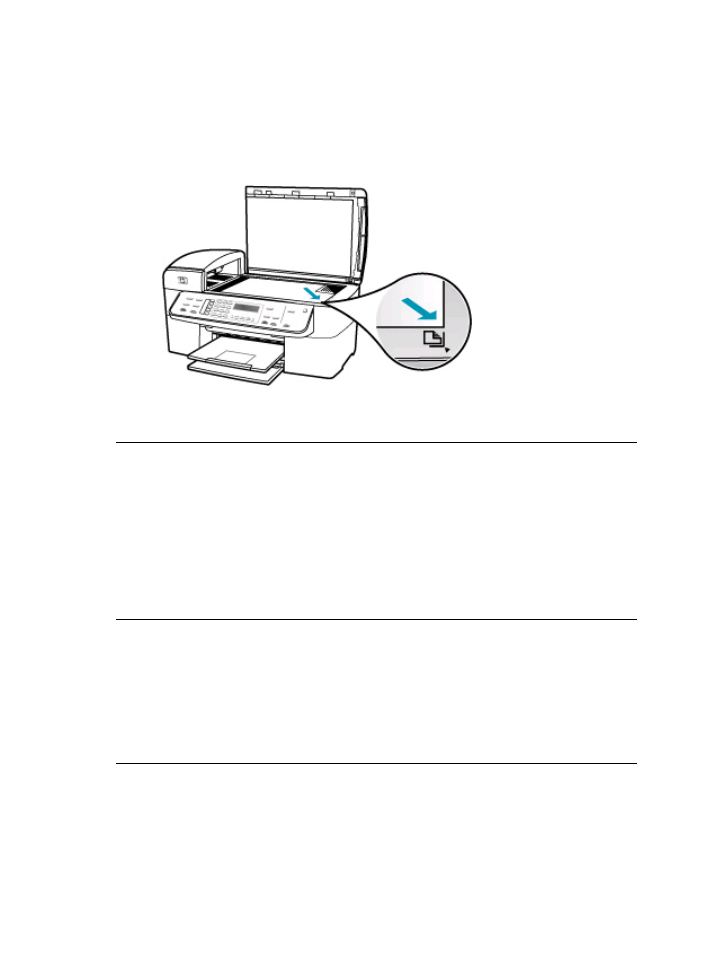
Solution: Load the original print side down on the right front corner of the glass.
To load an original on the scanner glass
1.
Remove all originals from the document feeder tray, and then lift the lid on the
HP All-in-One.
2.
Load your original print side down on the right front corner of the glass.
3.
Close the lid.
Scanned image is incorrectly cropped
Cause: The software is set to automatically crop scanned pictures.
Solution: The Autocrop feature crops anything that is not part of the main image.
Sometimes this might not be what you want. In that case, you can turn off
autocropping and crop the scanned image manually, or not at all.
You can change the Autocrop feature in the HP Scan Pro software. For more
information, see the HP Scan Pro section of the HP Photosmart Mac Help.
Scanned image has incorrect page layout
Cause: Automatic cropping is changing the page layout.
Solution: Turn off automatic cropping to retain the page layout.
You can change the Autocrop feature in the HP Scan Pro software. For more
information, see the HP Scan Pro section of the HP Photosmart Mac Help.
Scanned image shows dotted lines instead of text
Cause: If you use the Text image type to scan text that you plan to edit, the scanner
might not recognize color text. The Text image type scans at 300 x 300 dpi, in black
and white.
If you are scanning an original that has graphics or artwork surrounding the text, the
scanner might not recognize the text.
Chapter 11
246
Troubleshooting

Solution: Make a black-and-white copy of the original and then scan the copy.
Text format is incorrect
Cause: The scan document settings are incorrect.
Solution: Some programs cannot handle framed text formatting. Framed text is one
of the scan document settings. It maintains complex layouts, such as multiple columns
from a newsletter, by putting the text in different frames (boxes) in the destination
application.
Text is incorrect or missing
Cause: The brightness is not set correctly.
Solution: Adjust the brightness, and then rescan the original.
You can adjust the brightness in the HP Scan Pro software. For more information,
see the HP Scan Pro section of the HP Photosmart Mac Help.
Cause: Debris might be stuck on the glass or on the back of the document lid. This
can cause poor-quality scans.
Solution: Turn off the HP All-in-One, unplug the power cord, and use a soft cloth
to wipe the glass and the back of the document lid.
To clean the glass
1.
Turn off the HP All-in-One, and raise the lid.
2.
Clean the glass with a soft cloth or sponge slightly moistened with a nonabrasive
glass cleaner.
CAUTION:
Do not use abrasives, acetone, benzene, or carbon tetrachloride
on the glass, since they can damage it. Do not place or spray liquid directly
on the glass. The liquid might seep under the glass and damage the device.
3.
Dry the glass with a dry, soft, lint-free cloth to prevent spotting.
4.
Turn on the HP All-in-One.
To clean the lid backing
1.
Turn off the HP All-in-One, unplug the power cord, and raise the lid.
NOTE:
Depending how long the HP All-in-One is unplugged, the date and
time might be erased. You might need to reset the date and time later, when
you plug the power cord back in.
2.
Clean the white document backing with a soft cloth or sponge slightly moistened
with a mild soap and warm water.
Wash the backing gently to loosen debris. Do not scrub the backing.
Scan troubleshooting
247

3.
Dry the backing with a dry, soft, lint-free cloth.
CAUTION:
Do not use paper-based wipes, as these might scratch the
backing.
4.
If further cleaning is needed, repeat the previous steps using isopropyl (rubbing)
alcohol, and wipe the backing thoroughly with a damp cloth to remove any residual
alcohol.
CAUTION:
Be careful not to spill alcohol on the glass or exterior of the HP All-
in-One, as this might damage the device.
The scan feature does not work
Cause: There are several reasons why a scan might not occur:
•
The computer is turned off.
•
The HP All-in-One is not properly connected to the computer through a USB
cable.
•
The software that came with the HP All-in-One is not installed or is not running.
Solution:
•
Turn the computer on.
•
Check the cables that connect the HP All-in-One to your computer.
•
Restart your computer. If that does not help, install or reinstall the software that
came with the HP All-in-One.