Print troubleshooting
Use this section to solve these printing problems:
•
Envelopes print incorrectly
•
Borderless printing produces unexpected results
•
The HP All-in-One is not responding
•
The HP All-in-One prints meaningless characters
•
Nothing happens when I try to print
•
My document did not print
•
The margins are not printing as expected
•
Text or graphics are cut off at the edge of the page
•
A blank page came out while printing
•
Ink is spraying the inside of the HP All-in-One when I print a photo
Envelopes print incorrectly
Cause: A stack of envelopes is loaded incorrectly.
Solution: Remove all paper from the input tray. Load a stack of envelopes in the
input tray, with the envelope flaps facing up and on the left.
Print troubleshooting
159
NOTE:
To avoid paper jams, tuck the flaps inside the envelopes.
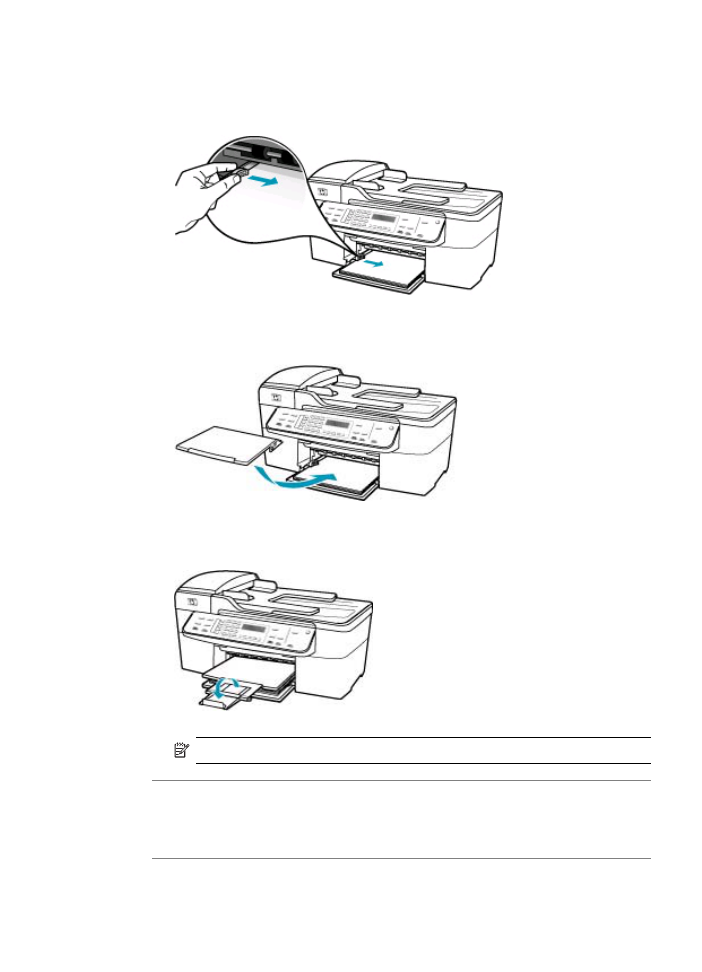
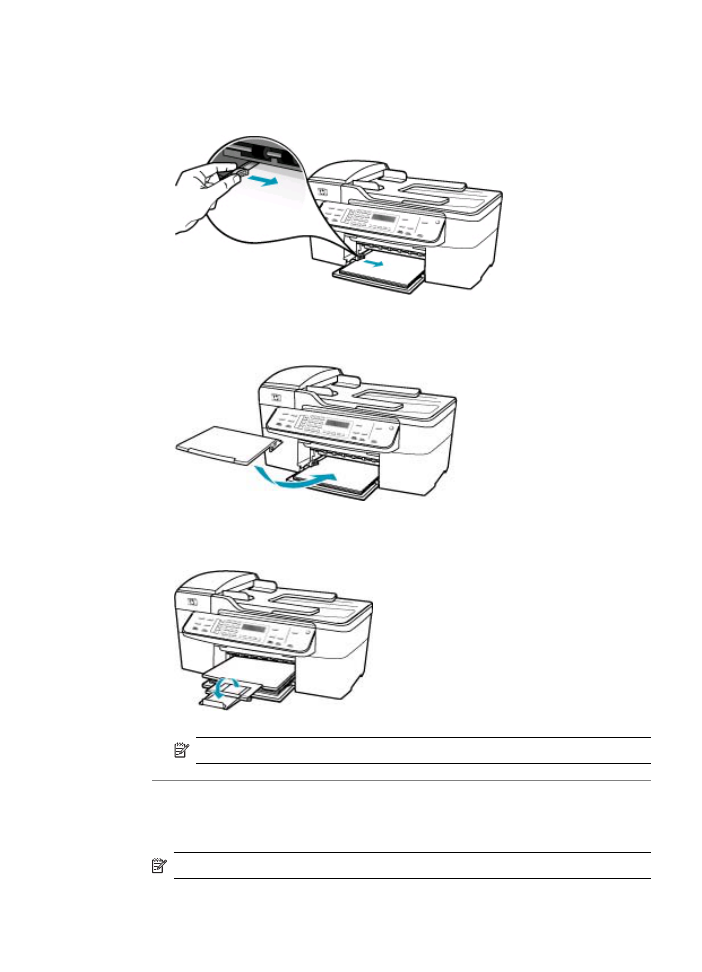
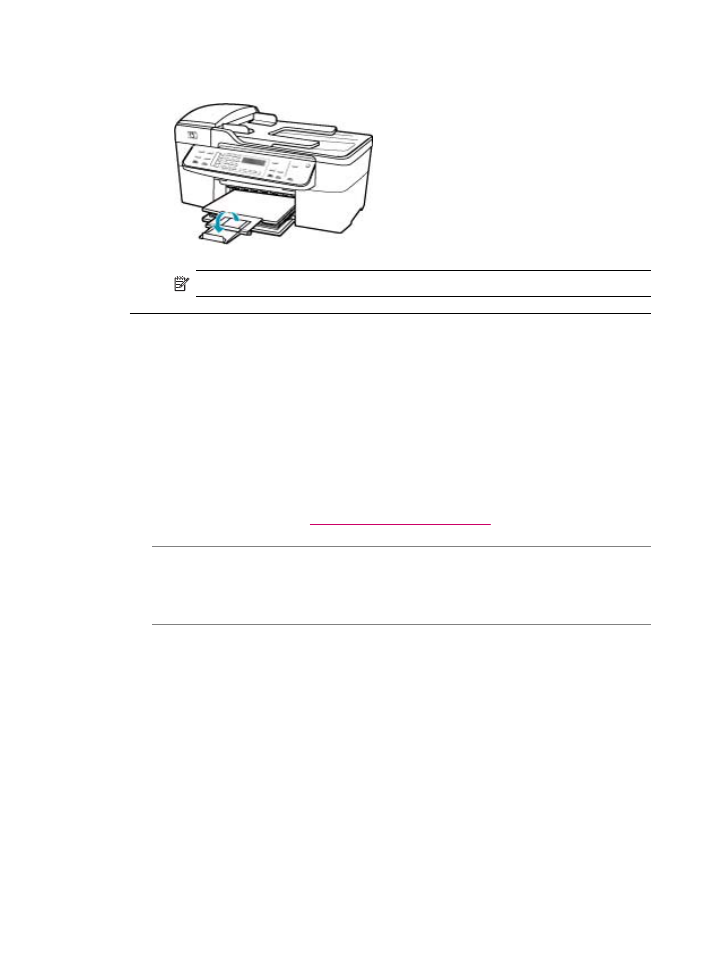
To load envelopes
1.
Remove the output tray.
2.
Remove all paper from the input tray.
3.
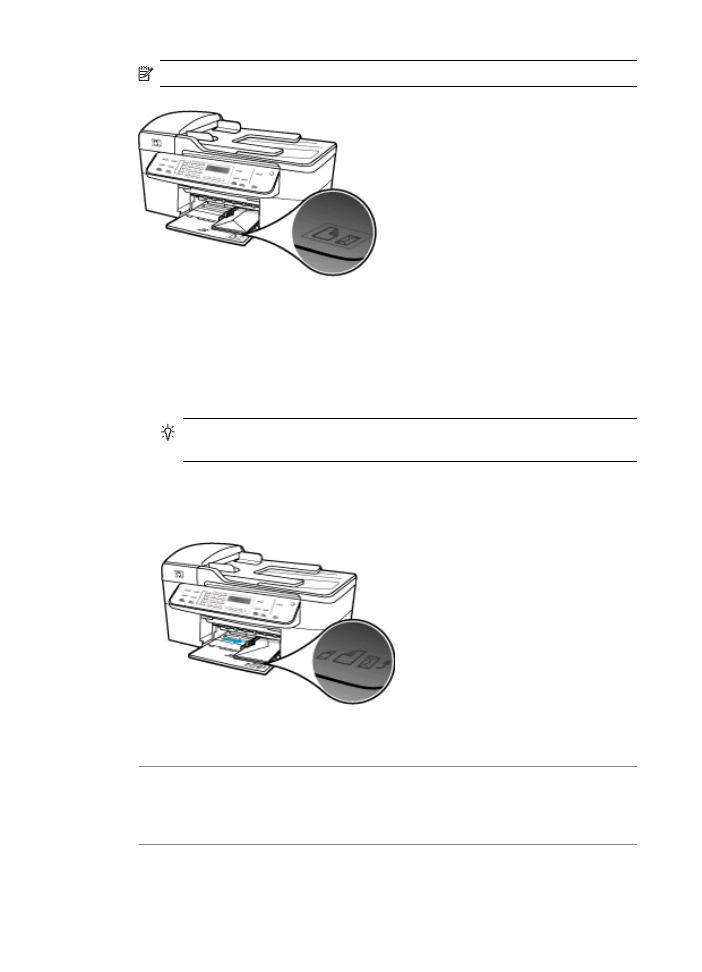
Insert one or more envelopes into the far-right side of the input tray with the
envelope flaps up and on the left. Slide the stack of envelopes forward until it
stops.
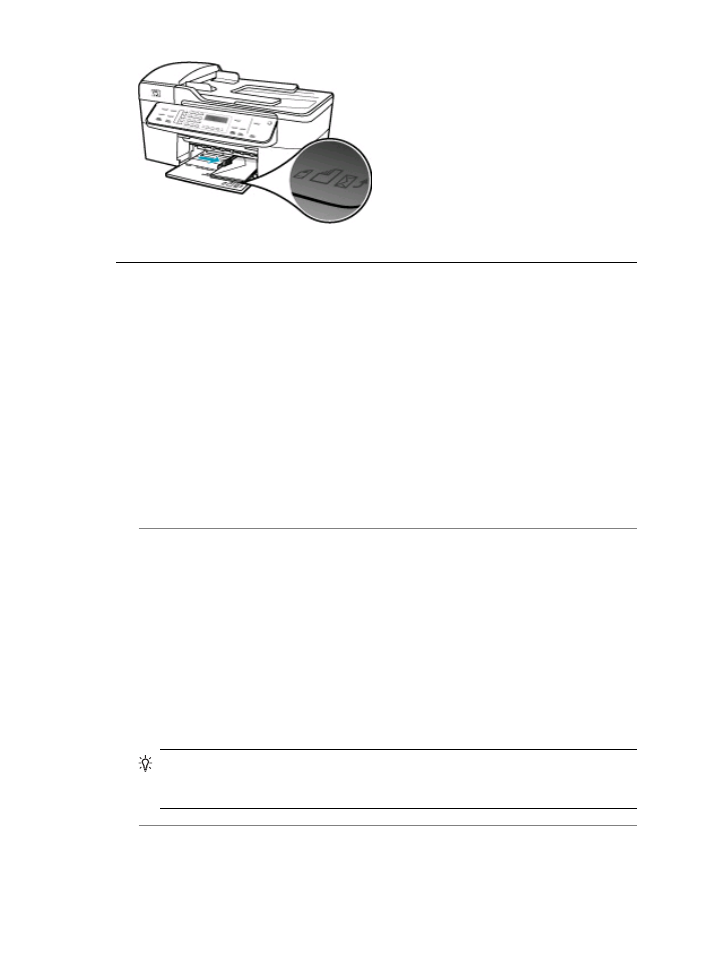
TIP:
For more help on loading envelopes, refer to the diagram engraved in
the base of the input tray.
4.
Slide the paper-width guide inward against the stack of envelopes until it stops.
Do not overload the input tray; make sure the stack of envelopes fits within the
input tray and is not higher than the top of the paper-width guide.
5.
Replace the output tray.
Cause: The wrong type of envelopes is loaded.
Solution: Do not use shiny or embossed envelopes or envelopes that have clasps
or windows.
Cause: The ink is smearing on the envelope.
Chapter 11
160
Troubleshooting
Solution: If the ink smears when printing envelopes, tuck the flaps inside the
envelopes. If the problem persists, remove the black print cartridge and print with only
the tri-color print cartridge installed.
Borderless printing produces unexpected results
Cause: Printing a borderless image from a non-HP software application produces
unexpected results.
Solution: Try printing the image from the photo imaging software that came with
the HP All-in-One.
The HP All-in-One is not responding
Cause: The HP All-in-One is busy with another task.
Solution: If the HP All-in-One is performing another task such as copying, faxing,
or scanning, your print job will be delayed until the HP All-in-One completes the
current task.
Some documents take a long time to print. If nothing has printed several minutes after
you sent a print job to the HP All-in-One, check the HP All-in-One display to see if
there are any messages.
Cause: The HP All-in-One has a paper jam.
Solution: For information on clearing a paper jam, see
Clear paper jams
.
Cause: The HP All-in-One is out of paper.
Solution: Load paper in the input tray.
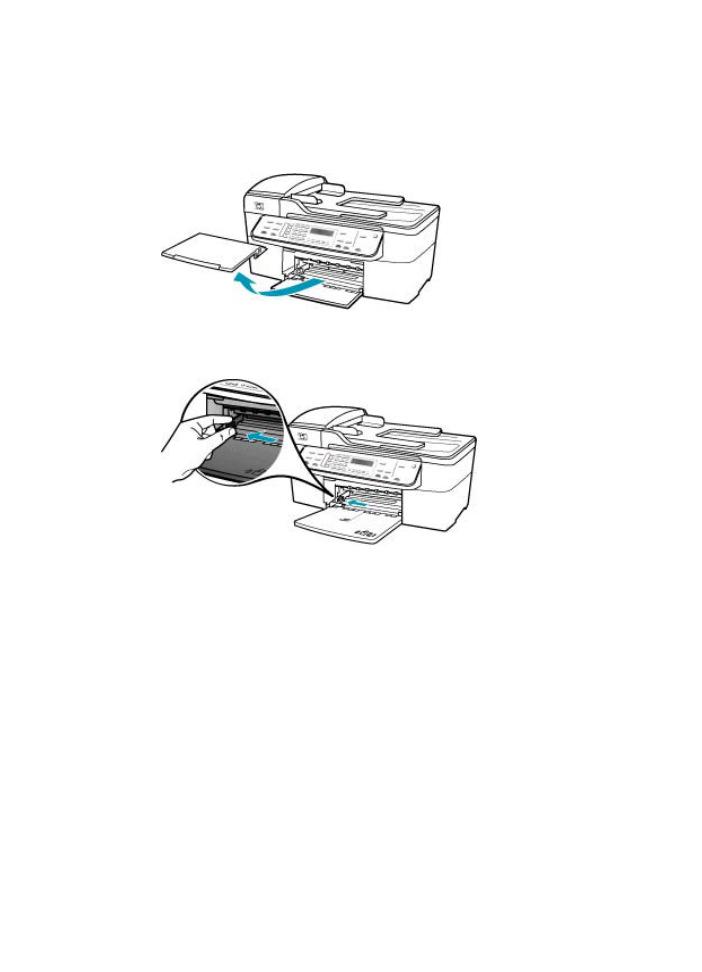
To load full-size paper
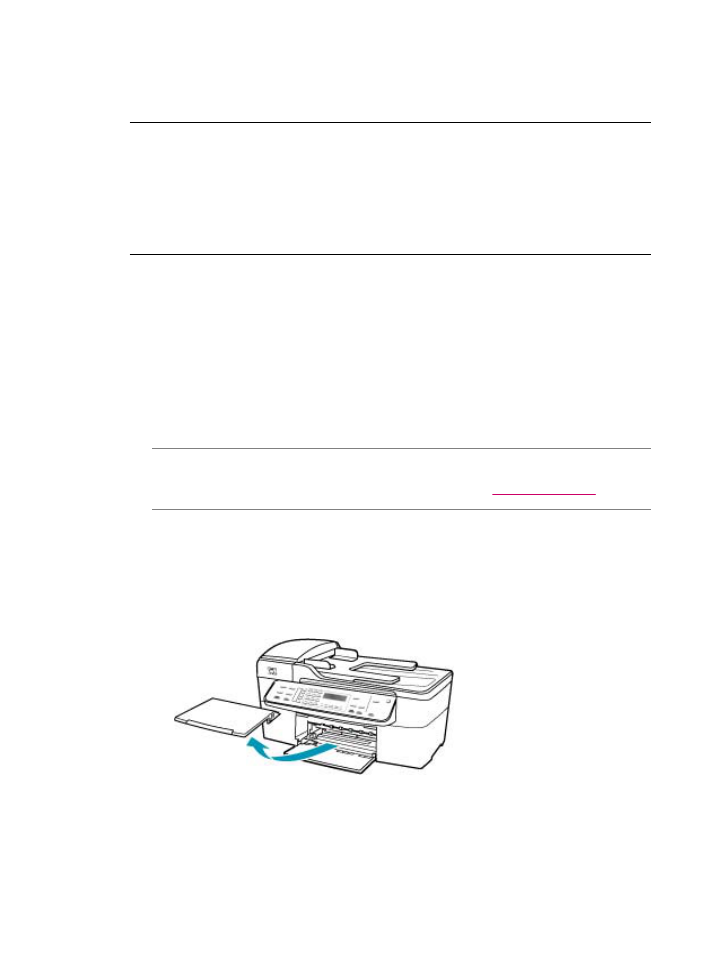
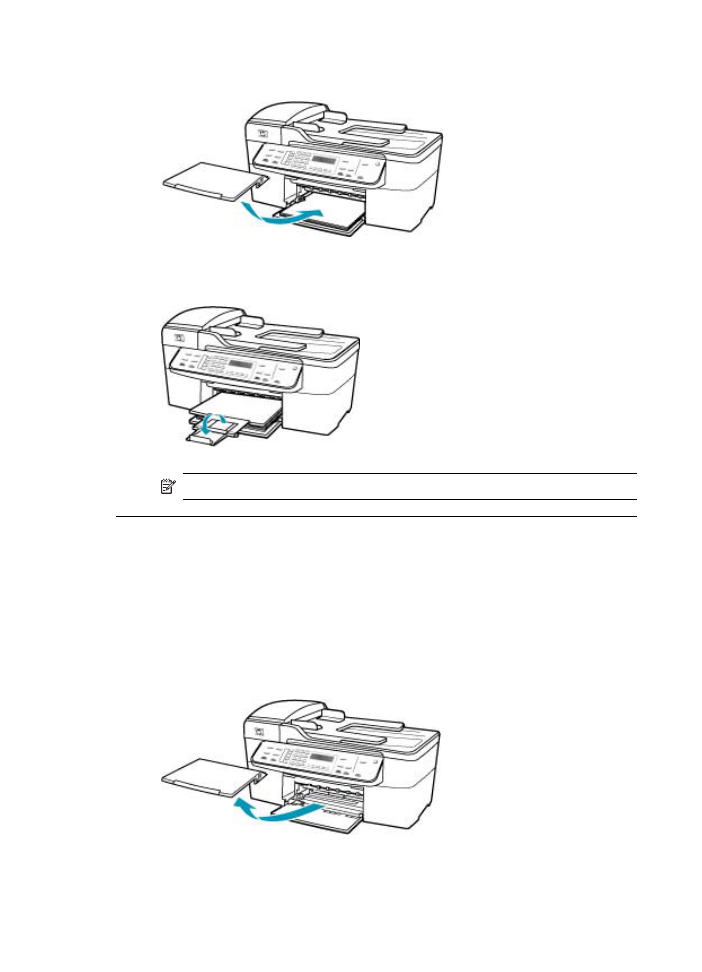
1.
Remove the output tray.
Print troubleshooting
161
2.
Slide the paper-width guide to its outermost position.
3.
Tap a stack of paper on a flat surface to align the edges, and then check the paper
for the following:
•
Make sure it is free of rips, dust, wrinkles, and curled or bent edges.
•
Make sure all the paper in the stack is the same size and type.
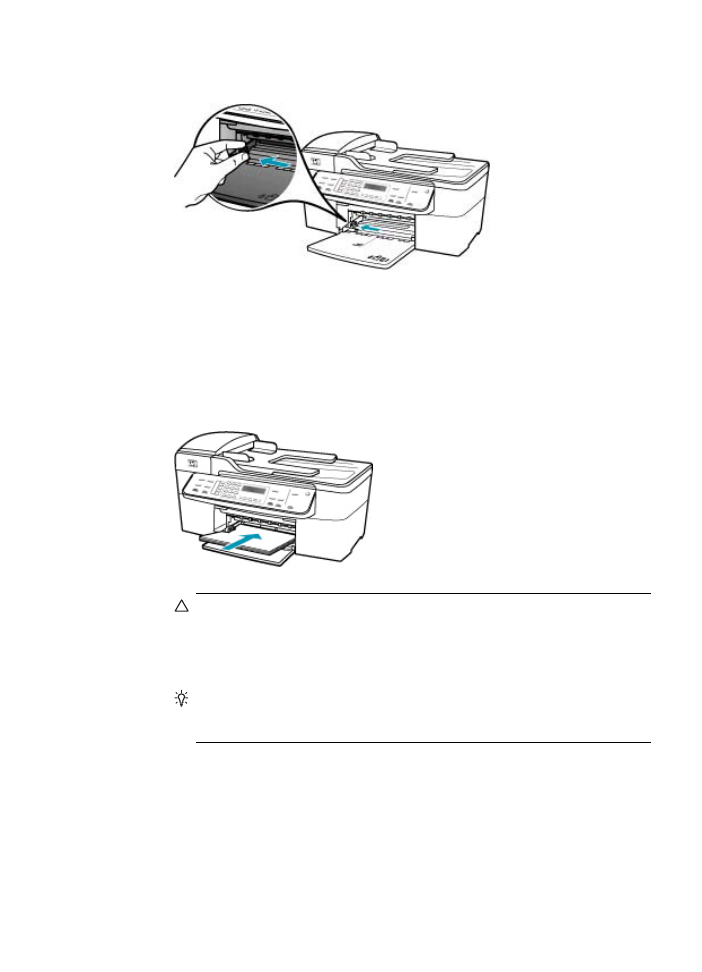
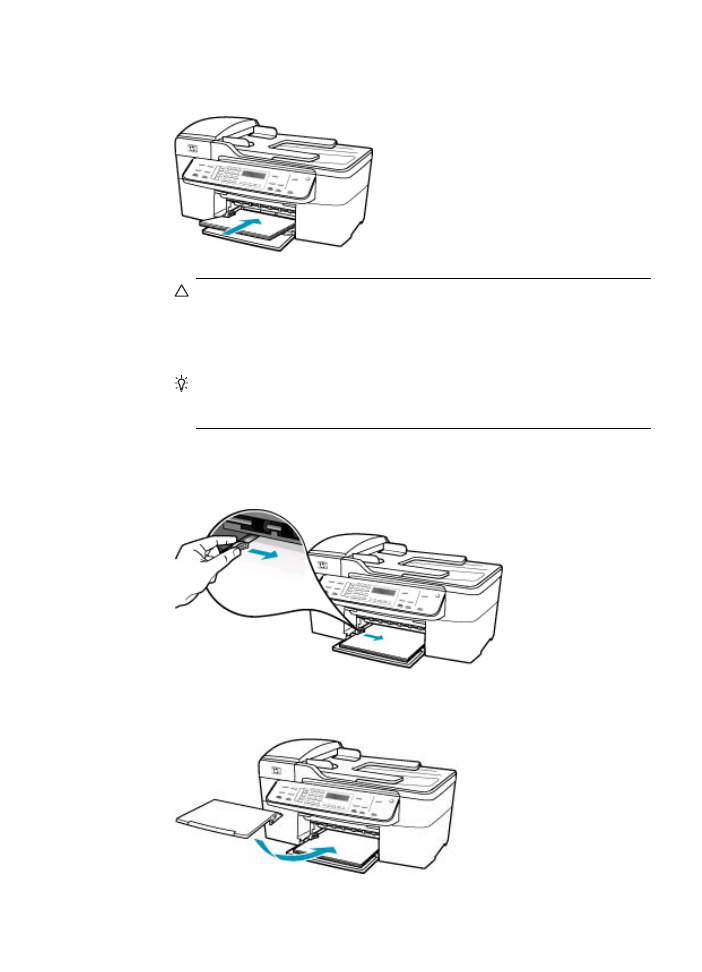
4.
Insert the stack of paper into the input tray with the short edge forward and the
print side down. Slide the stack of paper forward until it stops.
CAUTION:
Make sure that the HP All-in-One is idle and silent when you load
paper into the input tray. If the HP All-in-One is servicing the print cartridges
or otherwise engaged in a task, the paper stop inside the device might not be
in place. You could push the paper too far forward, causing the HP All-in-One
to eject blank pages.
TIP:
If you are using letterhead, insert the top of the page first with the print
side down. For more help on loading full-size paper and letterhead, refer to
the diagram engraved in the base of the input tray.
Chapter 11
162
Troubleshooting
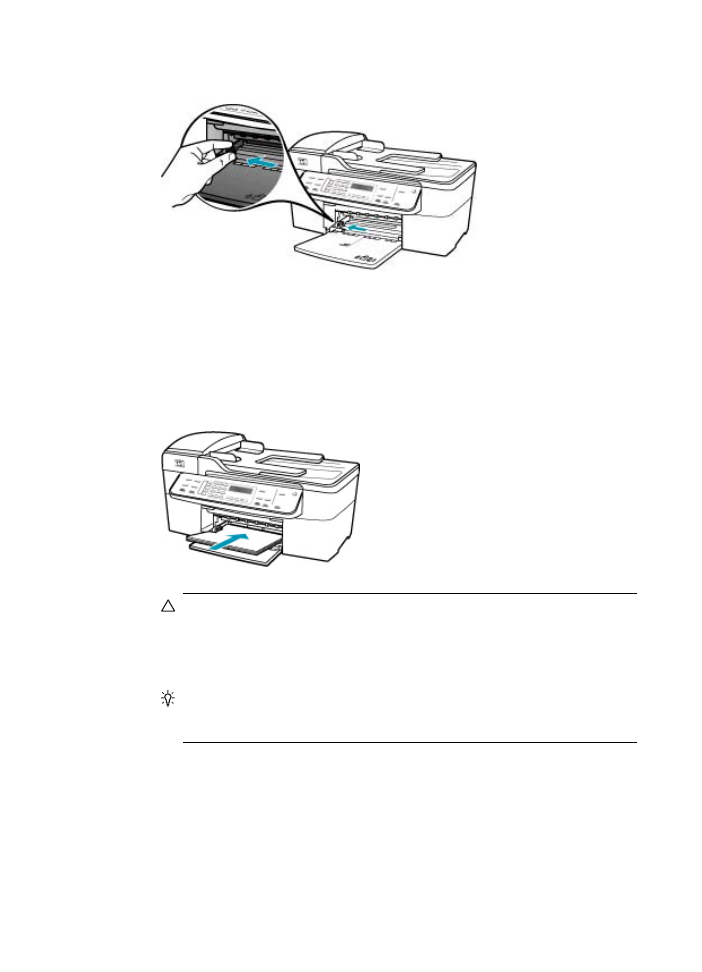
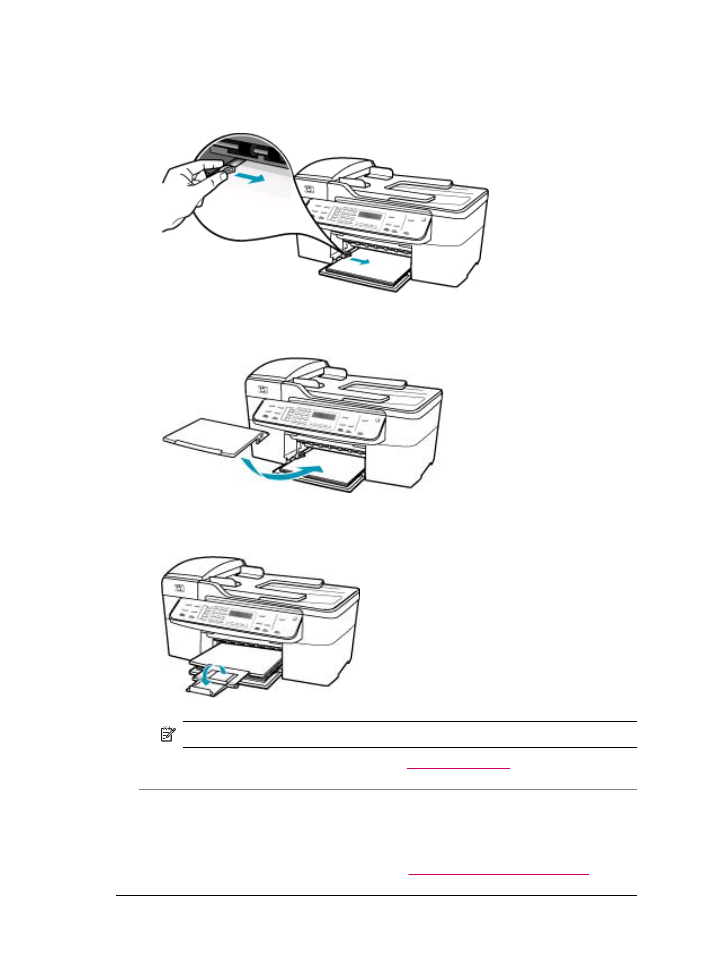
5.
Slide the paper-width guide inward until it stops at the edge of the paper.
Do not overload the input tray; make sure the stack of paper fits within the input
tray and is no higher than the top of the paper-width guide.
6.
Replace the output tray.
7.
Flip the tray extender up toward you.
NOTE:
When you use legal-size paper, leave the tray extender closed.
Cause: The print carriage has stalled.
Solution: Turn the HP All-in-One off, remove any objects that are blocking the print
carriage (including any packing materials), and then turn the HP All-in-One on again.
Cause: The computer is not communicating with the HP All-in-One.
Print troubleshooting
163

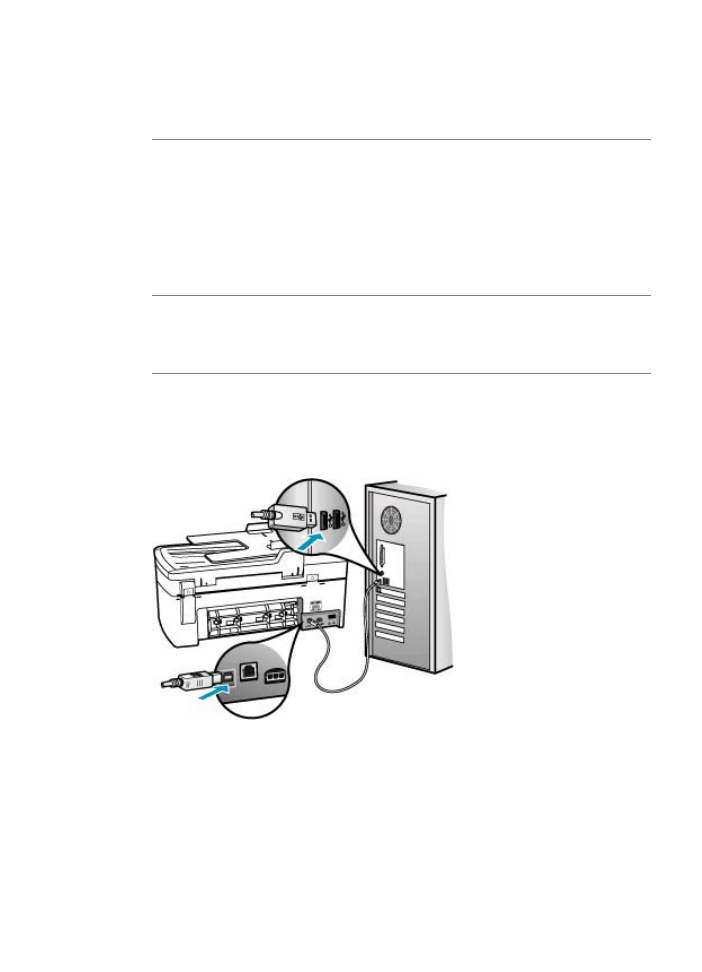
Solution: If the HP All-in-One is not properly connected to the computer,
communication errors can occur. Make sure the USB cable is connected to the HP All-
in-One and the computer as shown below.
You can print a test page from the HP Photosmart Studio (Mac) Software to confirm
the connection between the HP All-in-One and your Mac is working properly. This
test page is different from the self-test report that you can print from the control panel.
To print a test page
1.
Select the HP Device Manager from the Dock.
The HP Device Manager window appears.
2.
From the Information and Settings drop-down, select Maintain Printer.
3.
Select the HP All-in-One, and then select Launch Utility.
4.
Click Print Test Page.
A test page is printed as long as your connection is set up and working properly.
For information on setting up the HP All-in-One, see the Setup Poster provided
with the HP All-in-One.
Cause: The HP All-in-One is turned off.
Solution: Look at the display on the HP All-in-One. If the display is blank and the
light next to the Power button is not lit, the HP All-in-One is turned off. Make sure the
power cord is firmly connected to the HP All-in-One and plugged into a power outlet.
Press the Power button to turn on the HP All-in-One.
Cause: The HP All-in-One experienced an error.
Solution: Turn the HP All-in-One off, and then unplug the power cord. Plug the
power cord back in, and then press the Power button to turn on the HP All-in-One.
NOTE:
Depending how long the HP All-in-One is unplugged, the date and time
might be erased. You might need to reset the date and time later, when you plug
the power cord back in.
The HP All-in-One prints meaningless characters
Cause: The memory in the HP All-in-One is full.
Solution: Turn off the HP All-in-One and your computer for 60 seconds, then turn
them both on and try printing again.
Cause: The document is corrupt.
Solution: Try printing another document from the same software application. If this
works, then try printing a previously saved version of the document that is not corrupt.
Nothing happens when I try to print
Cause: The HP All-in-One is turned off.
Chapter 11
164
Troubleshooting
Solution: Look at the display on the HP All-in-One. If the display is blank and the
light next to the Power button is not lit, the HP All-in-One is turned off. Make sure the
power cord is firmly connected to the HP All-in-One and plugged into a power outlet.
Press the Power button to turn on the HP All-in-One.
Cause: The HP All-in-One is busy with another task.
Solution: If the HP All-in-One is performing another task such as copying, faxing,
or scanning, your print job will be delayed until the HP All-in-One completes the
current task.
Some documents take a long time to print. If nothing has printed several minutes after
you sent a print job to the HP All-in-One, check the HP All-in-One display to see if
there are any messages.
Cause: The HP All-in-One is not the selected printer.
Solution: Make sure the HP All-in-One is the selected printer in your software
application.
Cause: The computer is not communicating with the HP All-in-One.
Solution: If the HP All-in-One is not properly connected to the computer,
communication errors can occur. Make sure the USB cable is connected to the HP All-
in-One and the computer as shown below.
You can print a test page from the HP Photosmart Studio (Mac) Software to confirm
the connection between the HP All-in-One and your Mac is working properly. This
test page is different from the self-test report that you can print from the control panel.
To print a test page
1.
Select the HP Device Manager from the Dock.
The HP Device Manager window appears.
2.
From the Information and Settings drop-down, select Maintain Printer.
Print troubleshooting
165
3.
Select the HP All-in-One, and then select Launch Utility.
4.
Click Print Test Page.
A test page is printed as long as your connection is set up and working properly.
For information on setting up the HP All-in-One, see the Setup Poster provided
with the HP All-in-One.
Cause: The HP All-in-One has a paper jam.
Solution: For information on clearing paper jams, see
Clear paper jams
.
Cause: The print carriage has stalled.
Solution: Turn the HP All-in-One off, remove any objects that are blocking the print
carriage (including any packing materials), and then turn the HP All-in-One on again.
Cause: The HP All-in-One is out of paper.
Solution: Load paper in the input tray.
To load full-size paper
1.
Remove the output tray.
2.
Slide the paper-width guide to its outermost position.
Chapter 11
166
Troubleshooting
3.
Tap a stack of paper on a flat surface to align the edges, and then check the paper
for the following:
•
Make sure it is free of rips, dust, wrinkles, and curled or bent edges.
•
Make sure all the paper in the stack is the same size and type.
4.
Insert the stack of paper into the input tray with the short edge forward and the
print side down. Slide the stack of paper forward until it stops.
CAUTION:
Make sure that the HP All-in-One is idle and silent when you load
paper into the input tray. If the HP All-in-One is servicing the print cartridges
or otherwise engaged in a task, the paper stop inside the device might not be
in place. You could push the paper too far forward, causing the HP All-in-One
to eject blank pages.
TIP:
If you are using letterhead, insert the top of the page first with the print
side down. For more help on loading full-size paper and letterhead, refer to
the diagram engraved in the base of the input tray.
5.
Slide the paper-width guide inward until it stops at the edge of the paper.
Do not overload the input tray; make sure the stack of paper fits within the input
tray and is no higher than the top of the paper-width guide.
Print troubleshooting
167
6.
Replace the output tray.
7.
Flip the tray extender up toward you.
NOTE:
When you use legal-size paper, leave the tray extender closed.
My document did not print
Cause: The input tray is empty or there is a paper jam.
Solution: Make sure paper is loaded in the input tray and that there is no paper
jam.
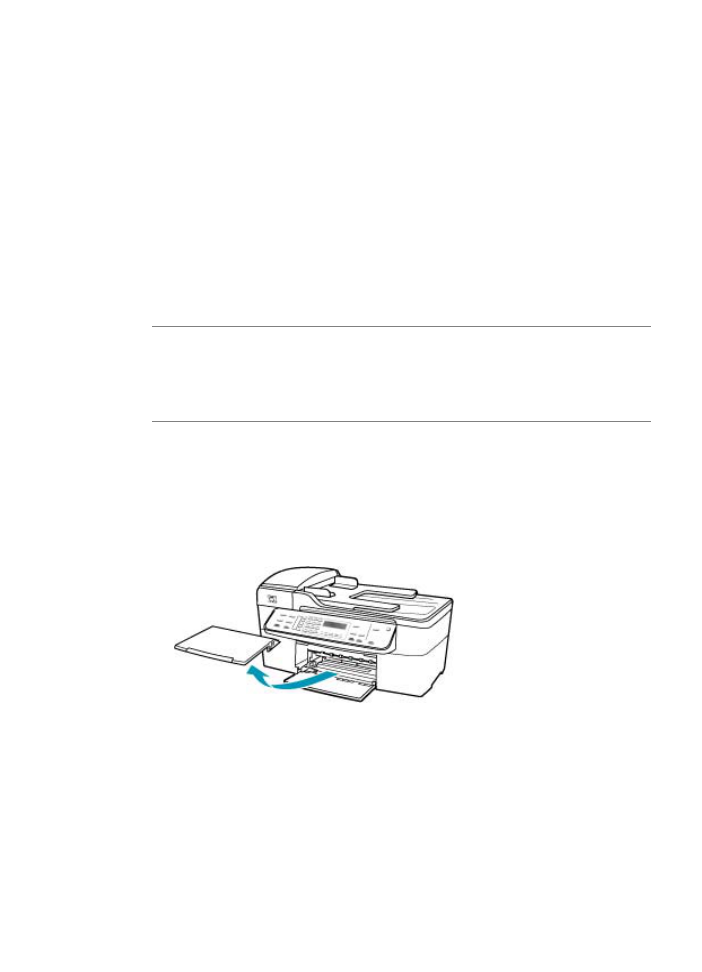
To load full-size paper
1.
Remove the output tray.
Chapter 11
168
Troubleshooting
2.
Slide the paper-width guide to its outermost position.
3.
Tap a stack of paper on a flat surface to align the edges, and then check the paper
for the following:
•
Make sure it is free of rips, dust, wrinkles, and curled or bent edges.
•
Make sure all the paper in the stack is the same size and type.
4.
Insert the stack of paper into the input tray with the short edge forward and the
print side down. Slide the stack of paper forward until it stops.
CAUTION:
Make sure that the HP All-in-One is idle and silent when you load
paper into the input tray. If the HP All-in-One is servicing the print cartridges
or otherwise engaged in a task, the paper stop inside the device might not be
in place. You could push the paper too far forward, causing the HP All-in-One
to eject blank pages.
TIP:
If you are using letterhead, insert the top of the page first with the print
side down. For more help on loading full-size paper and letterhead, refer to
the diagram engraved in the base of the input tray.
Print troubleshooting
169
5.
Slide the paper-width guide inward until it stops at the edge of the paper.
Do not overload the input tray; make sure the stack of paper fits within the input
tray and is no higher than the top of the paper-width guide.
6.
Replace the output tray.
7.
Flip the tray extender up toward you.
NOTE:
When you use legal-size paper, leave the tray extender closed.
For information on clearing a paper jam, see
Clear paper jams
.
Cause: The print cartridges might be out of ink.
Solution: Check the estimated ink levels remaining in the print cartridges. If the
print cartridges are low or out of ink, you might need to replace the print cartridges.
For more information on print cartridges, see
Print cartridge troubleshooting
.
Chapter 11
170
Troubleshooting
The margins are not printing as expected
Cause: The margins are not set correctly in your software application.
Solution: Check the printer margins.
To check your margin settings
1.
Preview your print job before sending it to the HP All-in-One.
2.
Check the margins.
The HP All-in-One uses the margins you have set in your software application,
as long as they are greater than the minimum margins the HP All-in-One supports.
3.
Cancel the print job if the margins are not satisfactory, and then adjust the margins
in your software application.
Make sure the margin settings for the document do not exceed the printable area of
the HP All-in-One.
Cause: The paper size setting might not be set correctly for the project you are
printing.
Solution: Verify that you have selected the proper paper size setting for your
project. Make sure that you have loaded the correct paper size in the input tray.
Cause: The paper guides are not positioned correctly.
Solution: Remove the stack of paper from the input tray, and then reload the paper
following the steps below.
To load full-size paper
1.
Remove the output tray.
Print troubleshooting
171

2.
Slide the paper-width guide to its outermost position.
3.
Tap a stack of paper on a flat surface to align the edges, and then check the paper
for the following:
•
Make sure it is free of rips, dust, wrinkles, and curled or bent edges.
•
Make sure all the paper in the stack is the same size and type.
4.
Insert the stack of paper into the input tray with the short edge forward and the
print side down. Slide the stack of paper forward until it stops.
CAUTION:
Make sure that the HP All-in-One is idle and silent when you load
paper into the input tray. If the HP All-in-One is servicing the print cartridges
or otherwise engaged in a task, the paper stop inside the device might not be
in place. You could push the paper too far forward, causing the HP All-in-One
to eject blank pages.
TIP:
If you are using letterhead, insert the top of the page first with the print
side down. For more help on loading full-size paper and letterhead, refer to
the diagram engraved in the base of the input tray.
Chapter 11
172
Troubleshooting
5.
Slide the paper-width guide inward until it stops at the edge of the paper.
Do not overload the input tray; make sure the stack of paper fits within the input
tray and is no higher than the top of the paper-width guide.
6.
Replace the output tray.
7.
Flip the tray extender up toward you.
NOTE:
When you use legal-size paper, leave the tray extender closed.
Cause: A stack of envelopes is loaded incorrectly.
Solution: Remove all paper from the input tray. Load a stack of envelopes in the
input tray, with the envelope flaps facing up and on the left.
NOTE:
To avoid paper jams, tuck the flaps inside the envelopes.
Print troubleshooting
173
Text or graphics are cut off at the edge of the page
Cause: The margins are not set correctly in your software application.
Solution: Make sure the margin settings for the document do not exceed the
printable area of the HP All-in-One.
To check your margin settings
1.
Preview your print job before sending it to the HP All-in-One.
2.
Check the margins.
The HP All-in-One uses the margins you have set in your software application,
as long as they are greater than the minimum margins the HP All-in-One supports.
3.
Cancel the print job if the margins are not satisfactory, and then adjust the margins
in your software application.
Cause: The size of the document you are printing is larger than the paper loaded
in the input tray.
Solution: Make sure the layout of the document you are trying to print fits on a paper
size supported by the HP All-in-One.
To preview the print layout
1.
Load the correct paper size into the input tray.
2.
Preview your print job before sending it to the HP All-in-One.
3.
Check the graphics in the document to make sure that the current size fits within
the printable area of the HP All-in-One.
4.
Cancel the print job if the graphics do not fit in the printable area of the page.
TIP:
Some software applications allow you to scale the document to fit the paper
size currently selected. Additionally, you can scale the size of a document from
the Page Setup dialog box.
Cause: The paper is loaded incorrectly.
Solution: If the paper is misfeeding, it could cause parts of the document to cut off.
Chapter 11
174
Troubleshooting
Remove the stack of paper from the input tray, and then reload the paper following
the steps below.
To load full-size paper
1.
Remove the output tray.
2.
Slide the paper-width guide to its outermost position.
3.
Tap a stack of paper on a flat surface to align the edges, and then check the paper
for the following:
•
Make sure it is free of rips, dust, wrinkles, and curled or bent edges.
•
Make sure all the paper in the stack is the same size and type.
Print troubleshooting
175
4.
Insert the stack of paper into the input tray with the short edge forward and the
print side down. Slide the stack of paper forward until it stops.
CAUTION:
Make sure that the HP All-in-One is idle and silent when you load
paper into the input tray. If the HP All-in-One is servicing the print cartridges
or otherwise engaged in a task, the paper stop inside the device might not be
in place. You could push the paper too far forward, causing the HP All-in-One
to eject blank pages.
TIP:
If you are using letterhead, insert the top of the page first with the print
side down. For more help on loading full-size paper and letterhead, refer to
the diagram engraved in the base of the input tray.
5.
Slide the paper-width guide inward until it stops at the edge of the paper.
Do not overload the input tray; make sure the stack of paper fits within the input
tray and is no higher than the top of the paper-width guide.
6.
Replace the output tray.
Chapter 11
176
Troubleshooting
7.
Flip the tray extender up toward you.
NOTE:
When you use legal-size paper, leave the tray extender closed.
A blank page came out while printing
Cause: If you are printing black text, and a blank page comes out of the HP All-in-
One, the black print cartridge might be empty.
Solution: Check the estimated ink levels remaining in the print cartridges. If the
print cartridges are low or out of ink, you might need to replace the print cartridges.
If there is ink remaining in the print cartridges, but you are still noticing a problem,
print a self-test report to determine if there is a problem with the print cartridges. If the
self-test report shows a problem, clean the print cartridges. If the problem persists,
you might need to replace the print cartridges.
For more information, see
Print cartridge troubleshooting
.
Cause: The document you are printing contains an additional blank page.
Solution: Open the document file in your software application and remove any extra
pages or lines at the end of the document.
Cause: The HP All-in-One picked up two sheets of paper.
Solution: If the HP All-in-One has only a few sheets remaining, load more paper in
the input tray. If there is plenty of paper in the input tray, remove the paper, tap the
Print troubleshooting
177
stack of paper against a flat surface, and reload the paper into the input tray. To
continue your print job, press the OK button on the control panel of the HP All-in-One.
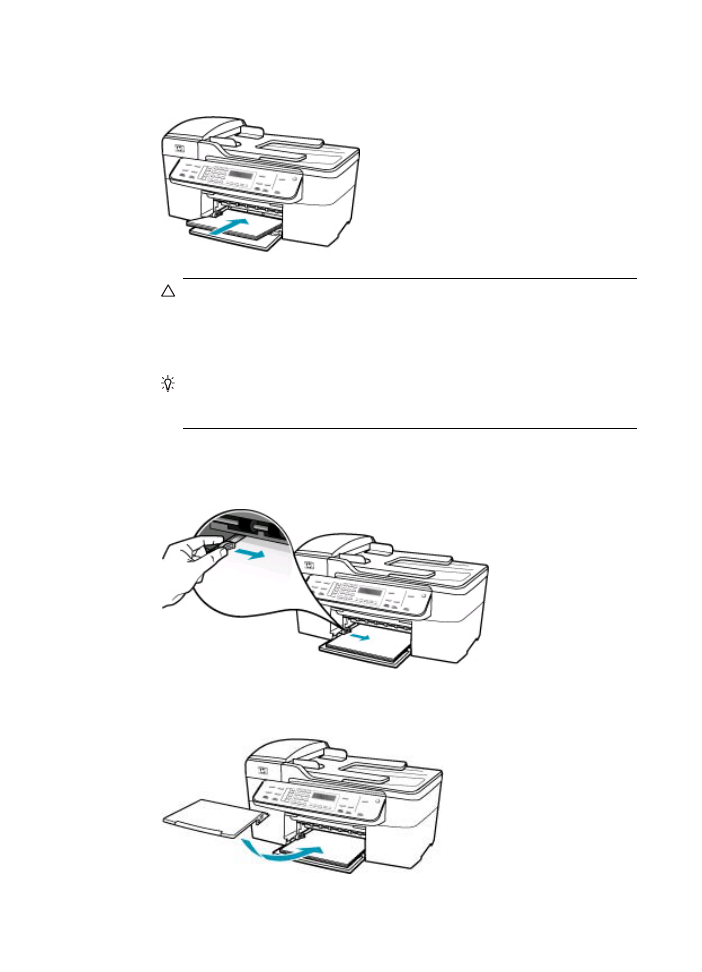
To load full-size paper
1.
Remove the output tray.
2.
Slide the paper-width guide to its outermost position.
3.
Tap a stack of paper on a flat surface to align the edges, and then check the paper
for the following:
•
Make sure it is free of rips, dust, wrinkles, and curled or bent edges.
•
Make sure all the paper in the stack is the same size and type.
Chapter 11
178
Troubleshooting
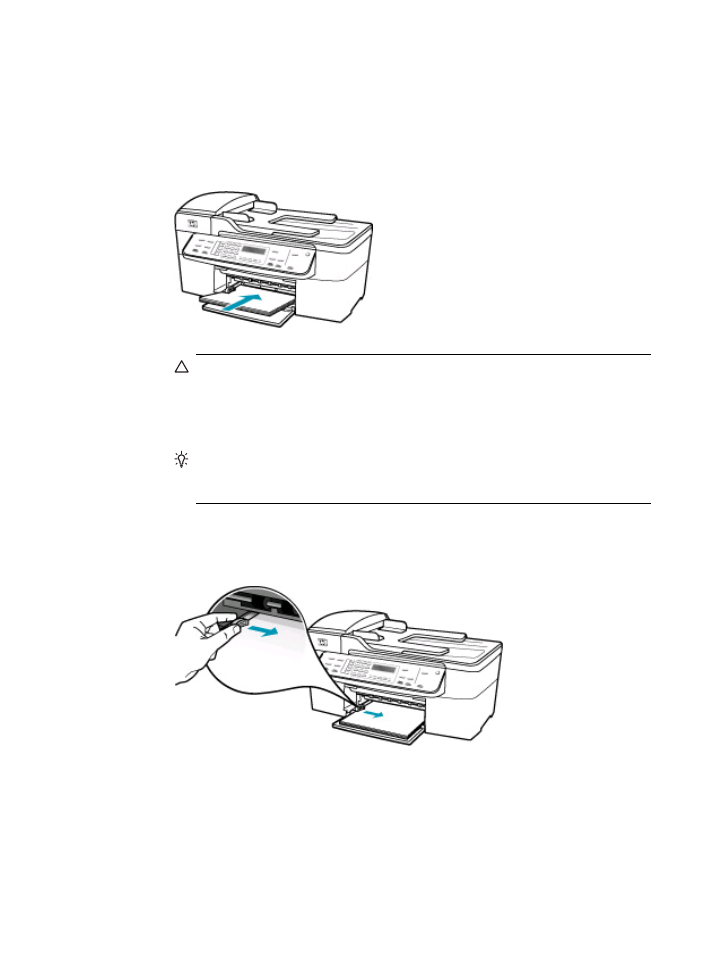
4.
Insert the stack of paper into the input tray with the short edge forward and the
print side down. Slide the stack of paper forward until it stops.
CAUTION:
Make sure that the HP All-in-One is idle and silent when you load
paper into the input tray. If the HP All-in-One is servicing the print cartridges
or otherwise engaged in a task, the paper stop inside the device might not be
in place. You could push the paper too far forward, causing the HP All-in-One
to eject blank pages.
TIP:
If you are using letterhead, insert the top of the page first with the print
side down. For more help on loading full-size paper and letterhead, refer to
the diagram engraved in the base of the input tray.
5.
Slide the paper-width guide inward until it stops at the edge of the paper.
Do not overload the input tray; make sure the stack of paper fits within the input
tray and is no higher than the top of the paper-width guide.
6.
Replace the output tray.
Print troubleshooting
179
7.
Flip the tray extender up toward you.
NOTE:
When you use legal-size paper, leave the tray extender closed.
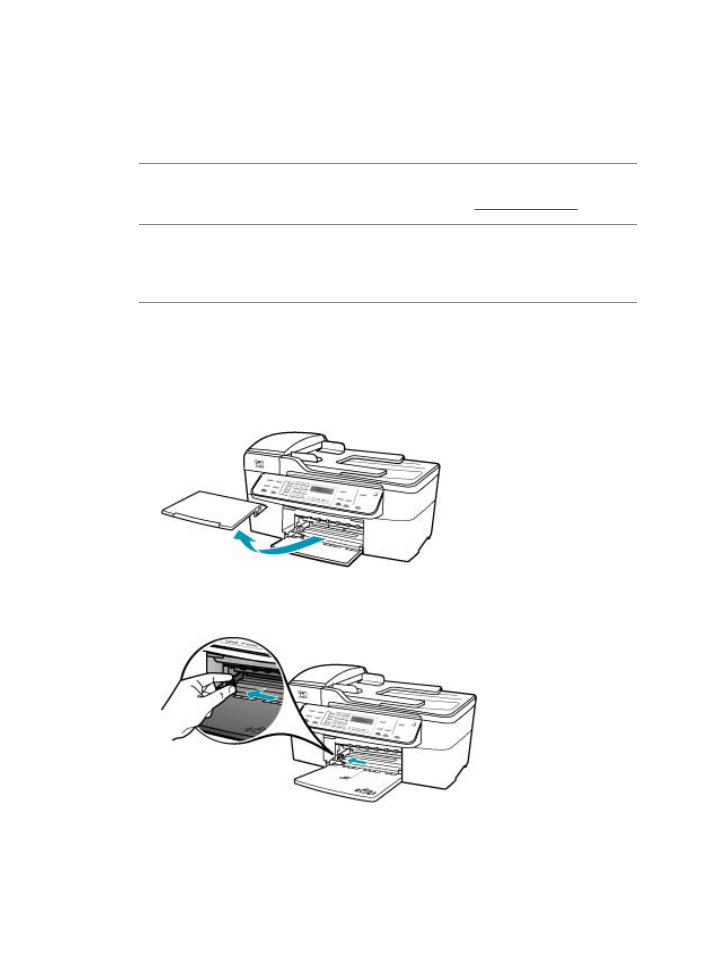
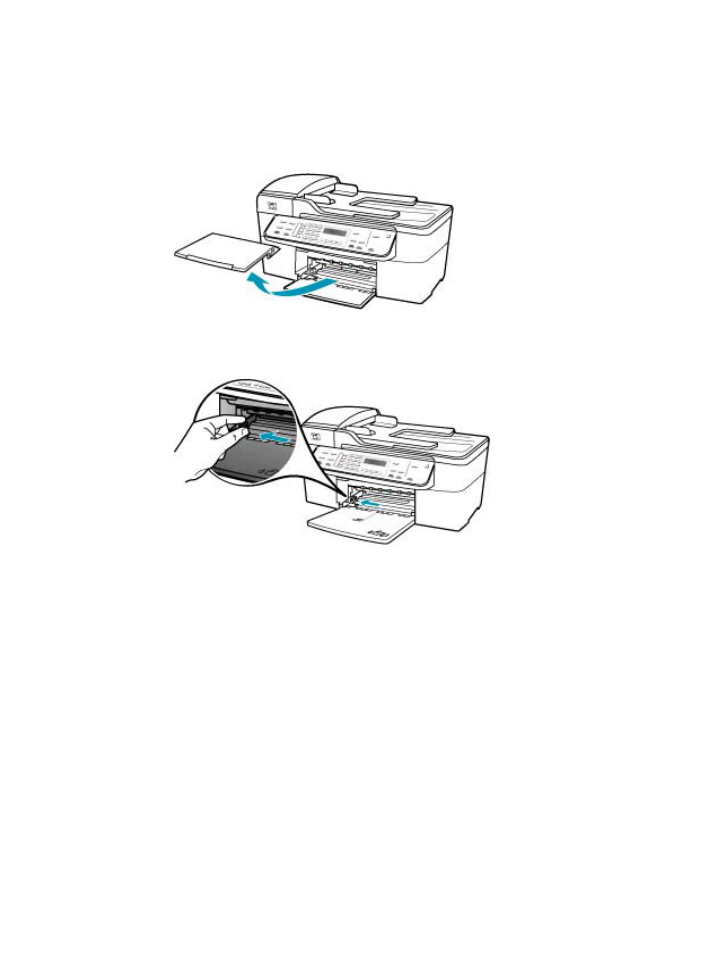
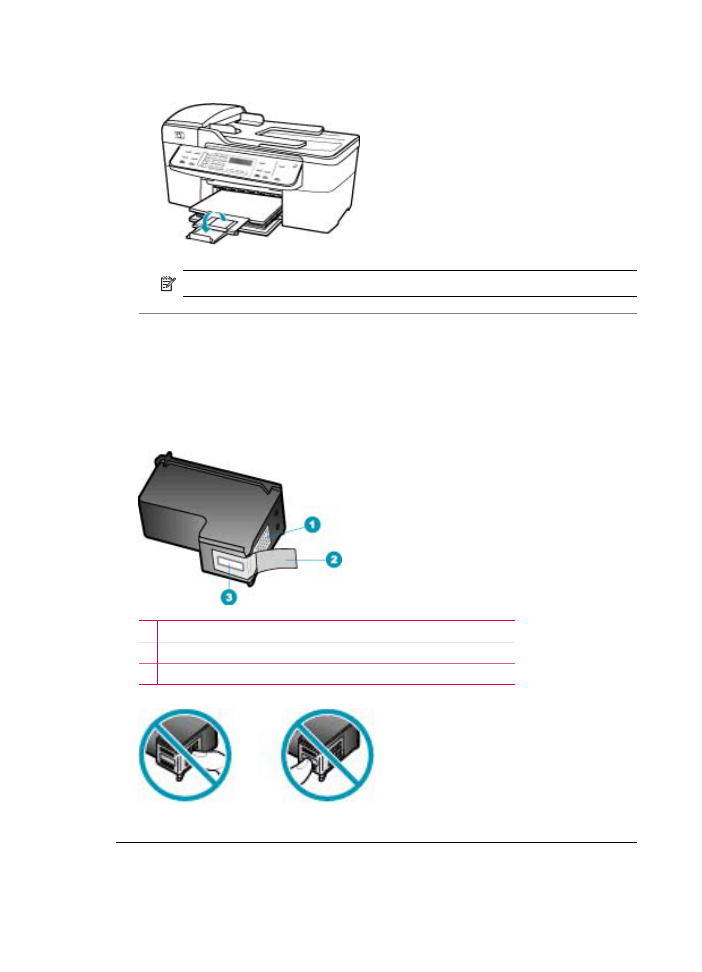
Cause: The protective plastic tape was only partially removed from the print
cartridge.
Solution: Check each print cartridge. The tape might have been removed from the
copper-colored contacts, but still might cover the ink nozzles. If the tape is still
covering the ink nozzles, carefully remove the tape from the print cartridges. Do not
touch the ink nozzles or the copper-colored contacts.
1 Copper-colored contacts
2 Plastic tape with pink pull tab (must be removed before installing)
3 Ink nozzles under tape
Chapter 11
180
Troubleshooting

Ink is spraying the inside of the HP All-in-One when I print a photo
Cause: The borderless print settings require photo paper to be loaded in the input
tray. You are using the wrong paper type.
Solution: Make sure you load photo paper in the input tray before you print a
borderless print job.