Print quality troubleshooting
This section contains the following topics:
•
Ink is bleeding or smearing
•
The automatic document feeder picks up too many pages or none at all
Print quality troubleshooting
141
•
Ink is not filling the text or graphics completely
•
The text edges are jagged
•
The printout has a horizontal band of distortion near the bottom of the page
•
Colors run into each other on the printout
•
Printouts have horizontal streaks or lines
•
Printouts are faded or have dull colors
•
Printouts seem blurry or fuzzy
•
Printouts have vertical streaks
•
Printouts are slanted or skewed
•
The print quality of the fax I received is poor
•
Some of the pages of a fax I received are faded or blank
•
Ink is overspraying the paper when I copy or print a photo
•
Paper is not picked up from the input tray
Ink is bleeding or smearing
Cause: The paper type is not suitable for the HP All-in-One.
Solution: Use HP Premium Papers or any other paper type that is appropriate for
the HP All-in-One.
Cause: The print cartridges need to be cleaned.
Solution: Print a self-test report to determine if there is a problem with the print
cartridges. If the self-test report shows a problem, clean the print cartridges. If the
problem persists, you might need to replace the print cartridges.
For more information on print cartridges, see
Print cartridge troubleshooting
.
Cause: The paper is too close to the print cartridge during printing.
Solution: If the paper is too close to the print cartridge during printing, the ink might
be smeared. This can happen if the paper is raised, wrinkled, or very thick, such as
a mailing envelope. Make sure the paper lays flat in the input tray and is not too
wrinkled.
The automatic document feeder picks up too many pages or none at all
Cause: The separator pad or rollers inside the automatic document feeder might
need to be cleaned. Pencil lead, wax, or ink can build up on the rollers and separator
pad after extensive use, or if you copy handwritten originals or originals that are heavy
with ink.
•
If the automatic document feeder does not pick up any pages at all, the rollers
inside the automatic document feeder need to be cleaned.
•
If the automatic document feeder picks up multiple pages instead of single sheets,
the separator pad inside the automatic document feeder needs to be cleaned.
Solution: Load one or two sheets of unused plain white full-size paper into the
document feeder tray and press Start Copy Black. As the plain paper passes through
the automatic document feeder, the paper releases and absorbs residue from the
rollers and separator pad.
Chapter 11
142
Troubleshooting
TIP:
If the automatic document feeder does not pick up the plain paper, try
cleaning the front roller. Wipe the roller with a soft lint-free cloth dampened with
distilled water.
If the problem persists, or the automatic document feeder does not pick up the plain
paper, you can clean the rollers and separator pad manually.
For more information, see
Clean the automatic document feeder
.
Ink is not filling the text or graphics completely
Cause: The print cartridges need to be cleaned or might be out of ink.
Solution: Check the estimated ink levels remaining in the print cartridges. If the
print cartridges are low or out of ink, you might need to replace the print cartridges.
If there is ink remaining in the print cartridges, but you are still noticing a problem,
print a self-test report to determine if there is a problem with the print cartridges. If the
self-test report shows a problem, clean the print cartridges. If the problem persists,
you might need to replace the print cartridges.
For more information on print cartridges, see
Print cartridge troubleshooting
.
Cause: The Paper Type setting is incorrect.
Solution: Change the Paper Type setting to match the type of paper loaded in the
input tray.
To set the paper type for copies
1.
In the Copy area, press Menu repeatedly until Paper Type appears.
2.
Press until the appropriate paper type appears.
3.
Press Start Copy Black or Start Copy Color.
To set the paper type for printing
1.
Make sure you have paper loaded in the input tray.
2.
From the File menu in your software application, choose Print.
3.
Make sure the HP All-in-One is the selected printer.
4.
From the pop-up menu, choose Paper Type/Quality.
5.
Click the Paper tab.
6.
From the Paper type pop-up menu, choose the type of paper loaded in the input
tray.
Cause: The print or copy quality setting on the HP All-in-One is set too low.
Print quality troubleshooting
143

Solution: Check the quality setting. Use a higher quality setting to increase the
amount of ink used for printing or copying.
To change the print speed or quality
1.
Make sure you have paper loaded in the input tray.
2.
From the File menu in your software application, choose Print.
3.
Make sure the HP All-in-One is the selected printer.
4.
From the pop-up menu, choose Paper Type/Quality.
5.
Click the Paper tab.
6.
From the Paper type pop-up menu, choose the type of paper loaded in the input
tray.
7.
From the Quality pop-up menu, choose the appropriate quality setting for your
project.
To change the copy quality
1.
Make sure you have paper loaded in the input tray.
2.
Load your original print side down on the right front corner of the glass or print
side up in the document feeder tray.
If you use the document feeder tray, place the pages so that the top edge of the
document goes in first.
3.
In the Copy area, press Quality until the appropriate quality setting is lit.
4.
Press Start Copy Black or Start Copy Color.
The text edges are jagged
Cause: The font is a custom size.
Solution: Some software applications offer custom fonts that have jagged edges
when enlarged or printed. Also, if you want to print bitmapped text, it might have
jagged edges when enlarged or printed.
The printout has a horizontal band of distortion near the bottom of the page
Cause: Your image has light blue, gray, or brown hues that print near the bottom
of the page.
Solution: Load high-quality paper in the input tray and print the image with a high
print quality setting, such as Best, Maximum dpi, or High Resolution. Always make
sure the paper you are printing on is flat. For best results when printing images,
use HP Premium Plus Photo Paper.
If the problem persists, use the software you installed with the HP All-in-One or
another software application to rotate your image 180 degrees so that the light blue,
gray, or brown hues in your image do not print at the bottom of the page. Print the
image using six-ink printing. To do so, install the photo print cartridge in place of the
black print cartridge. With the photo print cartridge and the tri-color print cartridge
installed, you have a six-ink system, which provides enhanced quality photos.
For more information on print cartridges, see
Print cartridge troubleshooting
.
Chapter 11
144
Troubleshooting

For more information on paper, see
Understand specifications for supported media
.
Colors run into each other on the printout
Cause: The print or copy quality setting is set too high for the type of paper loaded
in the HP All-in-One.
Solution: Check the quality setting. Use a lower quality setting to decrease the
amount of ink used for printing or copying.
To change the print speed or quality
1.
Make sure you have paper loaded in the input tray.
2.
From the File menu in your software application, choose Print.
3.
Make sure the HP All-in-One is the selected printer.
4.
From the pop-up menu, choose Paper Type/Quality.
5.
Click the Paper tab.
6.
From the Paper type pop-up menu, choose the type of paper loaded in the input
tray.
7.
From the Quality pop-up menu, choose the appropriate quality setting for your
project.
To change the copy quality
1.
Make sure you have paper loaded in the input tray.
2.
Load your original print side down on the right front corner of the glass or print
side up in the document feeder tray.
If you use the document feeder tray, place the pages so that the top edge of the
document goes in first.
3.
In the Copy area, press Quality until the appropriate quality setting is lit.
4.
Press Start Copy Black or Start Copy Color.
Cause: The paper type is not suitable for the HP All-in-One.
Solution: Use HP Premium Papers or any other paper type that is appropriate for
the HP All-in-One.
For more information on choosing paper, see
Understand specifications for supported
media
.
Cause: You are printing on the wrong side of the paper.
Solution: Load the paper with the print side down. For example, if you are loading
glossy photo paper, load the paper with the glossy side down.
Cause: You are using non-HP ink.
Solution: HP recommends that you use genuine HP print cartridges. Genuine HP
print cartridges are designed and tested with HP printers to help you easily produce
great results, time after time.
Print quality troubleshooting
145
NOTE:
HP cannot guarantee the quality or reliability of non-HP ink. Printer
service or repairs required as a result of printer failure or damage attributable to
the use of non-HP ink will not be covered under warranty.
Cause: The print cartridges need to be cleaned.
Solution: Print a self-test report to determine if there is a problem with the print
cartridges. If the self-test report shows a problem, clean the print cartridges. If the
problem persists, you might need to replace the print cartridges.
For more information on print cartridges, see
Print cartridge troubleshooting
.
Printouts have horizontal streaks or lines
Cause: The paper is not feeding properly or is loaded incorrectly.
Solution: Make sure you have paper loaded correctly.
To load full-size paper
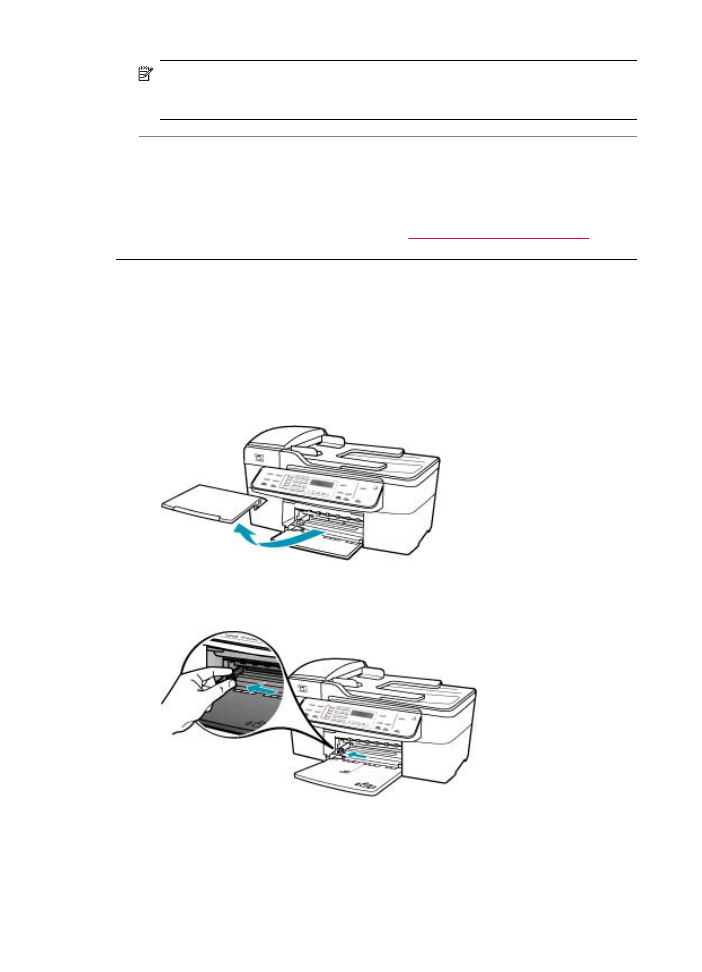
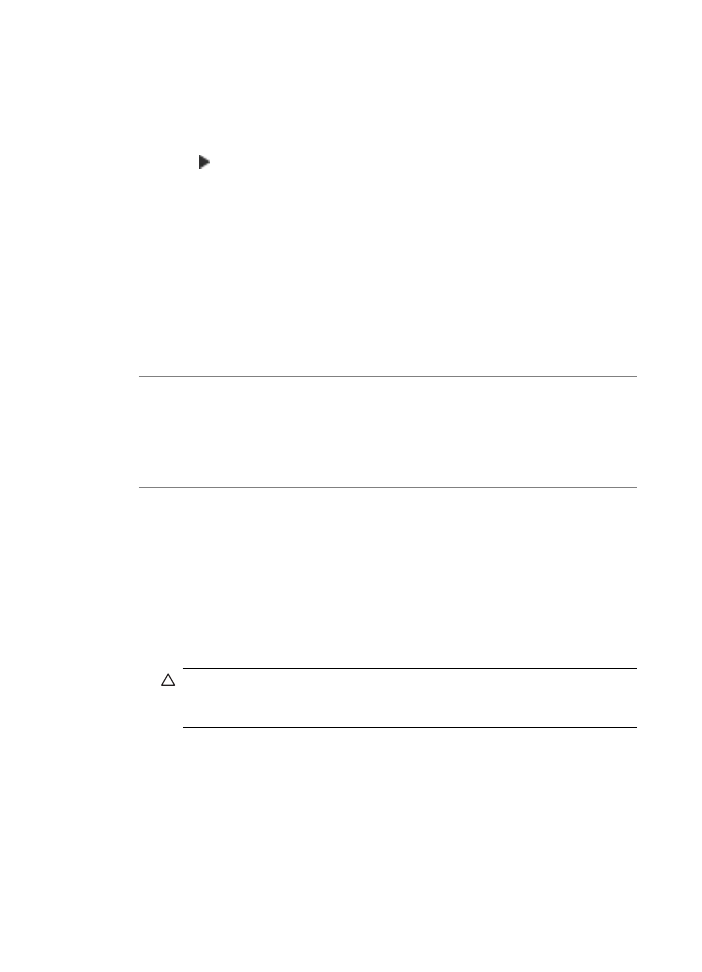
1.
Remove the output tray.
2.
Slide the paper-width guide to its outermost position.
3.
Tap a stack of paper on a flat surface to align the edges, and then check the paper
for the following:
•
Make sure it is free of rips, dust, wrinkles, and curled or bent edges.
•
Make sure all the paper in the stack is the same size and type.
Chapter 11
146
Troubleshooting
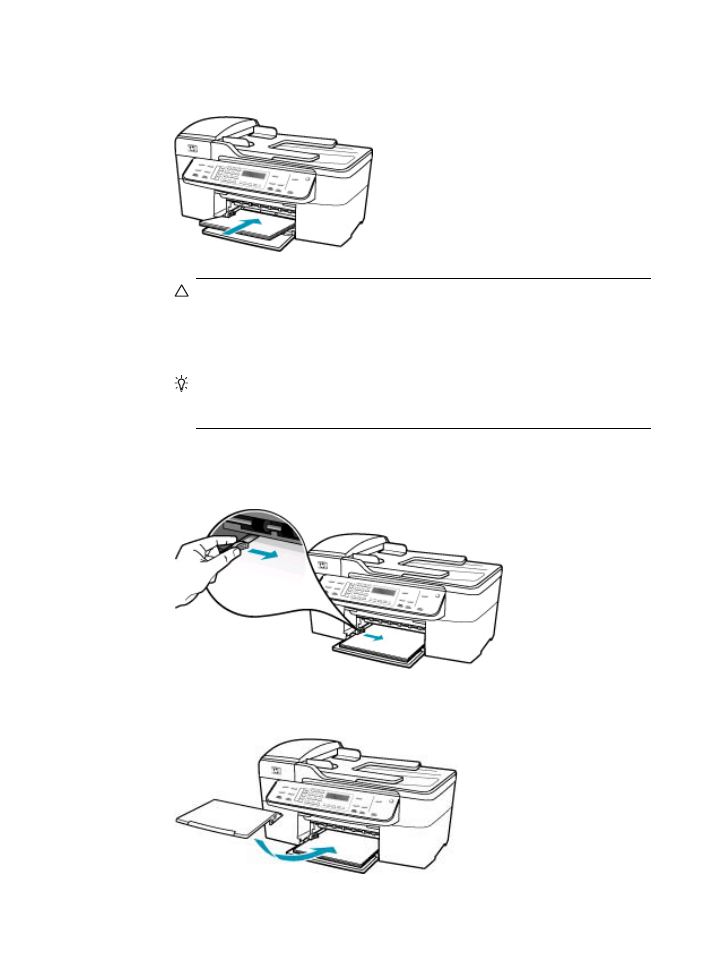
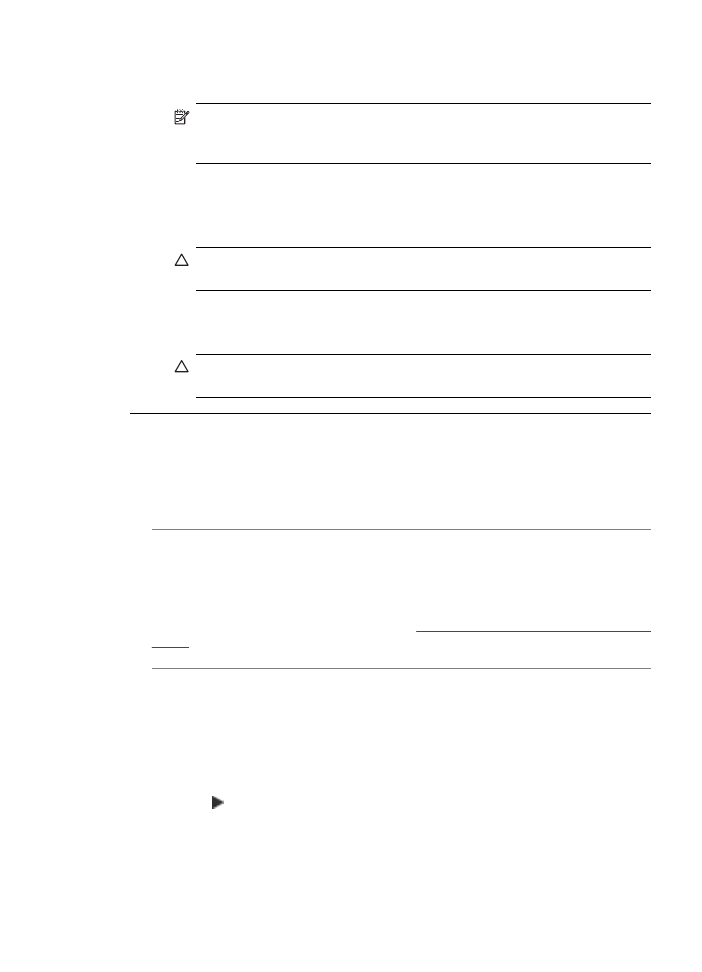
4.
Insert the stack of paper into the input tray with the short edge forward and the
print side down. Slide the stack of paper forward until it stops.
CAUTION:
Make sure that the HP All-in-One is idle and silent when you load
paper into the input tray. If the HP All-in-One is servicing the print cartridges
or otherwise engaged in a task, the paper stop inside the device might not be
in place. You could push the paper too far forward, causing the HP All-in-One
to eject blank pages.
TIP:
If you are using letterhead, insert the top of the page first with the print
side down. For more help on loading full-size paper and letterhead, refer to
the diagram engraved in the base of the input tray.
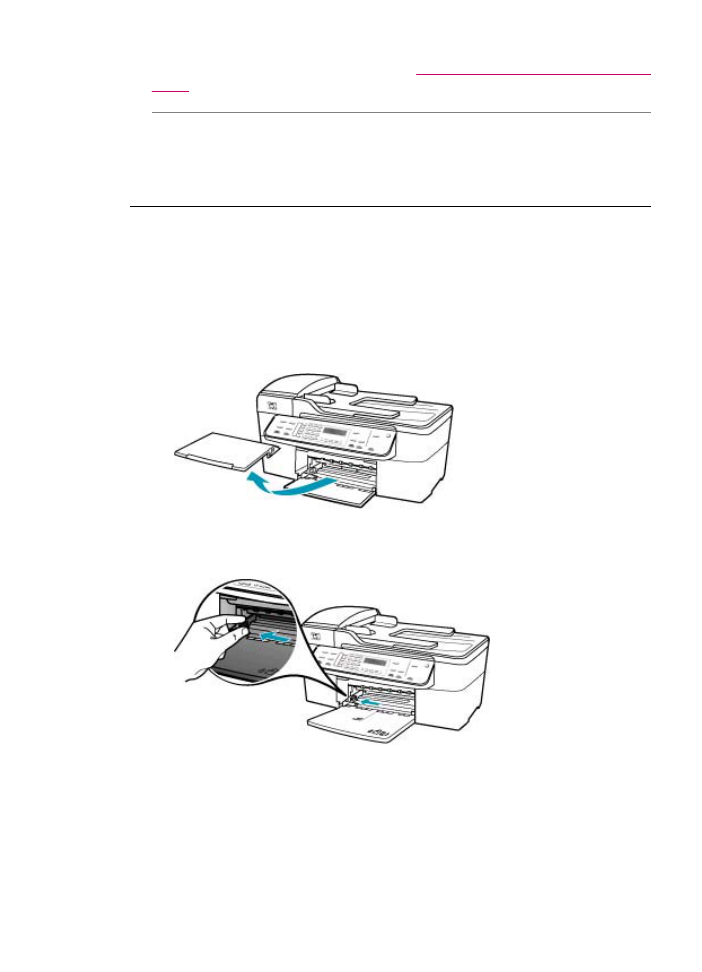
5.
Slide the paper-width guide inward until it stops at the edge of the paper.
Do not overload the input tray; make sure the stack of paper fits within the input
tray and is no higher than the top of the paper-width guide.
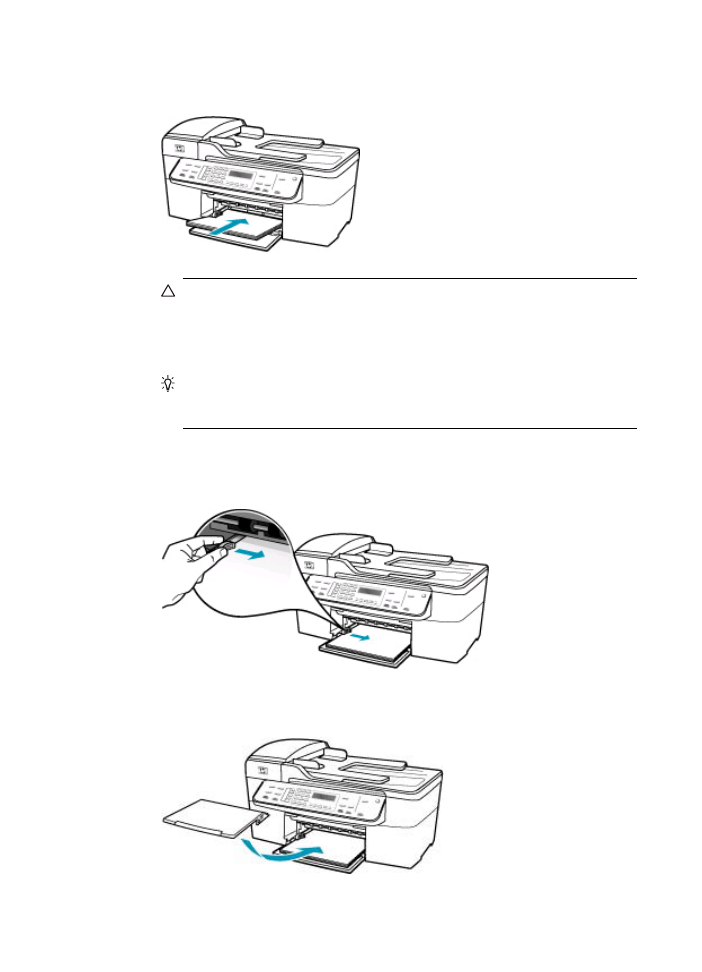
6.
Replace the output tray.
Print quality troubleshooting
147
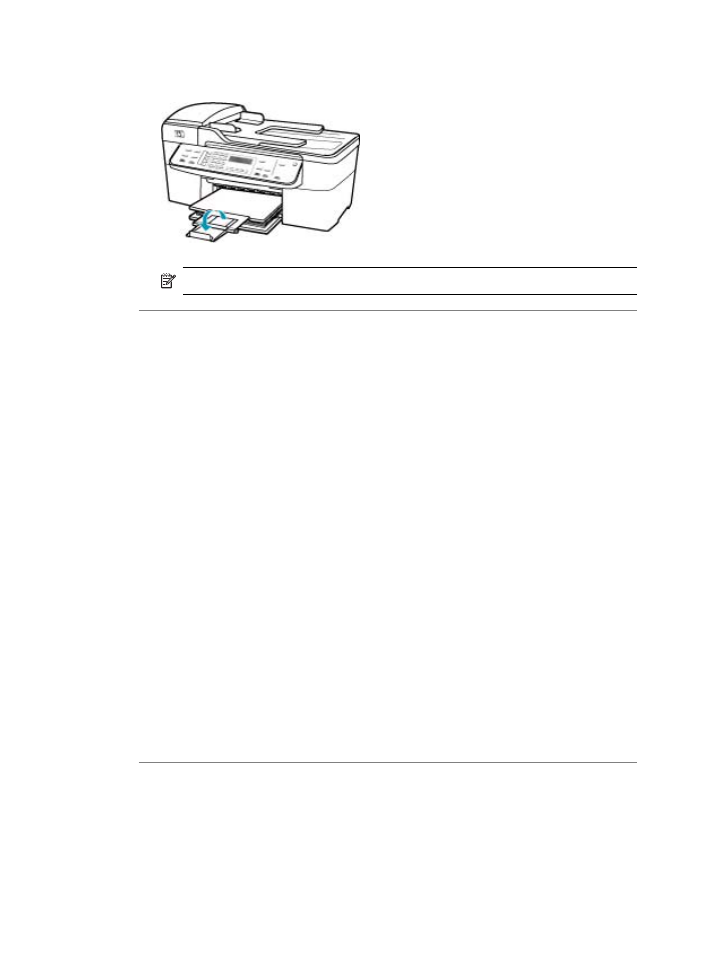
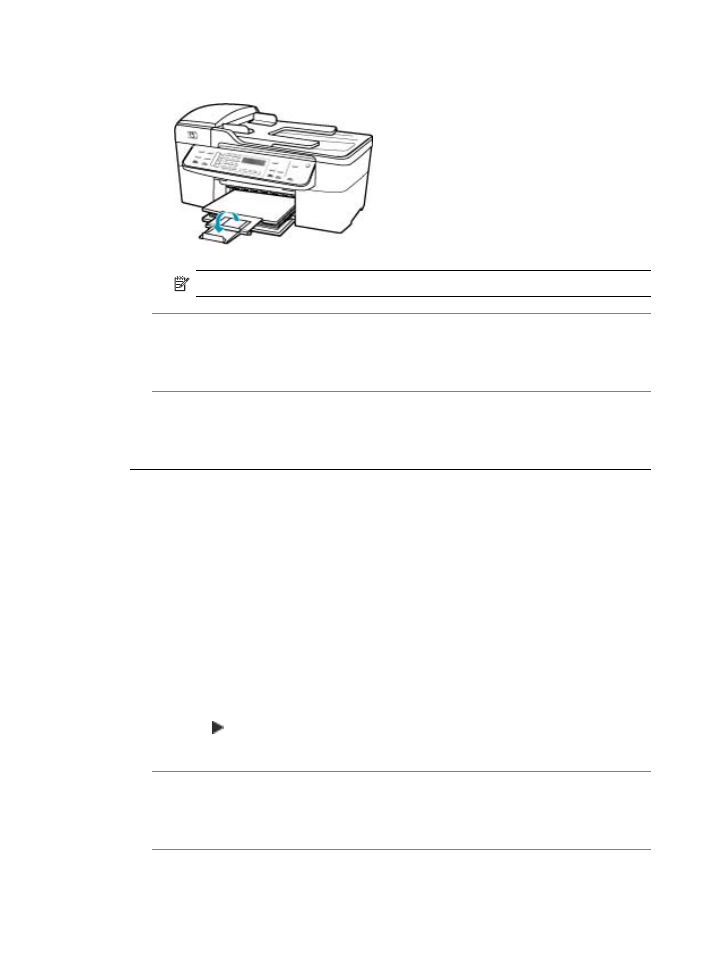
7.
Flip the tray extender up toward you.
NOTE:
When you use legal-size paper, leave the tray extender closed.
Cause: The print or copy quality setting on the HP All-in-One is set too low.
Solution: Check the quality setting. Use a higher quality setting to increase the
amount of ink used for printing or copying.
To change the print speed or quality
1.
Make sure you have paper loaded in the input tray.
2.
From the File menu in your software application, choose Print.
3.
Make sure the HP All-in-One is the selected printer.
4.
From the pop-up menu, choose Paper Type/Quality.
5.
Click the Paper tab.
6.
From the Paper type pop-up menu, choose the type of paper loaded in the input
tray.
7.
From the Quality pop-up menu, choose the appropriate quality setting for your
project.
To change the copy quality
1.
Make sure you have paper loaded in the input tray.
2.
Load your original print side down on the right front corner of the glass or print
side up in the document feeder tray.
If you use the document feeder tray, place the pages so that the top edge of the
document goes in first.
3.
In the Copy area, press Quality until the appropriate quality setting is lit.
4.
Press Start Copy Black or Start Copy Color.
Cause: The print cartridges need to be cleaned or might be out of ink.
Solution: Check the estimated ink levels remaining in the print cartridges. If the
print cartridges are low or out of ink, you might need to replace the print cartridges.
If there is ink remaining in the print cartridges, but you are still noticing a problem,
print a self-test report to determine if there is a problem with the print cartridges. If the
self-test report shows a problem, clean the print cartridges. If the problem persists,
you might need to replace the print cartridges.
Chapter 11
148
Troubleshooting
For more information on print cartridges, see
Print cartridge troubleshooting
.
Cause: There might be fiber or dust built up around the ink nozzle area on the print
cartridges.
Solution: Check the print cartridges. If it looks as though there are fibers or dust
around the ink nozzles, clean the ink nozzle area of the print cartridge.
To clean the area around the ink nozzles
1.
Turn on the HP All-in-One and open the print cartridge door.
The print carriage moves to the far right side of the HP All-in-One.
2.
Wait until the print carriage is idle and silent, and then unplug the power cord from
the back of the HP All-in-One.
NOTE:
Depending how long the HP All-in-One is unplugged, the date and
time might be erased. You might need to reset the date and time later, when
you plug the power cord back in.
3.
Lightly press down on the print cartridge to release it, and then pull it toward you
out of the slot.
NOTE:
Do not remove both print cartridges at the same time. Remove and
clean each print cartridge one at a time. Do not leave a print cartridge outside
the HP All-in-One for more than 30 minutes.
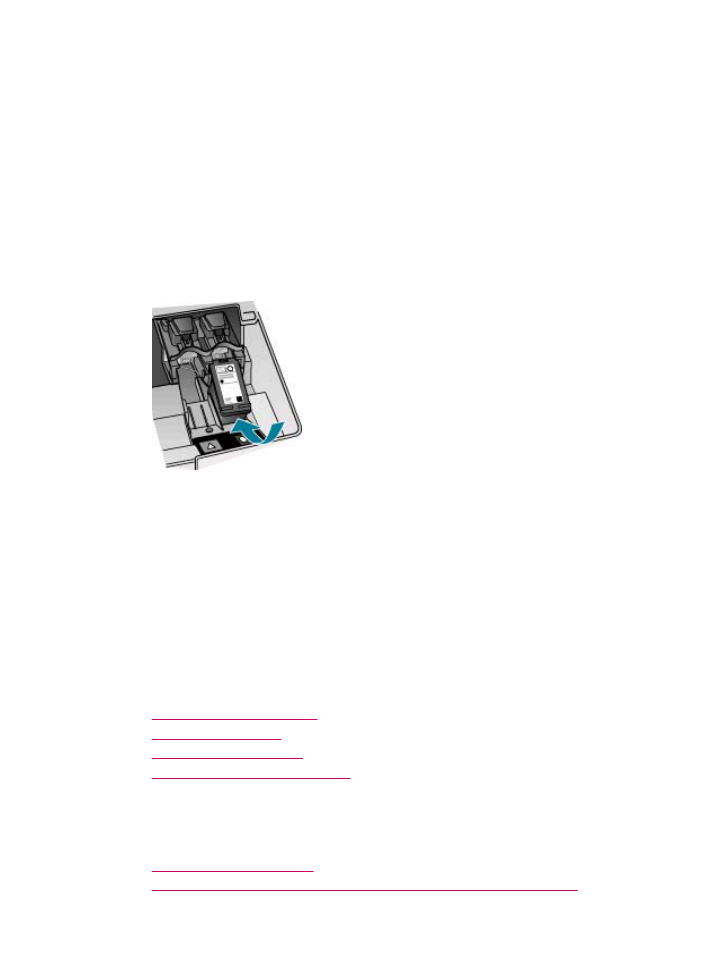
4.
Place the print cartridge on a piece of paper with the ink nozzles facing up.
5.
Lightly moisten a clean foam rubber swab with distilled water.
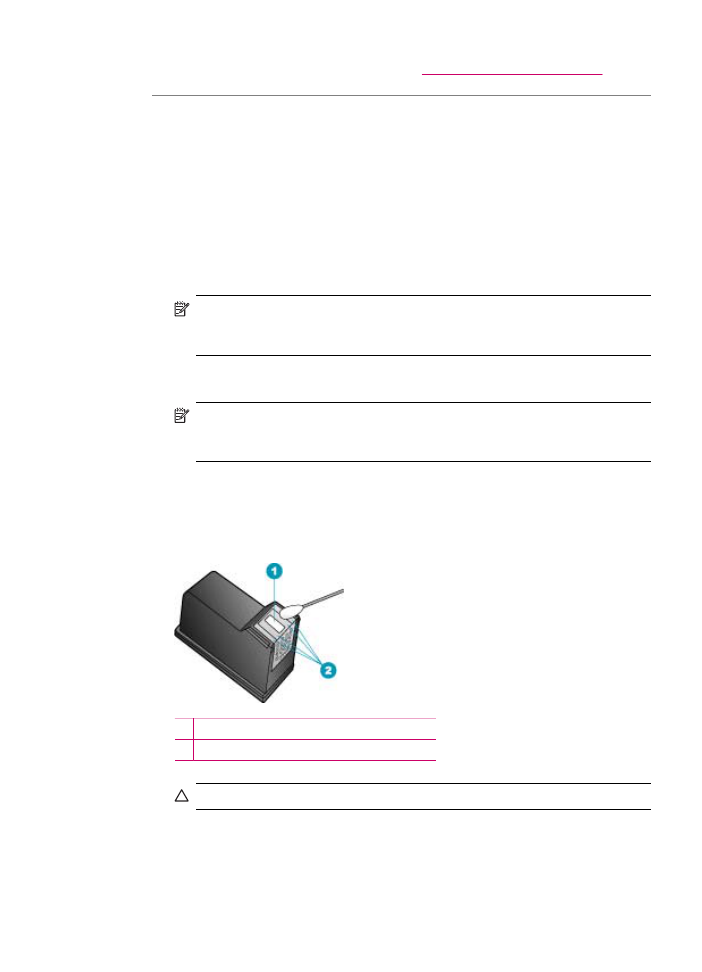
6.
Clean the face and edges around the ink nozzle area with the swab, as shown
below.
1 Nozzle plate (do not clean)
2 Face and edges around the ink nozzle area
CAUTION:
Do not clean the nozzle plate.
7.
Slide the print cartridge back into the slot. Push the print cartridge forward until it
clicks into place.
Print quality troubleshooting
149
8.
Repeat if necessary for the other print cartridge.
9.
Gently close the print cartridge door and plug the power cord into the back of the
HP All-in-One.
Cause: The sending fax machine is having problems.
Solution: Ask the sender to check their fax machine for any problems.
Cause: The phone line connection is noisy. Phone lines with poor sound quality
(noise) can cause print quality problems.
Solution: If the failure was due to noise on the phone line, contact the sender to
have them resend the fax. The quality might be better when you try again. You can
check the sound quality of the phone line by plugging a phone into the telephone wall
jack and listening for static or other noise. If the problem persists, turn Error
Correction Mode (ECM) off and contact your telephone company.
To change the ECM setting from the control panel
1.
Press Setup.
2.
Press 5, and then press 6.
This selects Advanced Fax Setup and then selects Error Correction Mode.
3.
Press to select On or Off.
4.
Press OK.
Printouts are faded or have dull colors
Cause: The print cartridges need to be cleaned or might be out of ink.
Solution: Check the estimated ink levels remaining in the print cartridges. If the
print cartridges are low or out of ink, you might need to replace the print cartridges.
If there is ink remaining in the print cartridges, but you are still noticing a problem,
print a self-test report to determine if there is a problem with the print cartridges. If the
self-test report shows a problem, clean the print cartridges. If the problem persists,
you might need to replace the print cartridges.
For more information on print cartridges, see
Print cartridge troubleshooting
.
Cause: The print or copy quality setting on the HP All-in-One is set too low.
Solution: Check the quality setting. Use a higher quality setting to increase the
amount of ink used for printing or copying.
To change the copy quality
1.
Make sure you have paper loaded in the input tray.
2.
Load your original print side down on the right front corner of the glass or print
side up in the document feeder tray.
If you use the document feeder tray, place the pages so that the top edge of the
document goes in first.
Chapter 11
150
Troubleshooting

3.
In the Copy area, press Quality until the appropriate quality setting is lit.
4.
Press Start Copy Black or Start Copy Color.
To change the print speed or quality
1.
Make sure you have paper loaded in the input tray.
2.
From the File menu in your software application, choose Print.
3.
Make sure the HP All-in-One is the selected printer.
4.
From the pop-up menu, choose Paper Type/Quality.
5.
Click the Paper tab.
6.
From the Paper type pop-up menu, choose the type of paper loaded in the input
tray.
7.
From the Quality pop-up menu, choose the appropriate quality setting for your
project.
For more information about changing quality settings, see the HP Officejet J5700 All-
in-One series Help section in the HP Photosmart Software Help.
Cause: The paper type is not suitable for the HP All-in-One.
Solution: If the paper you are using is too fibrous, the ink applied by the HP All-in-
One might not fully cover the surface of the paper. Use HP Premium Papers or any
other paper type that is appropriate for the HP All-in-One.
For more information on choosing paper, see
Understand specifications for supported
media
.
Cause: The Lighter / Darker copy setting for the HP All-in-One is set too light.
Solution: Adjust the lightness and darkness of the copies.
To adjust the copy contrast from the control panel
1.
Make sure you have paper loaded in the input tray.
2.
Load your original print side down on the right front corner of the glass or print
side up in the document feeder tray.
If you use the document feeder tray, place the pages so that the top edge of the
document goes in first.
3.
In the Copy area, press Menu repeatedly until Lighter / Darker appears.
4.
Do one of the following:
•
Press to darken the copy.
•
Press to lighten the copy.
5.
Press Start Copy Black or Start Copy Color.
Cause: The Paper Type setting is incorrect.
Print quality troubleshooting
151
Solution: Change the Paper Type setting to match the type of paper loaded in the
input tray.
To set the paper type for copies
1.
In the Copy area, press Menu repeatedly until Paper Type appears.
2.
Press until the appropriate paper type appears.
3.
Press Start Copy Black or Start Copy Color.
To set the paper type for printing
1.
Make sure you have paper loaded in the input tray.
2.
From the File menu in your software application, choose Print.
3.
Make sure the HP All-in-One is the selected printer.
4.
From the pop-up menu, choose Paper Type/Quality.
5.
Click the Paper tab.
6.
From the Paper type pop-up menu, choose the type of paper loaded in the input
tray.
Cause: Copying a poor-quality picture, such as a newspaper photo, causes bands,
checks, or stripes to appear on your copy. These are called moiré patterns.
Solution: To reduce moiré patterns, try placing one or more clear plastic sheet
protectors directly on the glass, and then place the original print side down on top of
the sheet protectors.
Cause: Debris might be stuck on the glass or on the back of the document lid; this
causes poor copy quality and slows down processing.
Solution:
To clean the glass
1.
Turn off the HP All-in-One, and raise the lid.
2.
Clean the glass with a soft cloth or sponge slightly moistened with a nonabrasive
glass cleaner.
CAUTION:
Do not use abrasives, acetone, benzene, or carbon tetrachloride
on the glass, since they can damage it. Do not place or spray liquid directly
on the glass. The liquid might seep under the glass and damage the device.
3.
Dry the glass with a dry, soft, lint-free cloth to prevent spotting.
4.
Turn on the HP All-in-One.
Chapter 11
152
Troubleshooting
To clean the lid backing
1.
Turn off the HP All-in-One, unplug the power cord, and raise the lid.
NOTE:
Depending how long the HP All-in-One is unplugged, the date and
time might be erased. You might need to reset the date and time later, when
you plug the power cord back in.
2.
Clean the white document backing with a soft cloth or sponge slightly moistened
with a mild soap and warm water.
Wash the backing gently to loosen debris. Do not scrub the backing.
3.
Dry the backing with a dry, soft, lint-free cloth.
CAUTION:
Do not use paper-based wipes, as these might scratch the
backing.
4.
If further cleaning is needed, repeat the previous steps using isopropyl (rubbing)
alcohol, and wipe the backing thoroughly with a damp cloth to remove any residual
alcohol.
CAUTION:
Be careful not to spill alcohol on the glass or exterior of the HP All-
in-One, as this might damage the device.
Printouts seem blurry or fuzzy
Cause: The fax sender is using a low resolution or the original was poor quality.
Solution: Ask the sender to increase the resolution and to verify the quality of the
original.
Cause: The paper loaded in the input tray is not suitable for the HP All-in-One.
Solution: If the paper you are using is too fibrous, the ink applied by the HP All-in-
One might not fully cover the surface of the paper. Use HP Premium Papers or any
other paper type that is appropriate for the HP All-in-One.
For more information on choosing paper, see
Understand specifications for supported
media
.
Cause: The Paper Type copy or print setting is incorrect.
Solution: Change the Paper Type setting to match the type of paper loaded in the
input tray.
To set the paper type for copies
1.
In the Copy area, press Menu repeatedly until Paper Type appears.
2.
Press until the appropriate paper type appears.
3.
Press Start Copy Black or Start Copy Color.
Print quality troubleshooting
153

To set the paper type for printing
1.
Make sure you have paper loaded in the input tray.
2.
From the File menu in your software application, choose Print.
3.
Make sure the HP All-in-One is the selected printer.
4.
From the pop-up menu, choose Paper Type/Quality.
5.
Click the Paper tab.
6.
From the Paper type pop-up menu, choose the type of paper loaded in the input
tray.
Cause: The print or copy quality setting on the HP All-in-One is set too low.
Solution: Check the quality setting. Use a higher quality setting to increase the
amount of ink used for printing or copying.
To change the print speed or quality
1.
Make sure you have paper loaded in the input tray.
2.
From the File menu in your software application, choose Print.
3.
Make sure the HP All-in-One is the selected printer.
4.
From the pop-up menu, choose Paper Type/Quality.
5.
Click the Paper tab.
6.
From the Paper type pop-up menu, choose the type of paper loaded in the input
tray.
7.
From the Quality pop-up menu, choose the appropriate quality setting for your
project.
To change the copy quality
1.
Make sure you have paper loaded in the input tray.
2.
Load your original print side down on the right front corner of the glass or print
side up in the document feeder tray.
If you use the document feeder tray, place the pages so that the top edge of the
document goes in first.
3.
In the Copy area, press Quality until the appropriate quality setting is lit.
4.
Press Start Copy Black or Start Copy Color.
Cause: You are printing on the wrong side of the paper.
Solution: Load paper with the print side down. For example, if you are loading
glossy photo paper, load the paper with the glossy side down.
Printouts have vertical streaks
Cause: The paper type is not suitable for the HP All-in-One.
Solution: If the paper you are using is too fibrous, the ink applied by the HP All-in-
One might not fully cover the surface of the paper. Use HP Premium Papers or any
other paper type that is appropriate for the HP All-in-One.
Chapter 11
154
Troubleshooting
For more information on choosing paper, see
Understand specifications for supported
media
.
Cause: The glass or automatic document feeder of the sending fax machine is dirty.
Solution: If you have vertical lines or streaks on the fax, the sender's fax machine
might have dirt or dust on the glass or automatic document feeder. Check with the
sender to see if the glass or automatic document feeder is clean.
Printouts are slanted or skewed
Cause: The paper is not feeding properly or is loaded incorrectly.
Solution: Make sure the paper is loaded correctly.
To load full-size paper
1.
Remove the output tray.
2.
Slide the paper-width guide to its outermost position.
3.
Tap a stack of paper on a flat surface to align the edges, and then check the paper
for the following:
•
Make sure it is free of rips, dust, wrinkles, and curled or bent edges.
•
Make sure all the paper in the stack is the same size and type.
Print quality troubleshooting
155
4.
Insert the stack of paper into the input tray with the short edge forward and the
print side down. Slide the stack of paper forward until it stops.
CAUTION:
Make sure that the HP All-in-One is idle and silent when you load
paper into the input tray. If the HP All-in-One is servicing the print cartridges
or otherwise engaged in a task, the paper stop inside the device might not be
in place. You could push the paper too far forward, causing the HP All-in-One
to eject blank pages.
TIP:
If you are using letterhead, insert the top of the page first with the print
side down. For more help on loading full-size paper and letterhead, refer to
the diagram engraved in the base of the input tray.
5.
Slide the paper-width guide inward until it stops at the edge of the paper.
Do not overload the input tray; make sure the stack of paper fits within the input
tray and is no higher than the top of the paper-width guide.
6.
Replace the output tray.
Chapter 11
156
Troubleshooting
7.
Flip the tray extender up toward you.
NOTE:
When you use legal-size paper, leave the tray extender closed.
Cause: The original might have been loaded incorrectly into the sending fax
machine.
Solution: Ask the sender to check that the fax was sent correctly.
Cause: More than one type of paper is loaded in the input tray.
Solution: Load only one type of paper at a time. When you are printing faxes, make
sure letter, A4, or legal paper is loaded in the input tray.
The print quality of the fax I received is poor
Cause: The phone line connection is noisy.
Solution: If the failure was due to noise on the phone line, contact the sender to
have them resend the fax. The quality might be better when you try again. You can
check the sound quality of the phone line by plugging a phone into the telephone wall
jack and listening for static or other noise. If the problem persists, turn Error
Correction Mode (ECM) off and contact your telephone company.
To change the ECM setting from the control panel
1.
Press Setup.
2.
Press 5, and then press 6.
This selects Advanced Fax Setup and then selects Error Correction Mode.
3.
Press to select On or Off.
4.
Press OK.
Cause: The sending fax machine is having problems.
Solution: Ask the sender to check the sending fax machine for any problems. Also
check to see if faxes from other senders have the same quality problems.
Cause: The glass or automatic document feeder of the sending fax machine is dirty.
Print quality troubleshooting
157

Solution: If you have vertical lines or streaks on the fax, the sender's fax machine
might have dirt or dust on the glass or automatic document feeder. Check with the
sender to see if the glass or automatic document feeder is clean.
Cause: The print cartridges need to be cleaned or might be out of ink.
Solution: Check the estimated ink levels remaining in the print cartridges. If the
print cartridges are low or out of ink, you might need to replace the print cartridges.
If there is ink remaining in the print cartridges, but you are still noticing a problem,
print a self-test report to determine if there is a problem with the print cartridges. If the
self-test report shows a problem, clean the print cartridges. If the problem persists,
you might need to replace the print cartridges.
For more information on print cartridges, see
Print cartridge troubleshooting
.
Some of the pages of a fax I received are faded or blank
Cause: The print cartridges need to be cleaned or might be out of ink.
Solution: Check the estimated ink levels remaining in the print cartridges. If the
print cartridges are low or out of ink, you might need to replace the print cartridges.
If there is ink remaining in the print cartridges, but you are still noticing a problem,
print a self-test report to determine if there is a problem with the print cartridges. If the
self-test report shows a problem, clean the print cartridges. If the problem persists,
you might need to replace the print cartridges.
For more information on print cartridges, see
Print cartridge troubleshooting
.
Cause: The sender incorrectly loaded the originals in the sending fax machine.
Solution: Check with the sender to see if they correctly loaded the originals in the
sending fax machine or accidentally sent a blank page.
Cause: The HP All-in-One picked up two sheets of paper while printing the fax.
Solution: If the HP All-in-One has only a few sheets remaining, load more paper in
the input tray. If there is plenty of paper in the input tray, remove the paper, tap the
stack of paper against a flat surface, and reload the paper into the input tray.
Cause: The paper loaded in the input tray is not suitable for your fax.
Solution: If the paper you are using is too fibrous, the ink applied by the HP All-in-
One might not fully cover the surface of the paper. Use HP Premium Papers or any
other paper type that is appropriate for the HP All-in-One.
For more information on choosing paper, see
Understand specifications for supported
media
.
Chapter 11
158
Troubleshooting
Ink is overspraying the paper when I copy or print a photo
Cause: A small amount (a few millimeters) of overspray is common when making
a copy of a photo. If there are more than a few millimeters of overspray, it might mean
the HP All-in-One thinks the paper loaded is wider than it actually is.
TIP:
One way to tell if ink is overspraying the paper is to check the back side of
pages you print after running a copy or print job. If the back side of the page has
ink streaks, the HP All-in-One might have over sprayed your previous copy or print
job.
Solution: Check the paper size setting. Set the paper size to match the paper
loaded in the input tray.
To set the paper size from the control panel
1.
In the Copy area, press Menu repeatedly until Copy Paper Size appears.
2.
Press until the appropriate paper size appears.
3.
Press Start Copy Black or Start Copy Color.
Paper is not picked up from the input tray
Cause: There is not enough paper in the input tray.
Solution: If the HP All-in-One is out of paper or there are only a few sheets
remaining, load more paper in the input tray. If there is paper in the input tray, remove
the paper, tap the stack of paper against a flat surface, and reload the paper into the
input tray. To continue your print job, press OK on the control panel of the HP All-in-
One.