
Fax troubleshooting
Use this section to solve the following fax problems:
•
The HP All-in-One is having problems sending and receiving faxes
•
The HP All-in-One cannot send faxes, but can receive faxes
•
The HP All-in-One is having problems sending a manual fax
•
Pages of a fax I sent are missing
•
The quality of the fax I sent is poor
•
Parts of a fax I sent are cut off
•
The fax I sent was blank when it was received
•
Fax transmission is slow
•
The HP All-in-One cannot receive faxes, but can send faxes
•
The HP All-in-One is having problems receiving a manual fax
•
Fax tones are recorded on my answering machine
•
The HP All-in-One is not answering incoming fax calls
•
Pages of a fax I received are missing
•
Faxes are received but do not print
•
Parts of a fax I received are cut off
•
The computer to which I am connecting has only one phone port
•
I hear static on my telephone line since connecting the HP All-in-One
•
The fax test failed
•
I am having problems faxing over the Internet using IP phone
•
The fax log report shows an error
The HP All-in-One is having problems sending and receiving faxes
Cause: The HP All-in-One is not set up properly for faxing.
Solution: Follow the instructions to set up the HP All-in-One properly for faxing,
based on the equipment and services you have on the same phone line as the HP All-
in-One. Then, run a fax test to check the status of the HP All-in-One and to make sure
you set it up properly. For more information, see
Set up the HP All-in-One for
faxing
.
Fax troubleshooting
181

The HP All-in-One prints a report with the results of the test. If the test fails, review
the report for information on how to fix the problem.
To test your fax setup from the control panel
1.
Set up the HP All-in-One for faxing according to your particular home or office
setup instructions.
2.
Insert the print cartridges and load full-size paper in the input tray before starting
the test.
3.
Press Setup.
4.
Press 6, then press 6 again.
This selects the Tools menu and then selects Run Fax Test.
The HP All-in-One displays the status of the test on the display and prints a report.
5.
Review the report.
•
If the test passes and you are still having problems faxing, check the fax
settings listed in the report to verify the settings are correct. A blank or
incorrect fax setting can cause problems faxing.
•
If the test fails, review the report for more information on how to fix any
problems found.
6.
After you pick up the fax report from the HP All-in-One, press OK.
If necessary, resolve any problems found and rerun the test.
Cause: The HP All-in-One is turned off.
Solution: Look at the display on the HP All-in-One. If the display is blank and the
Power button is not lit, the HP All-in-One is turned off. Make sure the power cord is
firmly connected to the HP All-in-One and plugged into a power outlet. Press the
Power button to turn on the HP All-in-One.
Cause: The wrong phone cord is used to connect the HP All-in-One or the phone
cord is plugged into the wrong port.
Solution:
NOTE:
This possible solution applies only in the countries/regions that receive
a 2-wire phone cord in the box with the HP All-in-One, including: Argentina,
Australia, Brazil, Canada, Chile, China, Colombia, Greece, India, Indonesia,
Ireland, Japan, Korea, Latin America, Malaysia, Mexico, Philippines, Poland,
Portugal, Russia, Saudi Arabia, Singapore, Spain, Taiwan, Thailand, USA,
Venezuela, and Vietnam.
Make sure you used the phone cord supplied in the box with the HP All-in-One to
connect to the telephone wall jack. One end of this special 2-wire phone cord should
Chapter 11
182
Troubleshooting
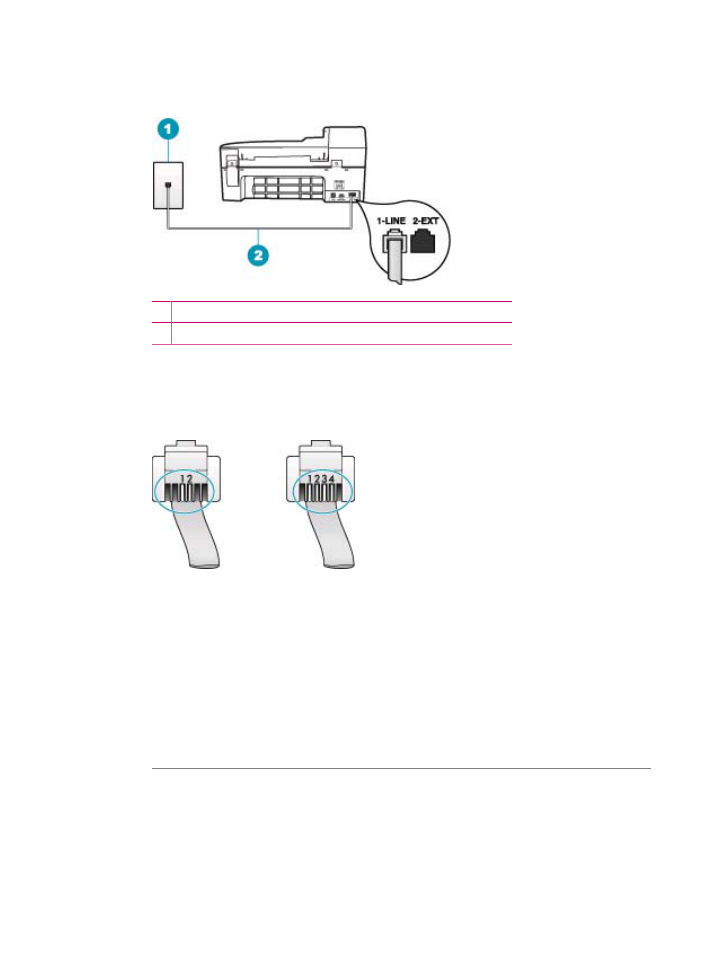
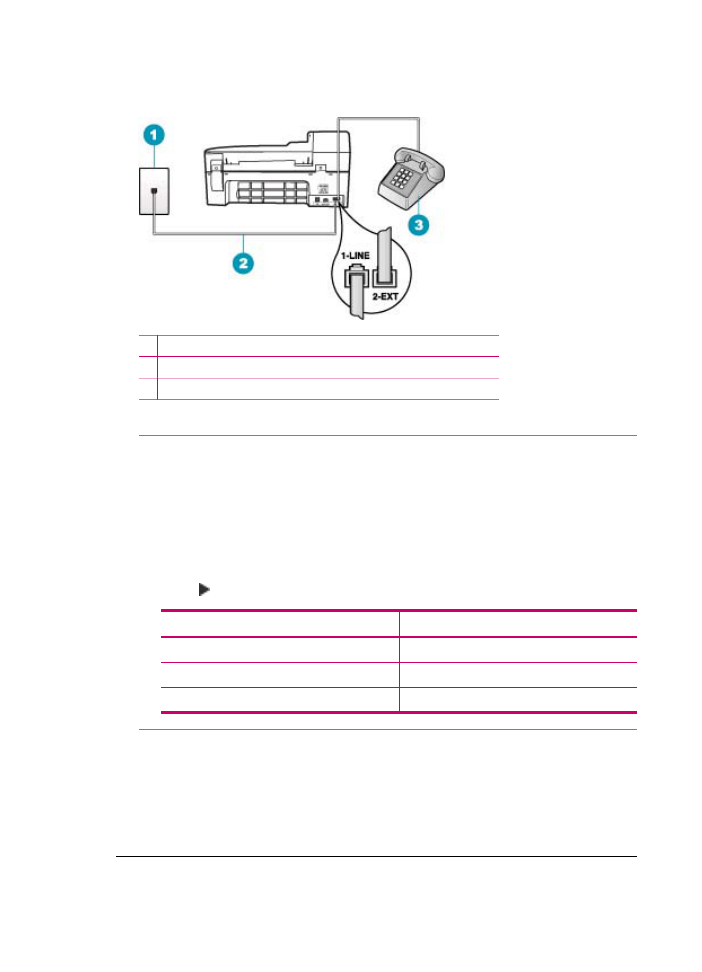
be connected to the port labeled 1-LINE on the back of the HP All-in-One and the
other end to your telephone wall jack, as shown below.
1 Telephone wall jack
2 Use the phone cord supplied in the box with the HP All-in-One
This special 2-wire phone cord is different from the more common 4-wire phone cords
you might already have in your office. Check the end of the cord and compare it to
the two types of cords shown below.
If you used a 4-wire phone cord, disconnect it, find the supplied 2-wire phone cord,
and then connect the 2-wire phone cord to the port labeled 1-LINE on the back of the
HP All-in-One.
If the HP All-in-One came with a 2-wire phone cord adaptor, you can use it with a 4-
wire phone cord, in case the supplied 2-wire phone cord is too short. Attach the 2-
wire phone cord adaptor to the port labeled 1-LINE on the back of the HP All-in-One.
Attach your 4-wire phone cord to the open port on the adaptor and to the telephone
wall jack. For more information on using the 2-wire phone cord adaptor, see the
documentation that came with it.
Cause: Other office equipment (such as an answering machine or a telephone) is
not set up properly with the HP All-in-One.
Fax troubleshooting
183
Solution:
NOTE:
This possible solution applies only in the countries/regions that receive
a 2-wire phone cord in the box with the HP All-in-One, including: Argentina,
Australia, Brazil, Canada, Chile, China, Colombia, Greece, India, Indonesia,
Ireland, Japan, Korea, Latin America, Malaysia, Mexico, Philippines, Poland,
Portugal, Russia, Saudi Arabia, Singapore, Spain, Taiwan, Thailand, USA,
Venezuela, and Vietnam.
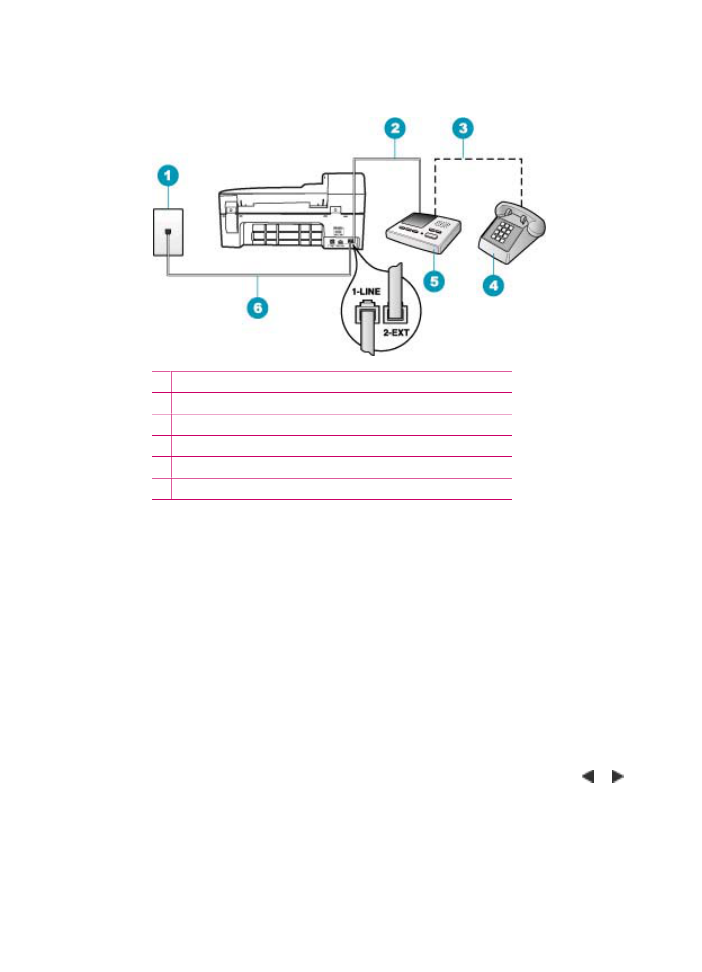
Make sure you have correctly connected the HP All-in-One to the telephone wall jack,
and correctly connected any additional equipment and services that share the phone
line with the HP All-in-One.
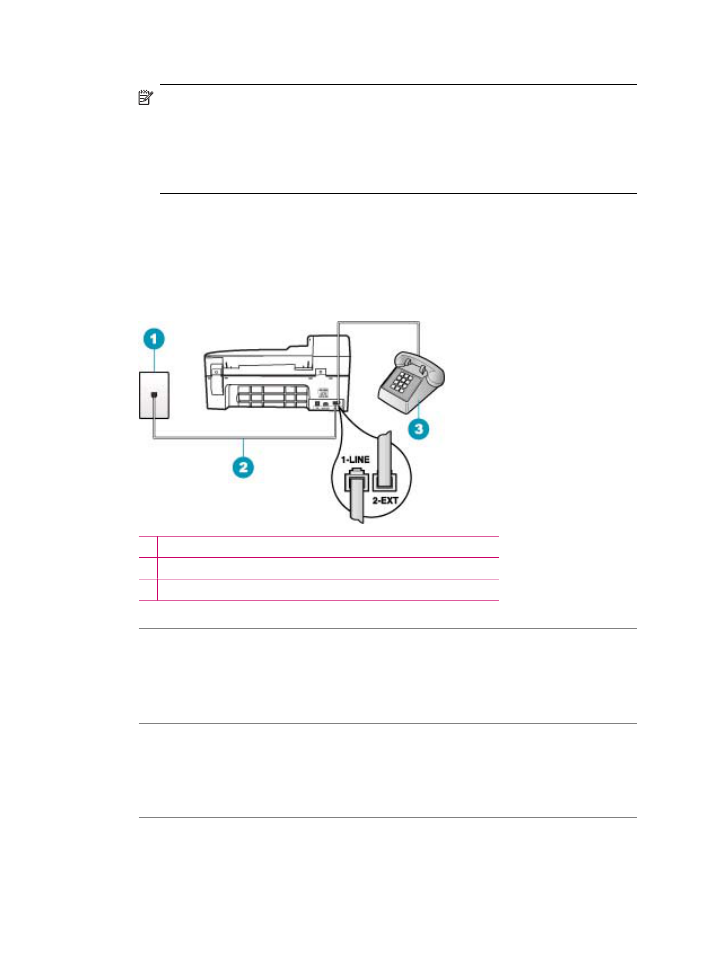
Use the port labeled 1-LINE on the back of the HP All-in-One to connect to the
telephone wall jack. Use the 2-EXT port to connect to any other equipment, such as
an answering machine or a telephone, as shown below.
1 Telephone wall jack
2 Use the phone cord supplied in the box with the HP All-in-One
3 Telephone (optional)
Cause: You are using a phone line splitter.
Solution: A phone line splitter can cause faxing problems. (A splitter is a two-cord
connector that plugs into a telephone wall jack.) Try removing the splitter and
connecting the HP All-in-One directly to the telephone wall jack.
Cause: The telephone wall jack is not working properly.
Solution: Try connecting a working telephone and phone cord to the telephone wall
jack you are using for the HP All-in-One and check for a dial tone. If you do not hear
a dial tone, call your local telephone company for service.
Cause: The phone line connection is noisy. Phone lines with poor sound quality
(noise) can cause faxing problems.
Solution: If the failure was due to noise on the phone line, contact the sender to
have them resend the fax. The quality might be better when you try again. You can
Chapter 11
184
Troubleshooting
check the sound quality of the phone line by plugging a phone into the telephone wall
jack and listening for static or other noise. If the problem persists, turn Error
Correction Mode (ECM) off and contact your telephone company.
If you are still having problems faxing, set the Fax Speed to a slower rate such as
Medium or Slow.
To change the ECM setting from the control panel
1.
Press Setup.
2.
Press 5, and then press 6.
This selects Advanced Fax Setup and then selects Error Correction Mode.
3.
Press to select On or Off.
4.
Press OK.
To set the fax speed from the control panel
1.
Press Setup.
2.
Press 5, and then press 7.
This selects Advanced Fax Setup and then selects Fax Speed.
3.
Press to select one of the following settings, and then press OK.
Fax speed setting
Fax speed
Fast
v.34 (33600 baud)
Medium
v.17 (14400 baud)
Slow
v.29 (9600 baud)
Cause: Other equipment that uses the same phone line as the HP All-in-One might
be in use.
Solution: Make sure extension phones (phones on the same phone line, but not
connected to the HP All-in-One) or other equipment are not in use or off the hook.
For example, you cannot use the HP All-in-One for faxing if an extension phone is off
the hook, or if you are using a computer dial-up modem to send e-mail or access the
Internet.
Cause: The HP All-in-One shares the same phone line with a DSL service and a
DSL filter is not connected.
Solution: If you use a DSL service, make sure that you have a DSL filter connected
or you will not be able to fax successfully. The DSL service sends out a digital signal
on the phone line that can interfere with the HP All-in-One, preventing the HP All-in-
One from sending and receiving faxes. The DSL filter removes the digital signal and
allows the HP All-in-One to communicate properly with the phone line. To check if
you already have a filter installed, listen to your phone line or dial tone. If you hear
noise or static on the line, you probably do not have a DSL filter installed, or it is
installed incorrectly. Obtain a DSL filter from your DSL provider. If you already have
a DSL filter, make sure it is connected correctly.
Cause: Another process has caused an error in the HP All-in-One.
Fax troubleshooting
185
Solution: Check the display or your computer for an error message providing
information about the problem and how to solve it. If there is an error, the HP All-in-
One will not send or receive a fax until the error condition is resolved.
For more information on error messages, see
Errors
.
Cause: You are using either a PBX or an ISDN converter/terminal adapter.
Solution:
•
Make sure the HP All-in-One is connected to the port that is designated for fax
and phone use. Also, make sure that the terminal adapter is set to the correct
switch type for your country/region, if possible.
NOTE:
Some ISDN systems allow you to configure the ports for specific
phone equipment. For example, you might have assigned one port for
telephone and Group 3 fax and another port for multiple purposes. If you have
problems when connected to the fax/phone port of your ISDN converter, try
using the port designated for multiple purposes; it might be labeled "multi-
combi" or something similar.
•
Try setting the Fax Speed to Medium or Slow.
Cause: The Fax Speed setting is set too fast.
Solution: You might need to send and receive faxes at a slower rate. Try setting
the Fax Speed to Medium or Slow if you use one of the following:
•
An Internet phone service
•
A PBX system
•
Fax over Internet Protocol (FoIP)
•
An ISDN service
To set the fax speed from the control panel
1.
Press Setup.
2.
Press 5, and then press 7.
This selects Advanced Fax Setup and then selects Fax Speed.
3.
Press to select one of the following settings, and then press OK.
Fax speed setting
Fax speed
Fast
v.34 (33600 baud)
Medium
v.17 (14400 baud)
Slow
v.29 (9600 baud)
Cause: The HP All-in-One might be connected to a telephone wall jack that is set
up for digital phones.
Solution: Make sure you connect the HP All-in-One to an analog phone line or you
will not be able to send or receive faxes. To check if your phone line is digital, connect
a regular analog phone to the line and listen for a dial tone. If you do not hear a normal
Chapter 11
186
Troubleshooting

sounding dial tone, it might be a phone line set up for digital phones. Connect the
HP All-in-One to an analog phone line and try sending or receiving a fax.
Cause: The HP All-in-One shares the same phone line with a DSL service and the
DSL modem might not be properly grounded.
Solution: If the DSL modem is not properly grounded, it can create noise on the
phone line. Phone lines with poor sound quality (noise) can cause faxing problems.
You can check the sound quality of the phone line by plugging a phone into the
telephone wall jack and listening for static or other noise.
If you hear noise
1.
Turn off your DSL modem and completely remove power for at least 15 minutes.
2.
Turn the DSL modem back on.
3.
Listen to the dial tone again. If the dial tone sounds clear (no noise or static), try
sending or receiving a fax.
NOTE:
You might notice static on the phone line again in the future. If the HP All-
in-One stops sending and receiving faxes, repeat this process.
If the phone line is still noisy, contact your phone company. For information on turning
your DSL modem off, contact your DSL provider for support.
Cause: You are faxing over the Internet using an IP phone, and there was a problem
with the transmission.
Solution: Try resending your fax at a later time. Also, make sure your Internet
service provider supports faxing over the Internet.
If the problem persists, contact your Internet service provider.
The HP All-in-One cannot send faxes, but can receive faxes
Cause: The HP All-in-One is not set up properly for faxing.
Solution: Follow the instructions to set up the HP All-in-One properly for faxing,
based on the equipment and services you have on the same phone line as the HP All-
in-One. Then, run a fax test to check the status of the HP All-in-One and to make sure
you set it up properly. For more information, see
Set up the HP All-in-One for
faxing
.
The HP All-in-One prints a report with the results of the test. If the test fails, review
the report for information on how to fix the problem.
To test your fax setup from the control panel
1.
Set up the HP All-in-One for faxing according to your particular home or office
setup instructions.
2.
Insert the print cartridges and load full-size paper in the input tray before starting
the test.
3.
Press Setup.
Fax troubleshooting
187

4.
Press 6, then press 6 again.
This selects the Tools menu and then selects Run Fax Test.
The HP All-in-One displays the status of the test on the display and prints a report.
5.
Review the report.
•
If the test passes and you are still having problems faxing, check the fax
settings listed in the report to verify the settings are correct. A blank or
incorrect fax setting can cause problems faxing.
•
If the test fails, review the report for more information on how to fix any
problems found.
6.
After you pick up the fax report from the HP All-in-One, press OK.
If necessary, resolve any problems found and rerun the test.
Cause: The HP All-in-One might be dialing too fast or too soon.
Solution: You might need to insert some pauses in the number sequence. For
example, if you need to access an outside line before dialing the phone number, insert
a pause following the access number. If your number is 95555555, and 9 accesses
an outside line, you might insert pauses as follows: 9-555-5555. To enter a pause in
the fax number you are typing, press Redial/Pause, or press the Space button
repeatedly, until a dash (-) appears on the display.
If you are using a speed dial entry to send the fax, update the speed dial entry to
include pauses in the number sequence.
You can also send the fax using monitor dialing. This enables you to listen to the
phone line as you dial. You can set the pace of your dialing and respond to prompts
as you dial.
Cause: The number you entered when sending the fax is not in the proper format.
Solution: Check to see that the fax number you entered is correct and in the proper
format. For example, you might need to dial a "9" prefix, depending on your phone
system.
If your phone line has a PBX system, make sure you are dialing the number for an
outside line before dialing the fax number.
Cause: The receiving fax machine is having problems.
Solution: To check this, try calling the fax number from a telephone and listen for
fax tones. If you cannot hear fax tones, the receiving fax might not be turned on or
connected, or a voice mail service could be interfering with the recipient's phone line.
You can also ask the recipient to check the receiving fax machine for any problems.
The HP All-in-One is having problems sending a manual fax
Cause: The recipient's fax machine might not support receiving faxes manually.
Solution: Check with the recipient to see if their fax machine can receive faxes
manually.
Chapter 11
188
Troubleshooting

Cause: You did not press Start Fax Black or Start Fax Color within three seconds
of hearing fax tones.
Solution: If you are sending a fax manually, make sure that you press Start Fax
Black or Start Fax Color within three seconds of hearing the recipient's fax tones,
otherwise the transmission might fail.
To send a fax manually from a phone
1.
Load your originals print side up into the document feeder tray.
NOTE:
This feature is not supported if you load your originals on the glass.
You must load your originals in the document feeder tray.
2.
Dial the number by using the keypad on the phone that is connected to the HP All-
in-One.
NOTE:
Do not use the keypad on the control panel of the HP All-in-One when
manually sending a fax. You must use the keypad on your phone to dial the
recipient's number.
3.
If the recipient answers the telephone, you can engage in a conversation before
sending your fax.
NOTE:
If a fax machine answers the call, you will hear fax tones from the
receiving fax machine. Proceed to the next step to transmit the fax.
4.
Once you are ready to send the fax, press Start Fax Black or Start Fax Color.
NOTE:
If prompted, press 1 to select Send Fax, and then press Start Fax
Black or Start Fax Color again.
If you were speaking with the recipient before sending the fax, inform the recipient
that they should press Start on their fax machine after they hear fax tones.
The telephone line is silent while the fax is transmitting. At this point, you can hang
up the telephone. If you want to continue speaking with the recipient, remain on
the line until the fax transmission is complete.
Cause: The telephone used to initiate the fax call was not connected directly to the
HP All-in-One or was not connected properly.
Solution:
NOTE:
This possible solution applies only in the countries/regions that receive
a 2-wire phone cord in the box with the HP All-in-One, including: Argentina,
Australia, Brazil, Canada, Chile, China, Colombia, Greece, India, Indonesia,
Ireland, Japan, Korea, Latin America, Malaysia, Mexico, Philippines, Poland,
Portugal, Russia, Saudi Arabia, Singapore, Spain, Taiwan, Thailand, USA,
Venezuela, and Vietnam.
Fax troubleshooting
189
To send a fax manually, the telephone must be connected directly to the port labeled
2-EXT on the HP All-in-One, as shown below.
1 Telephone wall jack
2 Use the phone cord supplied in the box with the HP All-in-One
3 Telephone
Cause: The Fax Speed setting might be set too fast.
Solution: Try setting the Fax Speed to Medium or Slow, and then resend the fax.
To set the fax speed from the control panel
1.
Press Setup.
2.
Press 5, and then press 7.
This selects Advanced Fax Setup and then selects Fax Speed.
3.
Press to select one of the following settings, and then press OK.
Fax speed setting
Fax speed
Fast
v.34 (33600 baud)
Medium
v.17 (14400 baud)
Slow
v.29 (9600 baud)
Cause: The HP All-in-One is not detecting an original loaded in the document feeder
tray.
Solution: If you did not load an original in the document feeder tray, or if the original
is not pushed in far enough, you will be unable to send a fax manually. Load an original
in the document feeder tray, or push the original farther into the tray. Once the HP All-
in-One detects the original, a confirmation message appears on the display.
Chapter 11
190
Troubleshooting

Pages of a fax I sent are missing
Cause: Two or more pages were fed through the document feeder tray at the same
time.
Solution: Print a Last Transaction report to verify the number of pages that were
sent. If two or more pages stuck together and were fed into the document feeder tray
at the same time, the number of pages in the report would not match the actual
number of pages. If the number of pages listed in the report does not match the actual
number of pages, you might need to clean the separator pad in the automatic
document feeder.
To print a Last Transaction report
1.
Press Setup, and then press 2.
This selects Print Report.
2.
Press to select Last Transaction, and then press OK.
For more information on cleaning the separator pad, see
Clean the automatic
document feeder
.
Cause: The receiving fax machine is having problems.
Solution: To check this, try calling the fax number from a telephone and listen for
fax tones. If you cannot hear fax tones, the receiving fax might not be turned on or
connected, or a voice mail service could be interfering with the recipient's phone line.
The memory of the receiving fax machine might be full or the fax machine might have
run out of paper. You can ask the recipient to check the receiving fax machine for any
problems.
Cause: The phone line connection is noisy. Phone lines with poor sound quality
(noise) can cause faxing problems.
Solution: If the failure was due to noise on the phone line, contact the sender to
have them resend the fax. The quality might be better when you try again. You can
check the sound quality of the phone line by plugging a phone into the telephone wall
jack and listening for static or other noise. If the problem persists, turn Error
Correction Mode (ECM) off and contact your telephone company.
To change the ECM setting from the control panel
1.
Press Setup.
2.
Press 5, and then press 6.
This selects Advanced Fax Setup and then selects Error Correction Mode.
3.
Press to select On or Off.
4.
Press OK.
The quality of the fax I sent is poor
Cause: The phone line connection is noisy. Phone lines with poor sound quality
(noise) can cause faxing problems.
Solution: If the failure was due to noise on the phone line, contact the sender to
have them resend the fax. The quality might be better when you try again. You can
Fax troubleshooting
191
check the sound quality of the phone line by plugging a phone into the telephone wall
jack and listening for static or other noise. If the problem persists, turn Error
Correction Mode (ECM) off and contact your telephone company.
If the problem persists, check to see if Error Correction Mode (ECM) is On. If it is
not, change the ECM setting to On. Faxes might take longer to send, but the print
quality of the received fax should improve.
If the print quality is still poor, turn off ECM, and then contact your telephone provider.
To change the ECM setting from the control panel
1.
Press Setup.
2.
Press 5, and then press 6.
This selects Advanced Fax Setup and then selects Error Correction Mode.
3.
Press to select On or Off.
4.
Press OK.
Cause: The fax resolution setting is set to a low resolution, such as Standard.
Solution: For the highest-quality fax, change the fax resolution to Fine, Very
Fine (if available), or Photo (for black-and-white photographs).
To change the resolution from the control panel
1.
Load your originals print side up into the document feeder tray. If you are sending
a single-page fax, such as a photograph, you can also load your original print side
down on the glass.
NOTE:
If you are sending a multiple-page fax, you must load the originals in
the document feeder tray. You cannot fax a multiple-page document from the
glass.
2.
In the Fax area, press Menu.
The Enter Number prompt appears.
3.
Enter the fax number by using the keypad, press Speed Dial or a one-touch speed
dial button to select a speed dial, or press Redial/Pause to redial the last number
dialed.
4.
In the Fax area, press Menu repeatedly until Resolution appears.
5.
Press to select a resolution setting, and then press OK.
6.
Press Start Fax Black.
•
If the device detects an original loaded in the automatic document
feeder, the HP All-in-One sends the document to the number you entered.
•
If the device does not detect an original loaded in the automatic
document feeder, the Fax from glass? prompt appears. Make sure your
original is loaded on the glass, and then press 1 to select Yes.
Cause: The glass of the HP All-in-One might be dirty.
Chapter 11
192
Troubleshooting

Solution: If you are sending a fax from the glass, make a copy to check the quality
of the printout. If the quality of the printout is poor, clean the glass.
To make a copy from the control panel
1.
Make sure you have paper loaded in the input tray.
2.
Load your original print side down on the right front corner of the glass or print
side up in the document feeder tray.
If you use the document feeder tray, place the pages so that the top edge of the
document goes in first.
3.
Do one of the following:
•
Press Start Copy Black to initiate a black-and-white copy job.
•
Press Start Copy Color to initiate a color copy job.
NOTE:
If you have a color original, pressing Start Copy Black produces a
black-and-white copy of the color original, while pressing Start Copy Color
produces a full-color copy of the color original.
To clean the glass
1.
Turn off the HP All-in-One, and raise the lid.
2.
Clean the glass with a soft cloth or sponge slightly moistened with a nonabrasive
glass cleaner.
CAUTION:
Do not use abrasives, acetone, benzene, or carbon tetrachloride
on the glass, since they can damage it. Do not place or spray liquid directly
on the glass. The liquid might seep under the glass and damage the device.
3.
Dry the glass with a dry, soft, lint-free cloth to prevent spotting.
4.
Turn on the HP All-in-One.
Cause: The receiving fax machine is having problems.
Solution: To check this, try calling the fax number from a telephone and listen for
fax tones. If you cannot hear fax tones, the receiving fax might not be turned on or
connected, or a voice mail service could be interfering with the recipient's phone line.
You can also ask the recipient to check the receiving fax machine for any problems.
Cause: The Lighter / Darker setting might be set too light. If you are sending a
faded, washed out, or handwritten fax, or a document with a watermark (such as a
red seal or stamp), you can change the Lighter / Darker setting to send the fax darker
than the original.
Fax troubleshooting
193

Solution: Make a copy to check the quality of the printout. If the printout is too light,
you can darken it by adjusting the Lighter / Darker setting when sending the fax.
To change the Lighter / Darker setting from the control panel
1.
Load your originals print side up into the document feeder tray. If you are sending
a single-page fax, such as a photograph, you can also load your original print side
down on the glass.
NOTE:
If you are sending a multiple-page fax, you must load the originals in
the document feeder tray. You cannot fax a multiple-page document from the
glass.
2.
In the Fax area, press Menu.
The Enter Number prompt appears.
3.
Enter the fax number by using the keypad, press Speed Dial or a one-touch speed
dial button to select a speed dial, or press Redial/Pause to redial the last number
dialed.
4.
In the Fax area, press Menu repeatedly until Lighter / Darker appears.
5.
Press to lighten the fax or press to darken it, and then press OK.
The indicator moves to the left or right as you press an arrow button.
6.
Press Start Fax Black.
•
If the device detects an original loaded in the automatic document
feeder, the HP All-in-One sends the document to the number you entered.
•
If the device does not detect an original loaded in the automatic
document feeder, the Fax from glass? prompt appears. Make sure your
original is loaded on the glass, and then press 1 to select Yes.
Parts of a fax I sent are cut off
Cause: The fax is larger than letter or A4 paper.
Solution: Some fax machines cannot accept faxes larger than letter or A4 paper.
Make sure the receiving fax machine can accept the paper size you are using. If not,
ask the recipient if the receiving fax machine has a fit to page setting they can use to
reduce the incoming fax to fit standard paper size such as letter or A4.
The fax I sent was blank when it was received
Cause: The original was not loaded or was loaded incorrectly.
Chapter 11
194
Troubleshooting
Solution: Load your originals into the document feeder tray. If you are sending a
single-page fax, such as a photograph, you can also load your original on the glass.
To load an original in the document feeder tray
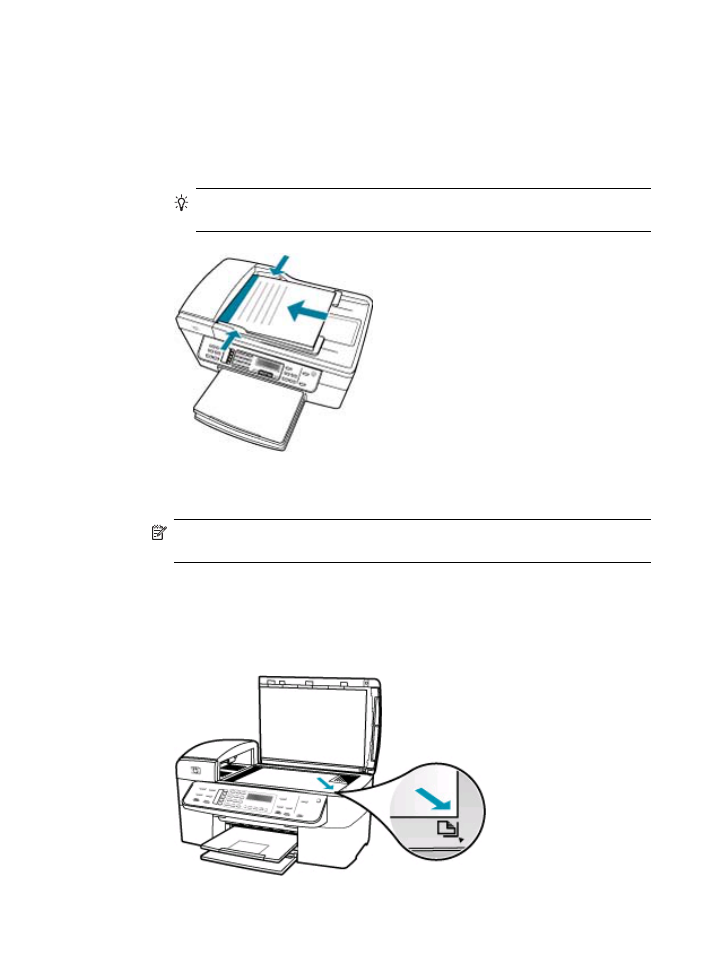
1.
Load your original, with the print side up, into the document feeder tray. Slide the
paper into the automatic document feeder until you hear a beep or see a message
on the display indicating that the HP All-in-One detected the pages you loaded.
TIP:
For more help on loading originals in the automatic document feeder,
refer to the diagram engraved in the document feeder tray.
2.
Slide the paper guides inward until they stop at the left and right edges of the
paper.
NOTE:
Remove all originals from the document feeder tray before lifting the lid
on the HP All-in-One.
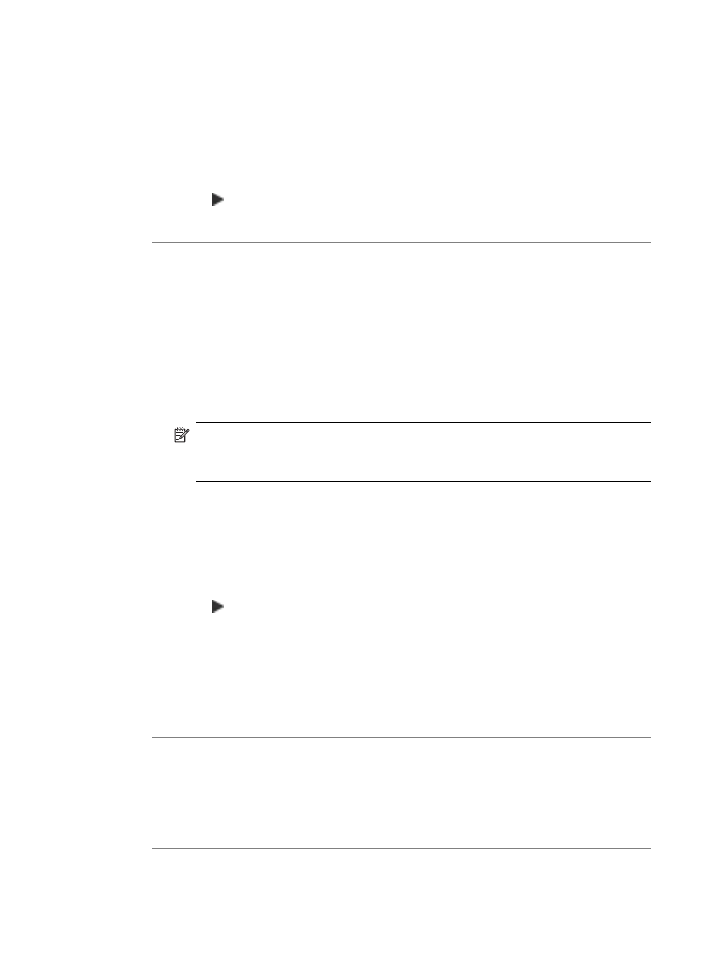
To load an original on the scanner glass
1.
Remove all originals from the document feeder tray, and then lift the lid on the
HP All-in-One.
2.
Load your original print side down on the right front corner of the glass.
Fax troubleshooting
195

3.
Close the lid.
Fax transmission is slow
Cause: You are sending a fax in color.
Solution: Sending a fax in color can take longer than sending a black-and-white
fax. Try sending the fax in black and white.
Cause: The document contains a lot of graphics or has very fine detail.
Solution: For faster transmission, use Standard resolution. This setting provides
the fastest possible transmission with the lowest quality of fax. The default resolution
is Fine, which can take longer to send.
To change the resolution from the control panel
1.
Load your originals print side up into the document feeder tray. If you are sending
a single-page fax, such as a photograph, you can also load your original print side
down on the glass.
NOTE:
If you are sending a multiple-page fax, you must load the originals in
the document feeder tray. You cannot fax a multiple-page document from the
glass.
2.
In the Fax area, press Menu.
The Enter Number prompt appears.
3.
Enter the fax number by using the keypad, press Speed Dial or a one-touch speed
dial button to select a speed dial, or press Redial/Pause to redial the last number
dialed.
4.
In the Fax area, press Menu repeatedly until Resolution appears.
5.
Press to select a resolution setting, and then press OK.
6.
Press Start Fax Black.
•
If the device detects an original loaded in the automatic document
feeder, the HP All-in-One sends the document to the number you entered.
•
If the device does not detect an original loaded in the automatic
document feeder, the Fax from glass? prompt appears. Make sure your
original is loaded on the glass, and then press 1 to select Yes.
Cause: The phone line connection is noisy. Phone lines with poor sound quality
(noise) can cause faxing problems.
Solution: If the failure was due to noise on the phone line, contact the sender to
have them resend the fax. The quality might be better when you try again. You can
check the sound quality of the phone line by plugging a phone into the telephone wall
Chapter 11
196
Troubleshooting
jack and listening for static or other noise. If the problem persists, turn Error
Correction Mode (ECM) off and contact your telephone company.
To change the ECM setting from the control panel
1.
Press Setup.
2.
Press 5, and then press 6.
This selects Advanced Fax Setup and then selects Error Correction Mode.
3.
Press to select On or Off.
4.
Press OK.
Cause: The fax resolution setting is set to a high resolution, such as Fine (the
default) or Photo.
Solution: For faster transmission, use Standard resolution. This setting provides
the fastest possible transmission with the lowest quality of fax.
To change the resolution from the control panel
1.
Load your originals print side up into the document feeder tray. If you are sending
a single-page fax, such as a photograph, you can also load your original print side
down on the glass.
NOTE:
If you are sending a multiple-page fax, you must load the originals in
the document feeder tray. You cannot fax a multiple-page document from the
glass.
2.
In the Fax area, press Menu.
The Enter Number prompt appears.
3.
Enter the fax number by using the keypad, press Speed Dial or a one-touch speed
dial button to select a speed dial, or press Redial/Pause to redial the last number
dialed.
4.
In the Fax area, press Menu repeatedly until Resolution appears.
5.
Press to select a resolution setting, and then press OK.
6.
Press Start Fax Black.
•
If the device detects an original loaded in the automatic document
feeder, the HP All-in-One sends the document to the number you entered.
•
If the device does not detect an original loaded in the automatic
document feeder, the Fax from glass? prompt appears. Make sure your
original is loaded on the glass, and then press 1 to select Yes.
Cause: The receiving fax machine is having problems.
Solution: To check this, try calling the fax number from a telephone and listen for
fax tones. If you cannot hear fax tones, the receiving fax might not be turned on or
connected, or a voice mail service could be interfering with the recipient's phone line.
You can also ask the recipient to check the receiving fax machine for any problems.
Cause: The Fax Speed option is set to a slow transmission speed.
Fax troubleshooting
197

Solution: Make sure the Fax Speed option is set to Fast or Medium.
To set the fax speed from the control panel
1.
Press Setup.
2.
Press 5, and then press 7.
This selects Advanced Fax Setup and then selects Fax Speed.
3.
Press to select one of the following settings, and then press OK.
Fax speed setting
Fax speed
Fast
v.34 (33600 baud)
Medium
v.17 (14400 baud)
Slow
v.29 (9600 baud)
The HP All-in-One cannot receive faxes, but can send faxes
Cause: The HP All-in-One is not set up properly for faxing.
Solution: Follow the instructions to set up the HP All-in-One properly for faxing,
based on the equipment and services you have on the same phone line as the HP All-
in-One. Then, run a fax test to check the status of the HP All-in-One and to make sure
you set it up properly. For more information, see
Set up the HP All-in-One for
faxing
.
The HP All-in-One prints a report with the results of the test. If the test fails, review
the report for information on how to fix the problem.
To test your fax setup from the control panel
1.
Set up the HP All-in-One for faxing according to your particular home or office
setup instructions.
2.
Insert the print cartridges and load full-size paper in the input tray before starting
the test.
3.
Press Setup.
4.
Press 6, then press 6 again.
This selects the Tools menu and then selects Run Fax Test.
The HP All-in-One displays the status of the test on the display and prints a report.
5.
Review the report.
•
If the test passes and you are still having problems faxing, check the fax
settings listed in the report to verify the settings are correct. A blank or
incorrect fax setting can cause problems faxing.
•
If the test fails, review the report for more information on how to fix any
problems found.
6.
After you pick up the fax report from the HP All-in-One, press OK.
If necessary, resolve any problems found and rerun the test.
Chapter 11
198
Troubleshooting

Cause: Auto Answer is turned off, which means that the HP All-in-One will not
answer incoming calls. You must be available to respond in person to incoming fax
calls, or the HP All-in-One will not answer the incoming fax call.
Solution: Depending on your office setup, you might be able to set the HP All-in-
One to answer incoming calls automatically. To find out what the recommended
answer mode is for your office setup, see
Choose the recommended answer mode
for your setup
.
If you must have Auto Answer off, you will need to press Start Fax Black or Start
Fax Color to receive a fax.
TIP:
If you are not close enough to the HP All-in-One to reach the control panel,
wait several seconds, and then press 1 2 3 on your phone. If the HP All-in-One
does not begin receiving the fax, wait several more seconds and press 1 2 3 again.
After the HP All-in-One begins to receive the fax, you can hang up the phone.
Cause: You subscribe to a voice mail service at the same phone number you use
for fax calls.
Solution: Set the HP All-in-One to answer faxes manually. You cannot receive
faxes automatically if you have a voice mail service at the same phone number you
use for fax calls. You must receive faxes manually; this means you must be available
to respond in person to incoming fax calls.
For more information on how to set up the HP All-in-One when you have a voice mail
service, see
Set up the HP All-in-One for faxing
.
Cause: You have a computer dial-up modem on the same phone line as the HP All-
in-One.
Solution: If you have a computer dial-up modem on the same phone line as the
HP All-in-One, check to make sure that the software that came with your modem is
not set to receive faxes automatically. Modems that are set up to receive faxes
automatically take over the phone line to receive all incoming faxes, which prevents
the HP All-in-One from receiving fax calls.
Cause: If you have an answering machine on the same phone line with the HP All-
in-One, you might have one of the following problems:
•
Your outgoing message might be too long or too loud to allow the HP All-in-One
to detect fax tones, and the sending fax machine might disconnect.
•
Your answering machine might not have enough quiet time after your outgoing
message to allow the HP All-in-One to detect fax tones. This problem is most
common with digital answering machines.
Fax troubleshooting
199

Solution: If you have an answering machine on the same phone line with the HP All-
in-One, do the following:
•
Disconnect the answering machine and then try receiving a fax. If faxing is
successful without the answering machine, the answering machine might be
causing the problem.
•
Reconnect the answering machine and record your outgoing message again.
Record a message that is approximately 10 seconds in duration. Speak slowly
and at a low volume when recording your message. Leave at least 5 seconds of
silence at the end of the voice message. There should be no background noise
when recording this silent time. Try to receive a fax again.
Cause: The answering machine is not set up properly with the HP All-in-One.
Solution:
NOTE:
This possible solution applies only in the countries/regions that receive
a 2-wire phone cord in the box with the HP All-in-One, including: Argentina,
Australia, Brazil, Canada, Chile, China, Colombia, Greece, India, Indonesia,
Ireland, Japan, Korea, Latin America, Malaysia, Mexico, Philippines, Poland,
Portugal, Russia, Saudi Arabia, Singapore, Spain, Taiwan, Thailand, USA,
Venezuela, and Vietnam.
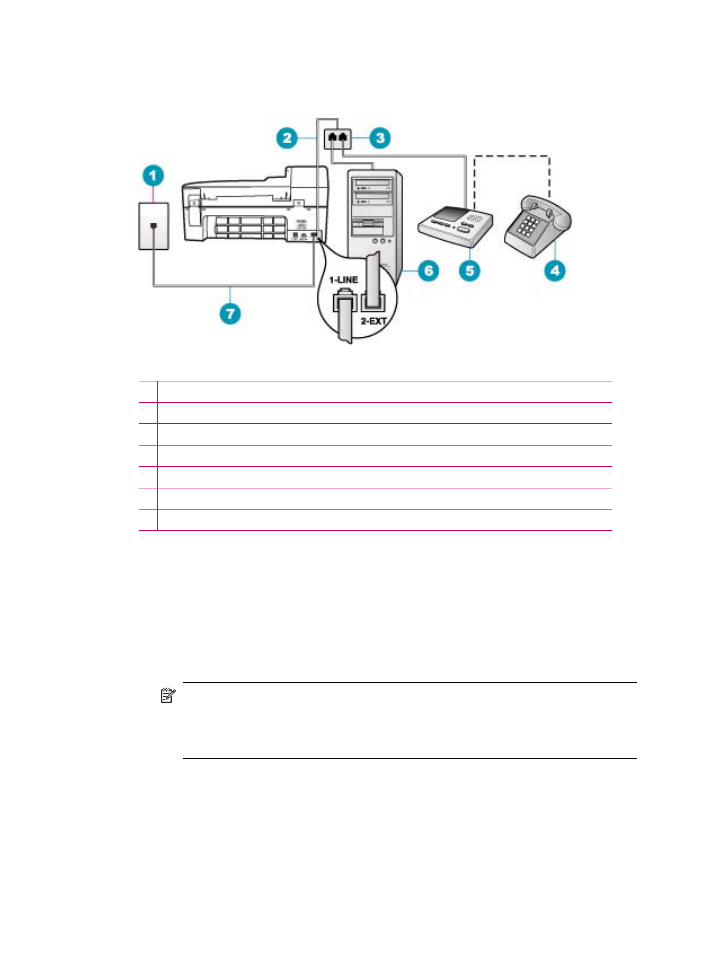
When you have an answering machine on the same phone line you use for fax calls,
you must connect the answering machine directly to the HP All-in-One using the port
Chapter 11
200
Troubleshooting
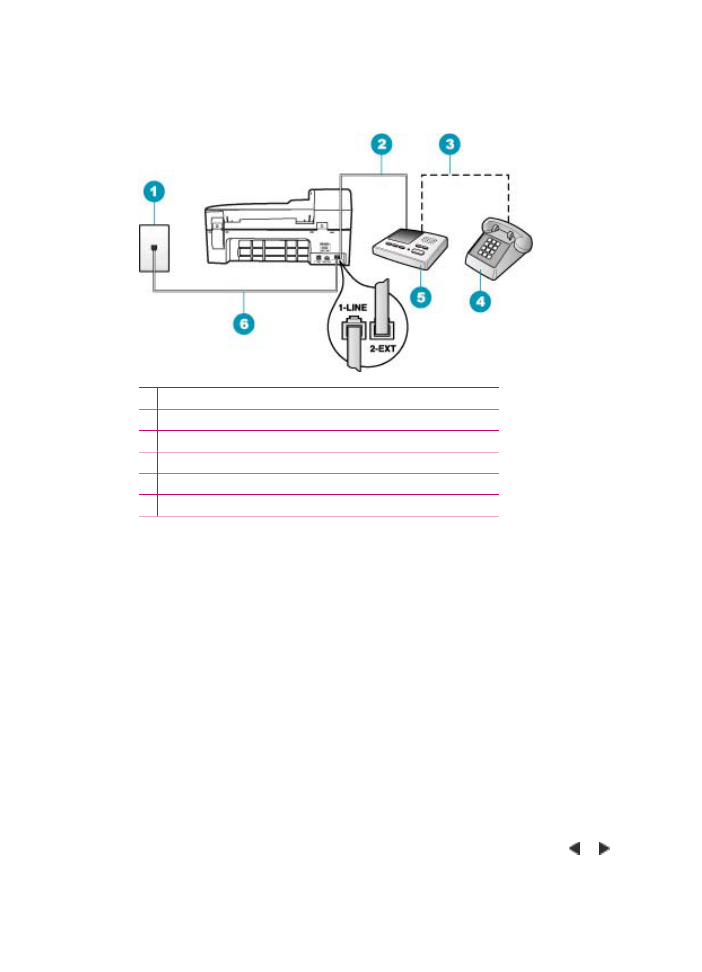
labeled 2-EXT, as shown below. You also need to set the correct number of rings to
answer for both the answering machine and HP All-in-One.
1 Telephone wall jack
2 Connect to the IN port on the answering machine
3 Connect to the OUT port on the answering machine
4 Telephone (optional)
5 Answering machine
6 Use the phone cord supplied in the box with the HP All-in-One
Make sure the HP All-in-One is set to receive faxes automatically and that the Rings
to Answer setting is correct. The number of rings to answer for the HP All-in-One
should be greater than the number of rings to answer for the answering machine. Set
your answering machine to a low number of rings and the HP All-in-One to answer
in the maximum number of rings supported by your device. (The maximum number
of rings varies by country/region.) In this setup, the answering machine will answer
the call and the HP All-in-One will monitor the line. If the HP All-in-One detects fax
tones, the HP All-in-One will receive the fax. If the call is a voice call, the answering
machine will record the incoming message.
To set the number of rings before answering from the control panel
1.
Press Setup.
2.
Press 4, and then press 3.
This selects Basic Fax Setup and then selects Rings to Answer.
3.
Enter the appropriate number of rings by using the keypad, or press or to
change the number of rings.
4.
Press OK to accept the setting.
Fax troubleshooting
201

To set the answer mode
1.
Press Setup.
2.
Press 4, and then press 2.
This selects Basic Fax Setup and then selects Rings to Answer.
3.
Enter the appropriate number of rings by using the keypad, or press or to
change the number of rings.
4.
Press OK to accept the setting.
Cause: You have a special ring pattern for your fax phone number (using a
distinctive ring service through your telephone company), and the Distinctive Ring
setting on the HP All-in-One does not match.
Solution: If you have a special ring pattern for your fax phone number (using a
distinctive ring service through your telephone company), make sure that the
Distinctive Ring setting on the HP All-in-One is set to match. For example, if the
phone company has assigned your number a double ring pattern, make sure Double
Rings is selected as the Distinctive Ring setting.
NOTE:
The HP All-in-One cannot recognize some ring patterns, such as those
with alternating short and long ringing patterns. If you are having problems with a
ring pattern of this type, ask your phone company to assign a non-alternating ring
pattern.
If you are not using a distinctive ring service, make sure that the Distinctive Ring
setting on the HP All-in-One is set to All Rings.
To change the distinctive ring pattern from the control panel
1.
Verify that the HP All-in-One is set to answer fax calls automatically.
2.
Press Setup.
3.
Press 5, and then press 1.
This selects Advanced Fax Setup and then selects Distinctive Ring.
4.
Press to select an option, and then press OK.
When the phone rings with the ring pattern assigned to your fax line, the HP All-
in-One answers the call and receives the fax.
Cause: The Distinctive Ring setting is not set to All Rings (and you are not using
a distinctive ring service).
Solution: If you are not using a distinctive ring service, make sure that the
Distinctive Ring setting on the HP All-in-One is set to All Rings.
Cause: The fax signal level might not be strong enough, which can cause fax
reception problems.
Solution: If the HP All-in-One shares the same phone line with other types of phone
equipment, such as an answering machine, a computer dial-up modem, or a multi-
port switch box, the fax signal level might be reduced. The signal level can also be
Chapter 11
202
Troubleshooting
reduced if you use a splitter or connect extra cables to extend the length of your
phone. A reduced fax signal can cause problems during fax reception.
•
If you are using a splitter or extension cables, try removing them and connecting
the HP All-in-One directly to the telephone wall jack.
•
To find out if other equipment is causing a problem, disconnect everything except
the HP All-in-One from the phone line, and then try to receive a fax. If you can
receive faxes successfully without the other equipment, one or more pieces of the
other equipment is causing problems; try adding them back one at a time and
receiving a fax each time, until you identify which equipment is causing the
problem.
Cause: The memory of the HP All-in-One is full.
Solution: If Backup Fax Reception is enabled and there is an error condition on
the HP All-in-One, the memory might become full of faxes that have not yet been
printed and the HP All-in-One will stop answering calls. If an error condition exists
that is preventing the HP All-in-One from printing faxes, review the display for
information on the error condition. Also, check for the following problems:
•
The HP All-in-One is not set up properly for faxing. For more information, see
Set
up the HP All-in-One for faxing
.
•
There is no paper loaded in the input tray.
•
There is a paper jam.
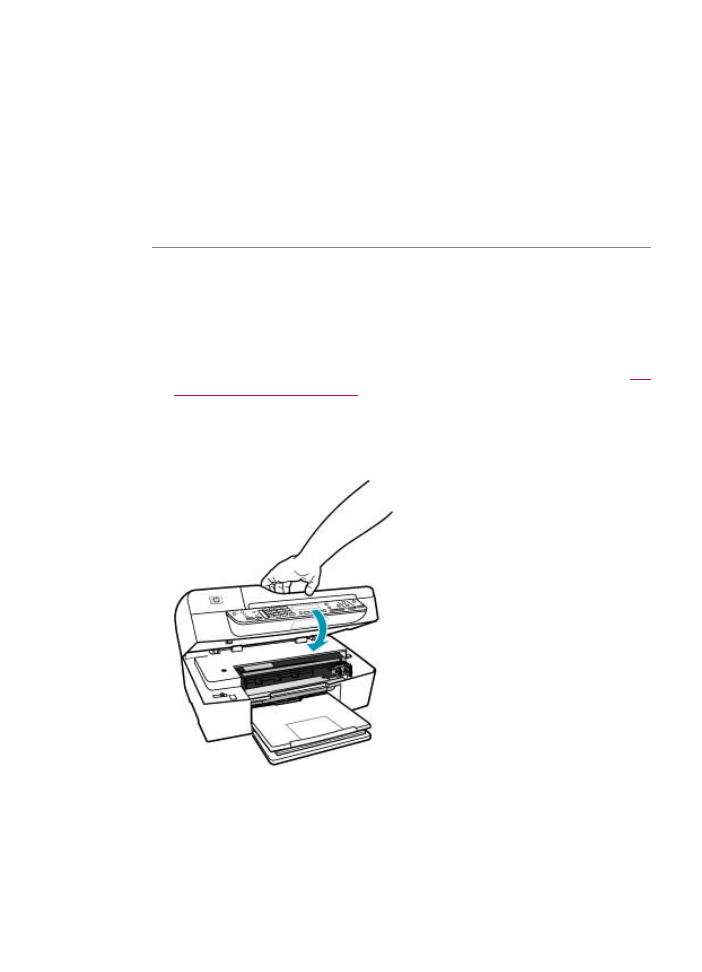
•
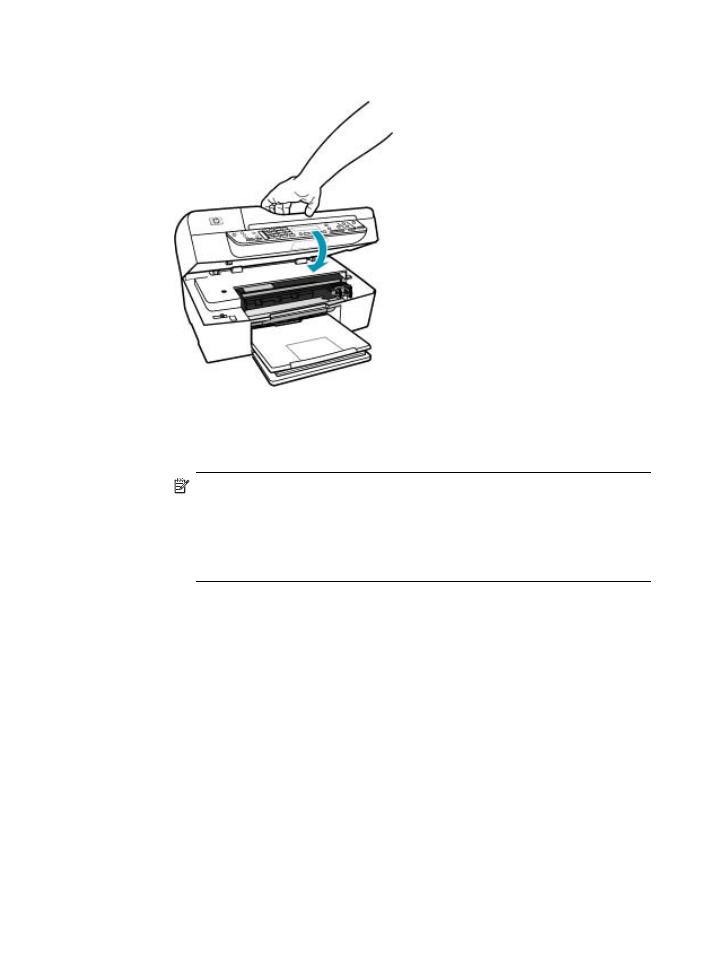
The print cartridge door is open. Close the print cartridge door, as shown below:
•
The print carriage is stalled. Turn the HP All-in-One off, remove any objects that
are blocking the print carriage (including any packing materials), and then turn
the HP All-in-One on again.
Fax troubleshooting
203

Resolve any problems found. The HP All-in-One automatically begins printing all the
unprinted faxes from memory. To clear the memory, you can also delete the faxes
stored in memory by turning off the HP All-in-One.
Cause: An error condition is preventing the HP All-in-One from receiving faxes
and Backup Fax Reception is set to Off.
Solution: Check for the following problems:
•
The HP All-in-One is turned off. Press the Power button to turn on the device.
•
The HP All-in-One is not set up properly for faxing. For more information, see
Set
up the HP All-in-One for faxing
.
•
There is no paper loaded in the input tray.
•
There is a paper jam.
•
The print cartridge door is open. Close the print cartridge door.
•
The print carriage is stalled. Turn the HP All-in-One off, remove any objects that
are blocking the print carriage (including any packing materials), and then turn
the HP All-in-One on again.
NOTE:
If Backup Fax Reception is enabled and you turn off the HP All-in-
One, all faxes stored in memory are deleted, including any unprinted faxes
that you might have received while the HP All-in-One was in an error condition.
You will need to contact the senders to ask them to resend any unprinted
faxes. For a list of the faxes you have received, print the Fax Log. The Fax
Log is not deleted when the HP All-in-One is turned off.
After you resolve any problems found, the HP All-in-One can begin answering
incoming fax calls.
The HP All-in-One is having problems receiving a manual fax
Cause: There are documents loaded in the document feeder tray.
Solution: The HP All-in-One will not receive a fax manually if documents are loaded
in the document feeder tray. Instead, the HP All-in-One attempts to send the
documents loaded in the document feeder tray. Remove any originals before
manually receiving faxes.
You can also contact the sender to verify that there are documents loaded in the
sending fax machine.
Cause: The Fax Speed setting might be set too fast.
Chapter 11
204
Troubleshooting
Solution: Set the Fax Speed to Medium or Slow, and then contact the sender to
have them resend the fax.
To set the fax speed from the control panel
1.
Press Setup.
2.
Press 5, and then press 7.
This selects Advanced Fax Setup and then selects Fax Speed.
3.
Press to select one of the following settings, and then press OK.
Fax speed setting
Fax speed
Fast
v.34 (33600 baud)
Medium
v.17 (14400 baud)
Slow
v.29 (9600 baud)
Cause: There is an error message or other prompt on the display.
Solution: Check the display for an error message or prompt providing information
about the problem and how to solve it. If there is an error message or prompt on the
display, the HP All-in-One will not receive the fax manually until the error condition is
resolved and the message is cleared.
If the HP All-in-One has an alignment message, you might be able to press OK to
clear the message and resume faxing. For more information on alignment messages,
see
Need alignment or alignment failed
.
For more information about other errors, see
Errors
.
Fax tones are recorded on my answering machine
Cause: The answering machine is not set up properly with the HP All-in-One or
the Rings to Answer setting is not correct.
Solution:
NOTE:
This possible solution applies only in the countries/regions that receive
a 2-wire phone cord in the box with the HP All-in-One, including: Argentina,
Australia, Brazil, Canada, Chile, China, Colombia, Greece, India, Indonesia,
Ireland, Japan, Korea, Latin America, Malaysia, Mexico, Philippines, Poland,
Portugal, Russia, Saudi Arabia, Singapore, Spain, Taiwan, Thailand, USA,
Venezuela, and Vietnam.
Fax troubleshooting
205
When you have an answering machine on the same phone line you use for fax calls,
you must connect the answering machine directly to the HP All-in-One using the port
labeled 2-EXT, as shown below.
1 Telephone wall jack
2 Connect to the IN port on the answering machine
3 Connect to the OUT port on the answering machine
4 Telephone (optional)
5 Answering machine
6 Use the phone cord supplied in the box with the HP All-in-One
Make sure the HP All-in-One is set to receive faxes automatically and that the Rings
to Answer setting is correct. The number of rings to answer for the HP All-in-One
should be greater than the number of rings to answer for the answering machine. If
the answering machine and the HP All-in-One are set to the same number of rings to
answer, both devices will answer the call and fax tones will be recorded on the
answering machine.
Set your answering machine to a low number of rings and the HP All-in-One to answer
in the maximum number of rings supported. (The maximum number of rings varies
by country/region.) In this setup, the answering machine will answer the call and the
HP All-in-One will monitor the line. If the HP All-in-One detects fax tones, the HP All-
in-One will receive the fax. If the call is a voice call, the answering machine will record
the incoming message.
To set the answer mode
1.
Press Setup.
2.
Press 4, and then press 2.
This selects Basic Fax Setup and then selects Rings to Answer.
3.
Enter the appropriate number of rings by using the keypad, or press or to
change the number of rings.
4.
Press OK to accept the setting.
Chapter 11
206
Troubleshooting

To set the number of rings before answering from the control panel
1.
Press Setup.
2.
Press 4, and then press 3.
This selects Basic Fax Setup and then selects Rings to Answer.
3.
Enter the appropriate number of rings by using the keypad, or press or to
change the number of rings.
4.
Press OK to accept the setting.
Cause: The HP All-in-One is set up to receive faxes manually, which means that
the HP All-in-One will not answer incoming calls. You must be available to respond
in person to incoming fax calls, or the HP All-in-One will not receive the fax and your
answering machine will record the fax tones.
Solution: Set up the HP All-in-One to answer incoming calls automatically by
turning on Auto Answer. If it is turned off, the HP All-in-One will not monitor incoming
calls and receive faxes. In this case, the answering machine will answer the fax call
and record the fax tones.
For more information on setting up the HP All-in-One when you have an answering
machine, see
Set up the HP All-in-One for faxing
.
The HP All-in-One is not answering incoming fax calls
Cause: The HP All-in-One is turned off.
Solution: Look at the display on the HP All-in-One. If the display is blank and the
Power button is not lit, the HP All-in-One is turned off. Make sure the power cord is
firmly connected to the HP All-in-One and plugged into a power outlet. Press the
Power button to turn on the HP All-in-One.
Cause: Auto Answer is turned off, which means that the HP All-in-One will not
answer incoming calls. You must be available to respond in person to incoming fax
calls, or the HP All-in-One will not answer the incoming fax call.
Solution: Depending on your office setup, you might be able to set the HP All-in-
One to answer incoming calls automatically. To find out what the recommended
answer mode is for your office setup, see
Choose the recommended answer mode
for your setup
.
If you must have Auto Answer off, you will need to press Start Fax Black or Start
Fax Color to receive a fax.
TIP:
If you are not close enough to the HP All-in-One to reach the control panel,
wait several seconds, and then press 1 2 3 on your phone. If the HP All-in-One
does not begin receiving the fax, wait several more seconds and press 1 2 3 again.
After the HP All-in-One begins to receive the fax, you can hang up the phone.
Cause: You have a special ring pattern for your fax phone number (using a
distinctive ring service through your telephone company), and the Distinctive Ring
setting on the HP All-in-One does not match.
Fax troubleshooting
207

Solution: If you have a special ring pattern for your fax phone number (using a
distinctive ring service through your telephone company), make sure that the
Distinctive Ring feature on the HP All-in-One is set to match. For example, if the
phone company has assigned your number a double ring pattern, make sure Double
Rings is selected as the Distinctive Ring setting.
NOTE:
The HP All-in-One cannot recognize some ring patterns, such as those
with alternating short and long ringing patterns. If you are having problems with a
ring pattern of this type, ask your phone company to assign a non-alternating ring
pattern.
If you are not using a distinctive ring service, check to make sure that the Distinctive
Ring feature on the HP All-in-One is set to All Rings.
To change the distinctive ring pattern from the control panel
1.
Verify that the HP All-in-One is set to answer fax calls automatically.
2.
Press Setup.
3.
Press 5, and then press 1.
This selects Advanced Fax Setup and then selects Distinctive Ring.
4.
Press to select an option, and then press OK.
When the phone rings with the ring pattern assigned to your fax line, the HP All-
in-One answers the call and receives the fax.
Cause: The Distinctive Ring feature is not set to All Rings (and you are not using
a distinctive ring service).
Solution: If you are not using a distinctive ring service, check to make sure that
the Distinctive Ring feature on the HP All-in-One is set to All Rings.
Cause: The memory of the HP All-in-One is full.
Solution: If the memory becomes full of faxes that have not yet been printed, the
HP All-in-One stops answering calls. If an error condition exists that is preventing the
HP All-in-One from printing faxes, review the display for information on the error
condition. Also, check for the following problems:
•
The HP All-in-One is not set up properly for faxing. For more information, see
Set
up the HP All-in-One for faxing
.
•
There is no paper loaded in the input tray.
•
There is a paper jam.
Chapter 11
208
Troubleshooting
•
The print cartridge door is open. Close the print cartridge door, as shown below:
•
The print carriage is stalled. Turn the HP All-in-One off, remove any objects that
are blocking the print carriage (including any packing materials), and then turn
the HP All-in-One on again.
NOTE:
If Backup Fax Reception is enabled and you turn off the HP All-in-
One, all faxes stored in memory are deleted, including any unprinted faxes
that you might have received while the HP All-in-One was in an error condition.
You will need to contact the senders to ask them to resend any unprinted
faxes. For a list of the faxes you have received, print the Fax Log. The Fax
Log is not deleted when the HP All-in-One is turned off.
Resolve any problems found. To clear the memory, you can either print or delete the
faxes stored in memory.
To reprint faxes in memory from the control panel
1.
Make sure you have paper loaded in the input tray.
2.
Press Setup.
3.
Press 6, and then press 5.
This selects Tools and then selects Reprint Faxes in Memory.
The faxes are printed in the reverse order they were received with the most
recently received fax printed first, and so on.
4.
If you want to stop reprinting the faxes in memory, press Cancel.
Fax troubleshooting
209
To delete all the faxes in memory from the control panel
▲
Turn off the HP All-in-One by pressing the Power button.
All faxes stored in memory will be deleted from memory when you turn off the
power to the HP All-in-One.
NOTE:
You can also delete any faxes stored in memory by selecting Clear
Fax Log from the Tools menu. To do so, press Setup, press 6, and then
press 7.
Cause: An error condition is preventing the HP All-in-One from receiving faxes
and Backup Fax Reception is set to Off.
Solution: Check for the following problems:
•
The HP All-in-One is turned off. Press the Power button to turn on the device.
•
The HP All-in-One is not set up properly for faxing. For more information, see
Set
up the HP All-in-One for faxing
.
•
There is no paper loaded in the input tray.
•
There is a paper jam.
•
The print cartridge door is open. Close the print cartridge door.
•
The print carriage is stalled. Turn the HP All-in-One off, remove any objects that
are blocking the print carriage (including any packing materials), and then turn
the HP All-in-One on again.
After you resolve any problems found, the HP All-in-One can begin answering
incoming fax calls.
Pages of a fax I received are missing
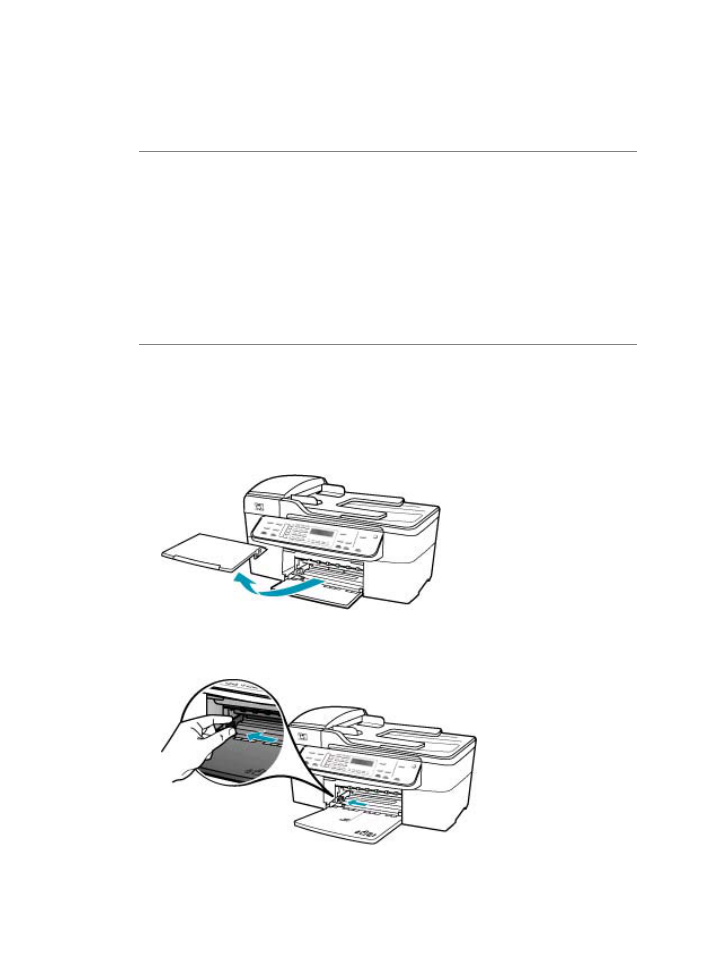
Cause: The paper is not loaded correctly in the input tray.
Solution: Make sure you have paper loaded correctly.
To load full-size paper
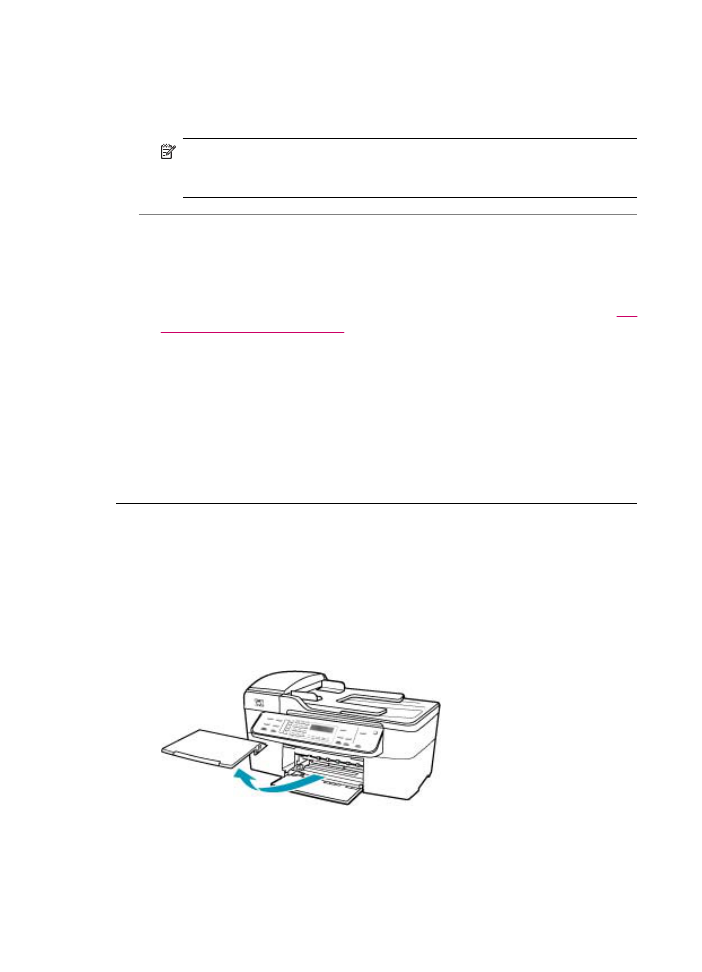
1.
Remove the output tray.
Chapter 11
210
Troubleshooting
2.
Slide the paper-width guide to its outermost position.
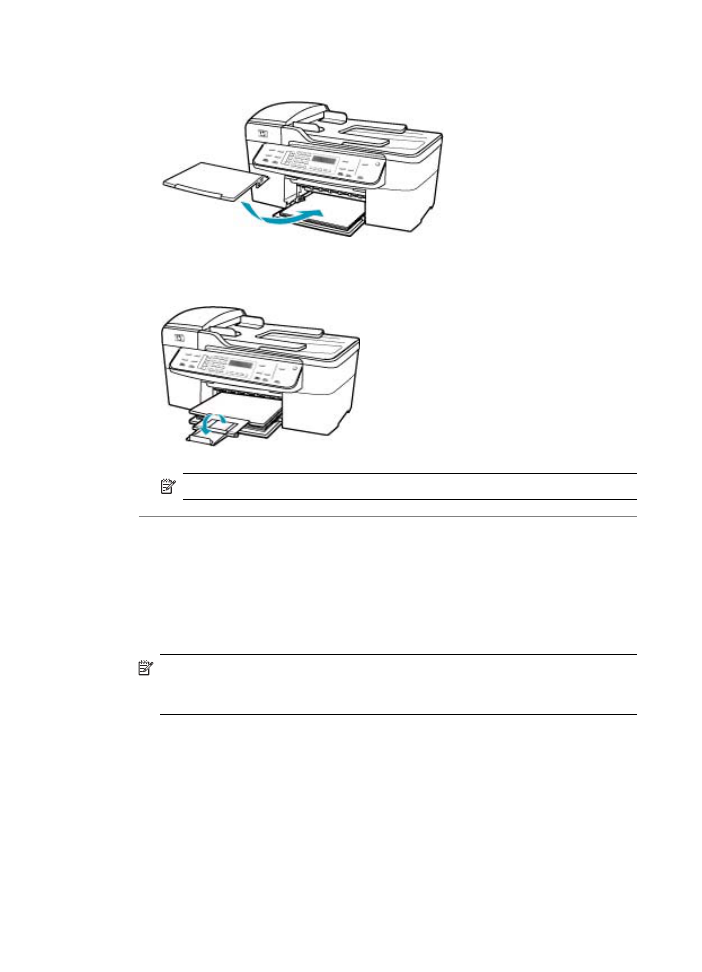
3.
Tap a stack of paper on a flat surface to align the edges, and then check the paper
for the following:
•
Make sure it is free of rips, dust, wrinkles, and curled or bent edges.
•
Make sure all the paper in the stack is the same size and type.
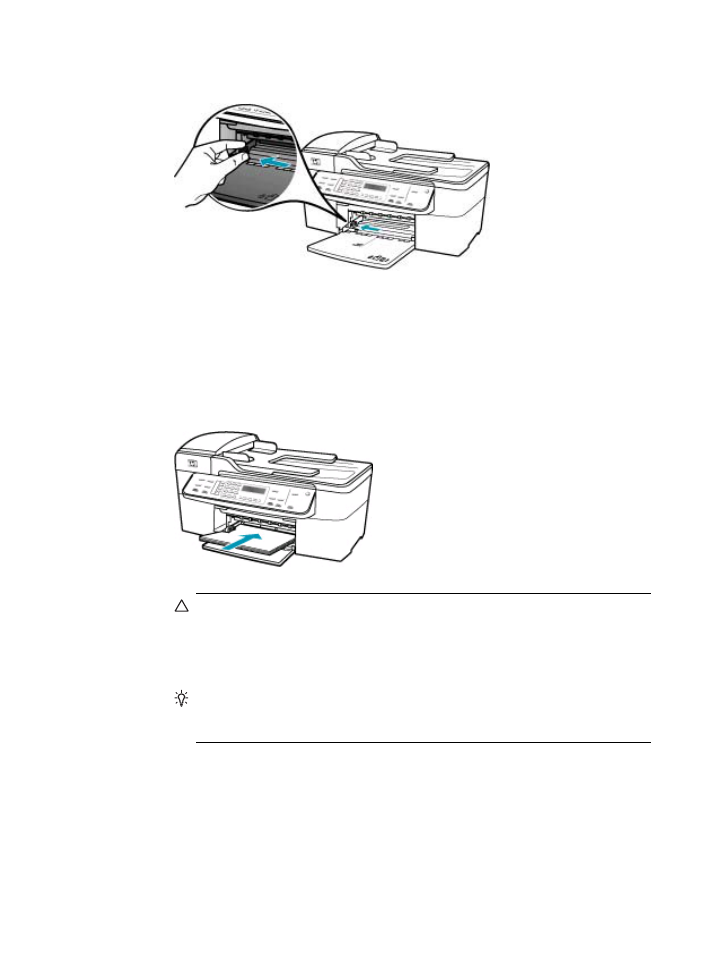
4.
Insert the stack of paper into the input tray with the short edge forward and the
print side down. Slide the stack of paper forward until it stops.
CAUTION:
Make sure that the HP All-in-One is idle and silent when you load
paper into the input tray. If the HP All-in-One is servicing the print cartridges
or otherwise engaged in a task, the paper stop inside the device might not be
in place. You could push the paper too far forward, causing the HP All-in-One
to eject blank pages.
TIP:
If you are using letterhead, insert the top of the page first with the print
side down. For more help on loading full-size paper and letterhead, refer to
the diagram engraved in the base of the input tray.
Fax troubleshooting
211
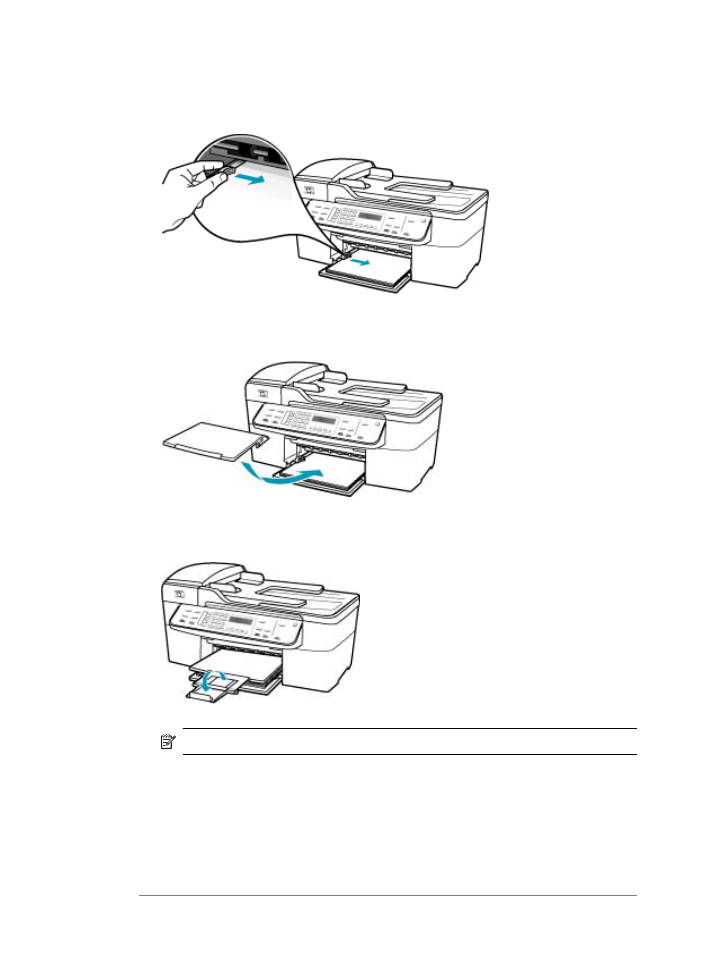
5.
Slide the paper-width guide inward until it stops at the edge of the paper.
Do not overload the input tray; make sure the stack of paper fits within the input
tray and is no higher than the top of the paper-width guide.
6.
Replace the output tray.
7.
Flip the tray extender up toward you.
NOTE:
When you use legal-size paper, leave the tray extender closed.
If you have Backup Fax Reception enabled, the HP All-in-One might have stored
the fax in memory upon reception. After you have correctly loaded the paper in the
input tray, the HP All-in-One automatically begins printing all the unprinted faxes from
memory, in the order they were received. If you do not have Backup Fax
Reception enabled, or if the fax was not stored in memory for some reason (for
example, if the HP All-in-One was out of memory), you will need to contact the sender
and ask for the fax to be resent.
Chapter 11
212
Troubleshooting

Cause: The sending fax machine is having problems.
Solution: Check with the sender to find out how many pages were sent. The
sending fax machine might have failed to feed each page of the original.
Faxes are received but do not print
Cause: The HP All-in-One has a paper jam or is out of paper.
Solution: If you have Backup Fax Reception enabled, the HP All-in-One might
have stored the fax in memory upon reception. After clearing the paper jam or loading
paper in the input tray, the HP All-in-One automatically begins printing all the
unprinted faxes from memory, in the order they were received. If you do not have
Backup Fax Reception enabled, or if the fax was not stored in memory for some
reason (for example, if the HP All-in-One was out of memory), ask the sender to
resend the fax.
For more information on clearing paper jams, see
Clear paper jams
.
Cause: Another process has caused an error in the HP All-in-One.
Solution: Check the display or your computer for an error message providing
information about the problem and how to solve it. If there is an error, the HP All-in-
One will not print the fax until the error condition is resolved.
For more information on error messages, see
Errors
.
Cause: The print cartridges might be out of ink.
Solution: Check the estimated ink levels remaining in the print cartridges. If the
print cartridges are low or out of ink, you might need to replace the print cartridges.
If there is ink remaining in the print cartridges, but you are still noticing a problem,
print a self-test report to determine if there is a problem with the print cartridges. If the
self-test report shows a problem, clean the print cartridges. If the problem persists,
you might need to replace the print cartridges.
For more information on print cartridges, see
Print cartridge troubleshooting
.
Cause: The print carriage is stalled.
Solution: Turn the HP All-in-One off, remove any objects that are blocking the print
carriage (including any packing materials), and then turn the HP All-in-One on again.
NOTE:
If Backup Fax Reception is enabled and you turn off the HP All-in-One,
all faxes stored in memory are deleted, including any unprinted faxes that you
might have received while the HP All-in-One was in an error condition. You will
need to contact the senders to ask them to resend any unprinted faxes. For a list
of the faxes you have received, print the Fax Log. The Fax Log is not deleted
when the HP All-in-One is turned off.
Fax troubleshooting
213
Parts of a fax I received are cut off
Cause: The sending fax machine has a problem.
Solution: Check with the sender to see if the sending fax machine is having
problems.
Cause: The fax originated on a larger paper size, such as legal, and the Automatic
Reduction option is turned off.
Solution: You can print the fax on legal-size paper or you can set the Automatic
Reduction feature to reduce the image so, if possible, it fits on one page.
To print the fax on legal paper
1.
Load legal paper in the input tray.
2.
Change the paper size for received faxes to legal.
3.
Turn off Automatic Reduction.
Cause: The paper-width guide is not positioned correctly.
Solution: Make sure you have paper loaded correctly.
To load full-size paper
1.
Remove the output tray.
2.
Slide the paper-width guide to its outermost position.
Chapter 11
214
Troubleshooting

3.
Tap a stack of paper on a flat surface to align the edges, and then check the paper
for the following:
•
Make sure it is free of rips, dust, wrinkles, and curled or bent edges.
•
Make sure all the paper in the stack is the same size and type.
4.
Insert the stack of paper into the input tray with the short edge forward and the
print side down. Slide the stack of paper forward until it stops.
CAUTION:
Make sure that the HP All-in-One is idle and silent when you load
paper into the input tray. If the HP All-in-One is servicing the print cartridges
or otherwise engaged in a task, the paper stop inside the device might not be
in place. You could push the paper too far forward, causing the HP All-in-One
to eject blank pages.
TIP:
If you are using letterhead, insert the top of the page first with the print
side down. For more help on loading full-size paper and letterhead, refer to
the diagram engraved in the base of the input tray.
5.
Slide the paper-width guide inward until it stops at the edge of the paper.
Do not overload the input tray; make sure the stack of paper fits within the input
tray and is no higher than the top of the paper-width guide.
Fax troubleshooting
215
6.
Replace the output tray.
7.
Flip the tray extender up toward you.
NOTE:
When you use legal-size paper, leave the tray extender closed.
Cause: A legal-size fax was sent that contained very fine detail, such as large
graphics, and letter-size paper is loaded in the input tray.
Solution: If a legal-size fax was sent that contained very fine detail, such as large
graphics, the HP All-in-One will attempt to fit the fax on one page (if automatic
reduction is enabled). If the memory is full, the HP All-in-One might not be able to
reduce the image, causing it to be cut off and printed on a second page. You can
clear the memory and have the sender resend the fax.
NOTE:
Clearing the memory will delete all faxes that are stored in memory,
including any faxes that have not been printed. You might want to print all faxes
in memory to make sure you do not lose any information.
To reprint faxes in memory from the control panel
1.
Make sure you have paper loaded in the input tray.
2.
Press Setup.
3.
Press 6, and then press 5.
This selects Tools and then selects Reprint Faxes in Memory.
The faxes are printed in the reverse order they were received with the most
recently received fax printed first, and so on.
4.
If you want to stop reprinting the faxes in memory, press Cancel.
Chapter 11
216
Troubleshooting
To delete all the faxes in memory from the control panel
▲
Turn off the HP All-in-One by pressing the Power button.
All faxes stored in memory will be deleted from memory when you turn off the
power to the HP All-in-One.
NOTE:
You can also delete any faxes stored in memory by selecting Clear
Fax Log from the Tools menu. To do so, press Setup, press 6, and then
press 7.
Cause: The paper loaded in the input tray is a different size than the Fax Paper
Size setting.
Solution: Make sure the paper loaded in the input tray matches the Fax Paper
Size setting.
The computer to which I am connecting has only one phone port
Cause: I am setting up the HP All-in-One on a shared voice/fax line with a computer
dial-up modem, and the computer has only one phone port.
Solution:
NOTE:
This possible solution applies only in the countries/regions that receive
a 2-wire phone cord in the box with the HP All-in-One, including: Argentina,
Australia, Brazil, Canada, Chile, China, Colombia, Greece, India, Indonesia,
Ireland, Japan, Korea, Latin America, Malaysia, Mexico, Philippines, Poland,
Portugal, Russia, Saudi Arabia, Singapore, Spain, Taiwan, Thailand, USA,
Venezuela, and Vietnam.
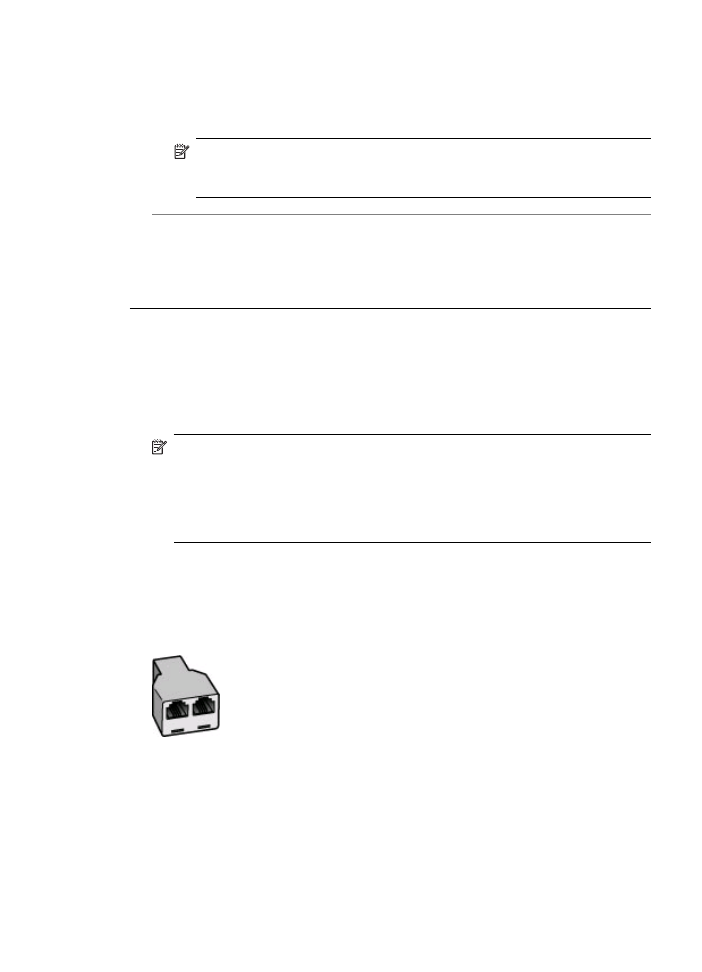
If your computer has only one phone port, you will need to purchase a parallel splitter
(also called a coupler), as shown below. (A parallel splitter has one RJ-11 port on the
front and two RJ-11 ports on the back. Do not use a 2-line phone splitter, a serial
splitter, or a parallel splitter which has two RJ-11 ports on the front and a plug on the
back.)
Figure 11-1 Example of a parallel splitter
Fax troubleshooting
217
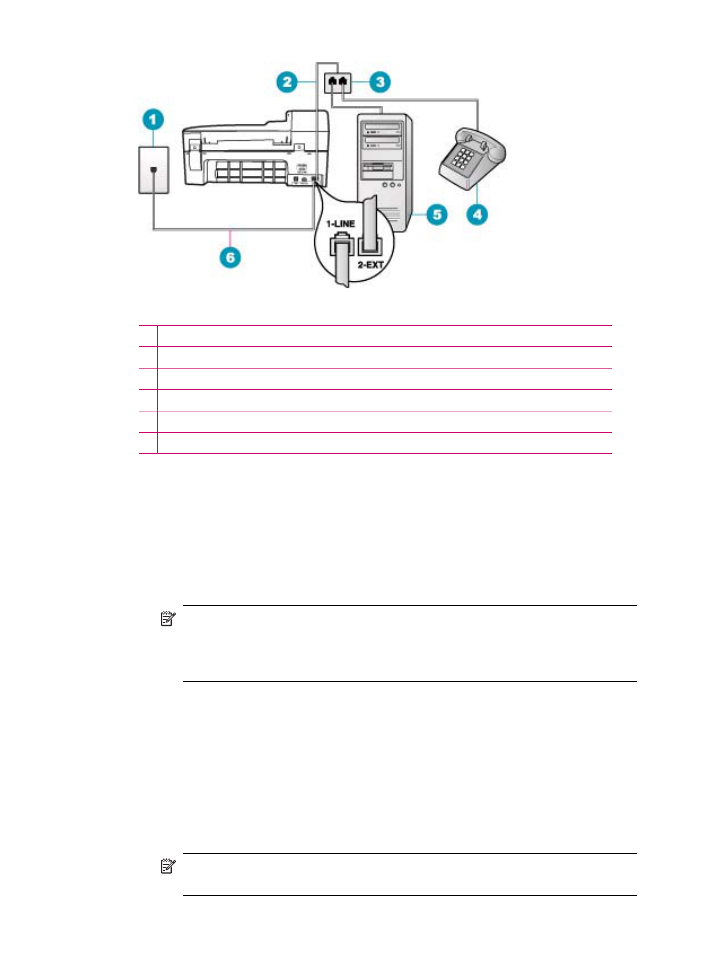
Figure 11-2 Back view of the HP All-in-One
1 Telephone wall jack
2 Phone cord connected to the 2-EXT port
3 Parallel splitter
4 Telephone (optional)
5 Computer with modem
6 Phone cord supplied in the box with the HP All-in-One connected to the 1-LINE port
To set up the HP All-in-One to a computer with one phone port
1.
Find the phone cord that connects from the back of your computer (your computer
dial-up modem) to a telephone wall jack. Disconnect the cord from the telephone
wall jack and plug it into the port labeled 2-EXT on the back of the HP All-in-One.
2.
Using the phone cord supplied in the box with the HP All-in-One, connect one end
to your telephone wall jack, then connect the other end to the port labeled 1-LINE
on the back of the HP All-in-One.
NOTE:
If you do not use the supplied cord to connect from the telephone
wall jack to the HP All-in-One, you might not be able to fax successfully. This
special phone cord is different from the phone cords you might already have
in your home or office.
3.
Remove the white plug from the port labeled 2-EXT on the back of the HP All-in-
One.
4.
Using another phone cord, connect one end to the port labeled 2-EXT on the back
of the HP All-in-One. Connect the other end of the phone cord to the parallel
splitter on the side with the single phone port.
5.
Unplug your computer modem from the telephone wall jack, and connect it to the
parallel splitter on the side with two phone ports.
6.
If your modem software is set to receive faxes to your computer automatically,
turn off that setting.
NOTE:
If you do not turn off the automatic fax reception setting in your
modem software, the HP All-in-One will not be able to receive faxes.
Chapter 11
218
Troubleshooting

7.
(Optional) Connect a phone to the other open phone port on the parallel splitter.
8.
Now you need to decide how you want the HP All-in-One to answer calls,
automatically or manually:
•
If you set up the HP All-in-One to answer calls automatically, it answers all
incoming calls and receives faxes. The HP All-in-One will not be able to
distinguish between fax and voice calls in this case; if you suspect the call is
a voice call, you will need to answer it before the HP All-in-One answers the
call. To set up the HP All-in-One to answer calls automatically, turn on the
Auto Answer setting.
•
If you set up the HP All-in-One to answer faxes manually, you must be
available to respond in person to incoming fax calls or the HP All-in-One
cannot receive faxes. To set up the HP All-in-One to answer calls manually,
turn off the Auto Answer setting.
9.
Run a fax test.
If you pick up the phone before the HP All-in-One answers the call and hear fax tones
from a sending fax machine, you will need to answer the fax call manually.
Cause: I am setting up the HP All-in-One on a shared voice/fax line with a computer
dial-up modem and answering machine, and the computer only has one phone port.
Solution:
NOTE:
This possible solution applies only in the countries/regions that receive
a 2-wire phone cord in the box with the HP All-in-One, including: Argentina,
Australia, Brazil, Canada, Chile, China, Colombia, Greece, India, Indonesia,
Ireland, Japan, Korea, Latin America, Malaysia, Mexico, Philippines, Poland,
Portugal, Russia, Saudi Arabia, Singapore, Spain, Taiwan, Thailand, USA,
Venezuela, and Vietnam.
If your computer has only one phone port, you will need to purchase a parallel splitter
(also called a coupler). (A parallel splitter has one RJ-11 port on the front and two
Fax troubleshooting
219
RJ-11 ports on the back. Do not use a 2-line phone splitter, a serial splitter, or a parallel
splitter which has two RJ-11 ports on the front and a plug on the back.)
Figure 11-3 Back view of the HP All-in-One
1 Telephone wall jack
2 Phone cord connected to the 2-EXT port
3 Parallel splitter
4 Telephone (optional)
5 Answering machine
6 Computer with modem
7 Phone cord supplied in the box with the HP All-in-One connected to the 1-LINE port
To set up the HP All-in-One to a computer with one phone port
1.
Find the phone cord that connects from the back of your computer (your computer
dial-up modem) to a telephone wall jack. Disconnect the cord from the telephone
wall jack and plug it into the port labeled 2-EXT on the back of the HP All-in-One.
2.
Using the phone cord supplied in the box with the HP All-in-One, connect one end
to your telephone wall jack, then connect the other end to the port labeled 1-LINE
on the back of the HP All-in-One.
NOTE:
If you do not use the supplied cord to connect from the telephone
wall jack to the HP All-in-One, you might not be able to fax successfully. This
special phone cord is different from the phone cords you might already have
in your home or office.
3.
Remove the white plug from the port labeled 2-EXT on the back of the HP All-in-
One.
4.
Using another phone cord, connect one end to the port labeled 2-EXT on the back
of the HP All-in-One. Connect the other end of the phone cord to the parallel
splitter on the side with the single phone port.
5.
Unplug your computer modem from the telephone wall jack, and connect it to the
parallel splitter on the side with two phone ports.
Chapter 11
220
Troubleshooting

6.
Connect your answering machine to the other open phone port on the parallel
splitter.
NOTE:
If you do not connect your answering machine in this way, fax tones
from a sending fax machine might be recorded on your answering machine,
and you might not be able to receive faxes with the HP All-in-One.
7.
(Optional) If your answering machine does not have a built-in phone, for
convenience you might want to connect a phone to the back of your answering
machine at the "OUT" port.
8.
If your modem software is set to receive faxes to your computer automatically,
turn off that setting.
NOTE:
If you do not turn off the automatic fax reception setting in your
modem software, the HP All-in-One will not be able to receive faxes.
9.
Turn on the Auto Answer setting.
10.
Set your answering machine to answer after a low number of rings.
11.
Change the Rings to Answer setting on the HP All-in-One to the maximum
number of rings supported by your device. (The maximum number of rings varies
by country/region.)
12.
Run a fax test.
When the phone rings, your answering machine will answer after the number of rings
you have set, and then play your recorded greeting. The HP All-in-One monitors the
call during this time, "listening" for fax tones. If incoming fax tones are detected, the
HP All-in-One will emit fax reception tones and receive the fax; if there are no fax
tones, the HP All-in-One stops monitoring the line and your answering machine can
record a voice message.
Cause: I am setting up the HP All-in-One on a shared voice/fax line with a computer
dial-up modem and voice mail service, and the computer has only one phone port.
Solution:
NOTE:
This possible solution applies only in the countries/regions that receive
a 2-wire phone cord in the box with the HP All-in-One, including: Argentina,
Australia, Brazil, Canada, Chile, China, Colombia, Greece, India, Indonesia,
Ireland, Japan, Korea, Latin America, Malaysia, Mexico, Philippines, Poland,
Portugal, Russia, Saudi Arabia, Singapore, Spain, Taiwan, Thailand, USA,
Venezuela, and Vietnam.
If your computer has only one phone port, you will need to purchase a parallel splitter
(also called a coupler). (A parallel splitter has one RJ-11 port on the front and two
Fax troubleshooting
221
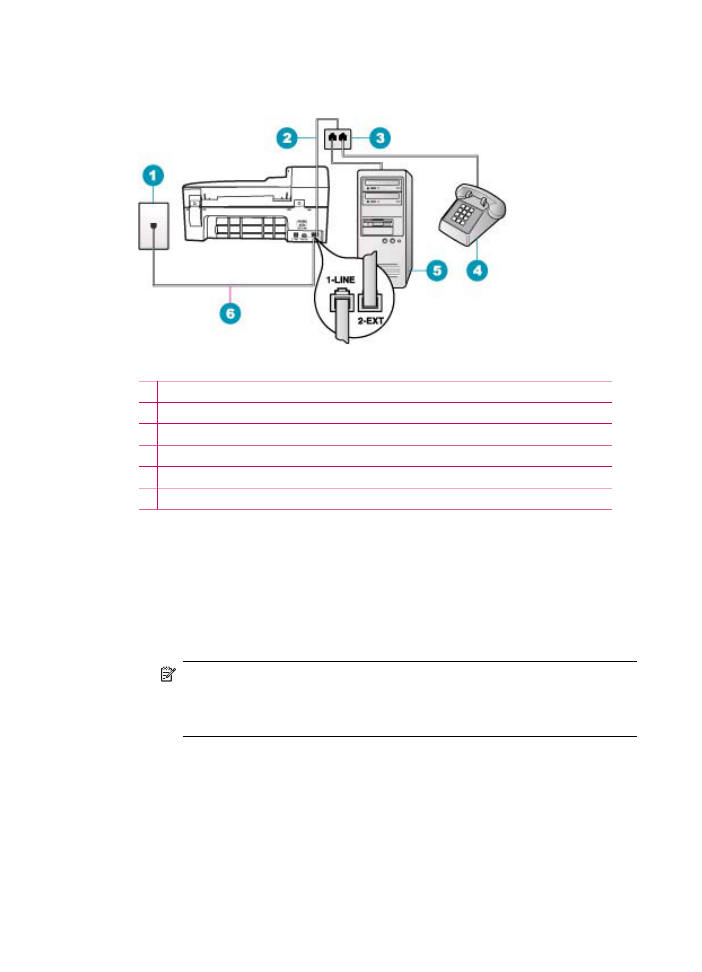
RJ-11 ports on the back. Do not use a 2-line phone splitter, a serial splitter, or a parallel
splitter which has two RJ-11 ports on the front and a plug on the back.)
Figure 11-4 Back view of the HP All-in-One
1 Telephone wall jack
2 Phone cord connected to the 2-EXT port
3 Parallel splitter
4 Telephone (optional)
5 Computer with modem
6 Phone cord supplied in the box with the HP All-in-One connected to the 1-LINE port
To set up the HP All-in-One to a computer with one phone port
1.
Find the phone cord that connects from the back of your computer (your computer
dial-up modem) to a telephone wall jack. Disconnect the cord from the telephone
wall jack and plug it into the port labeled 2-EXT on the back of the HP All-in-One.
2.
Using the phone cord supplied in the box with the HP All-in-One, connect one end
to your telephone wall jack, then connect the other end to the port labeled 1-LINE
on the back of the HP All-in-One.
NOTE:
If you do not use the supplied cord to connect from the telephone
wall jack to the HP All-in-One, you might not be able to fax successfully. This
special phone cord is different from the phone cords you might already have
in your home or office.
3.
Remove the white plug from the port labeled 2-EXT on the back of the HP All-in-
One.
4.
Using another phone cord, connect one end to the port labeled 2-EXT on the back
of the HP All-in-One. Connect the other end of the phone cord to the parallel
splitter on the side with the single phone port.
5.
Unplug your computer modem from the telephone wall jack, and connect it to the
parallel splitter on the side with two phone ports.
Chapter 11
222
Troubleshooting

6.
Connect your answering machine to the other open phone port on the parallel
splitter.
NOTE:
If you do not connect your answering machine in this way, fax tones
from a sending fax machine might be recorded on your answering machine,
and you might not be able to receive faxes with the HP All-in-One.
7.
(Optional) If your answering machine does not have a built-in phone, for
convenience you might want to connect a phone to the back of your answering
machine at the "OUT" port.
8.
If your modem software is set to receive faxes to your computer automatically,
turn off that setting.
NOTE:
If you do not turn off the automatic fax reception setting in your
modem software, the HP All-in-One will not be able to receive faxes.
9.
Turn on the Auto Answer setting.
10.
Set your answering machine to answer after a low number of rings.
11.
Change the Rings to Answer setting on the HP All-in-One to the maximum
number of rings supported by your device. (The maximum number of rings varies
by country/region.)
12.
Run a fax test.
When the phone rings, your answering machine will answer after the number of rings
you have set, and then play your recorded greeting. The HP All-in-One monitors the
call during this time, "listening" for fax tones. If incoming fax tones are detected, the
HP All-in-One will emit fax reception tones and receive the fax; if there are no fax
tones, the HP All-in-One stops monitoring the line and your answering machine can
record a voice message.
I hear static on my telephone line since connecting the HP All-in-One
Cause: The HP All-in-One is not set up properly for faxing.
Solution:
NOTE:
This possible solution applies only in the countries/regions that receive
a 2-wire phone cord in the box with the HP All-in-One, including: Argentina,
Australia, Brazil, Canada, Chile, China, Colombia, Greece, India, Indonesia,
Ireland, Japan, Korea, Latin America, Malaysia, Mexico, Philippines, Poland,
Portugal, Russia, Saudi Arabia, Singapore, Spain, Taiwan, Thailand, USA,
Venezuela, and Vietnam.
Connect the HP All-in-One to a working telephone wall jack. Make sure you used the
phone cord supplied in the box with the HP All-in-One. Connect the 2-wire phone cord
Fax troubleshooting
223
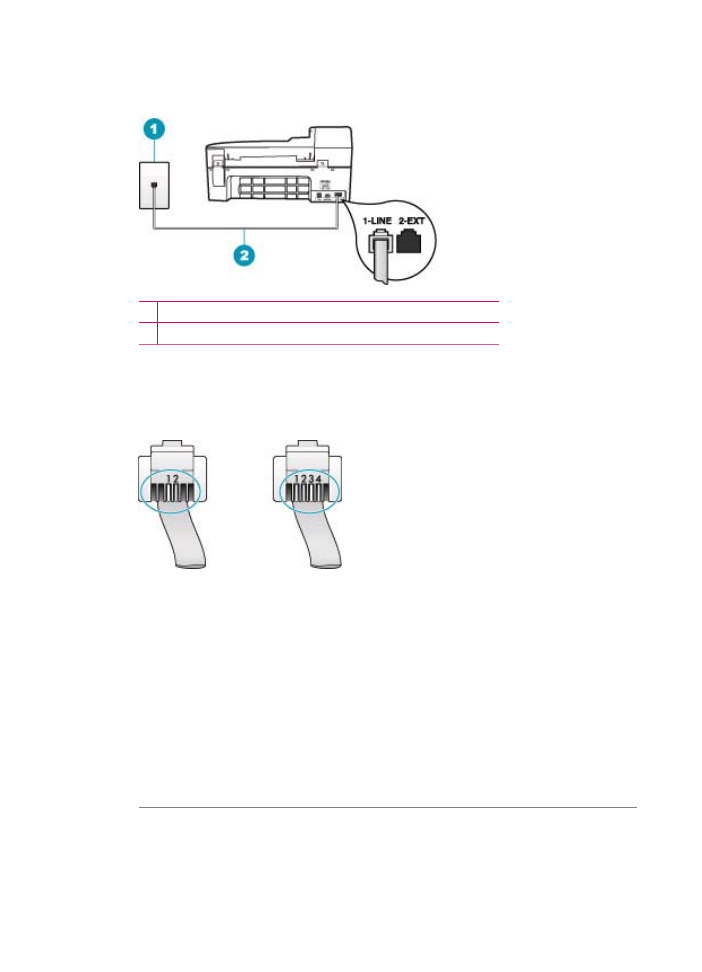
to the port labeled 1-LINE on the back of the HP All-in-One and to your telephone
wall jack, as shown below.
1 Telephone wall jack
2 Use the phone cord supplied in the box with the HP All-in-One
This special 2-wire phone cord is different from the more common 4-wire phone cords
you might already have in your office. Check the end of the cord and compare it to
the two types of cords shown below.
If you used a 4-wire phone cord, disconnect it, find the supplied 2-wire phone cord,
and then connect the 2-wire phone cord to the port labeled 1-LINE on the back of the
HP All-in-One.
If the HP All-in-One came with a 2-wire phone cord adaptor, you can use it with a 4-
wire phone cord, in case the supplied 2-wire phone cord is too short. Attach the 2-
wire phone cord adaptor to the port labeled 1-LINE on the back of the HP All-in-One.
Attach your 4-wire phone cord to the open port on the adaptor and to the telephone
wall jack. For more information on using the 2-wire phone cord adaptor, see the
documentation that came with it.
For more information on setting up the HP All-in-One, see the printed documentation
that came with the HP All-in-One.
Cause: You are using a phone line splitter between the 1-LINE port on the HP All-
in-One and the wall.
Solution: A phone line splitter can affect the sound quality of your phone line and
cause static. (A splitter is a two-cord connector that plugs into a telephone wall jack.)
Chapter 11
224
Troubleshooting

Try removing the splitter and connecting the HP All-in-One directly to the telephone
wall jack.
Cause: You are not using a proper grounded power outlet for the HP All-in-One.
Solution: Try connecting to another power outlet.
The fax test failed
If you tried to run the fax test from your computer and the fax test failed to run, the
HP All-in-One might be busy with another task or have an error condition preventing
it from running the fax test.
What to check
•
The HP All-in-One is set up properly, connected to a power supply, and is
connected to your computer. For more information on setting up the HP All-in-
One, see the Setup Poster that came with the HP All-in-One.
•
The HP All-in-One is turned on. If it is not, press the Power button to turn on the
HP All-in-One.
•
The print cartridges are installed correctly, the print carriage is not blocked, and
the print cartridge door is closed.
•
The HP All-in-One is not currently busy with another task such as aligning the
print cartridges. Check the display. If the HP All-in-One is busy, wait until it
completes the current task and run the fax test again.
•
The rear door is attached to the back of the HP All-in-One.
•
There are no error messages on the display. If there is an error message, resolve
the problem and run the fax test again.
If you run the fax test and the HP All-in-One reports that the test failed, read the
following information carefully to determine how to correct any problems with your fax
setup. Different portions of the fax test might fail for different reasons.
Cause: The "Fax Hardware Test" failed.
Solution:
What to do
•
Turn off the HP All-in-One by using the Power button located on the control panel
and then unplug the power cord from the back of the HP All-in-One. After a few
seconds, plug the power cord back in and turn the power on. Run the test again.
If the test fails again, continue reviewing the troubleshooting information in this
section.
NOTE:
Depending how long the HP All-in-One is unplugged, the date and
time might be erased. You might need to reset the date and time later, when
you plug the power cord back in.
•
Try to send or receive a test fax. If you can send or receive a fax successfully,
there might not be a problem.
After you resolve any problems found, run the fax test again to make sure it passes
and the HP All-in-One is ready for faxing. If the Fax Hardware Test continues to fail
Fax troubleshooting
225
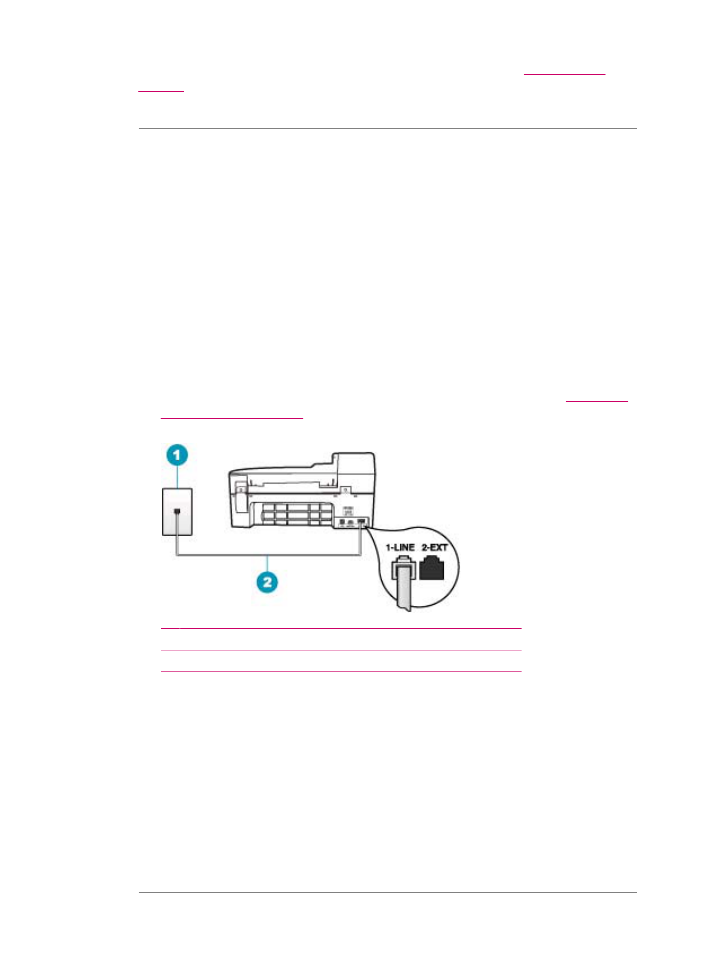
and you experience problems faxing, contact HP Support. Go to
www.hp.com/
support
. If prompted, choose your country/region, and then click Contact HP for
information on calling for technical support.
Cause: The "Fax Connected to Active Telephone Wall Jack" test failed.
Solution:
What to do
•
Check the connection between the telephone wall jack and the HP All-in-One to
make sure the phone cord is secure.
•
Make sure you use the phone cord that came with the HP All-in-One. If you do
not use the supplied phone cord to connect from the telephone wall jack to the
HP All-in-One, you might not be able to send or receive faxes. After you plug in
the phone cord that came with the HP All-in-One, run the fax test again.
•
Make sure you have correctly connected the HP All-in-One to the telephone wall
jack. Using the phone cord supplied in the box with the HP All-in-One, connect
one end to your telephone wall jack, then connect the other end to the port labeled
1-LINE on the back of the HP All-in-One. For more information, see
Set up the
HP All-in-One for faxing
.
1 Telephone wall jack
2 Use the phone cord supplied in the box with the HP All-in-One
•
If you are using a phone splitter, this can cause faxing problems. (A splitter is a
two-cord connector that plugs into a telephone wall jack.) Try removing the splitter
and connecting the HP All-in-One directly to the telephone wall jack.
•
Try connecting a working phone and phone cord to the telephone wall jack that
you are using for the HP All-in-One and check for a dial tone. If you do not hear
a dial tone, contact your telephone company and have them check the line.
•
Try to send or receive a test fax. If you can send or receive a fax successfully,
there might not be a problem.
After you resolve any problems found, run the fax test again to make sure it passes
and the HP All-in-One is ready for faxing.
Chapter 11
226
Troubleshooting
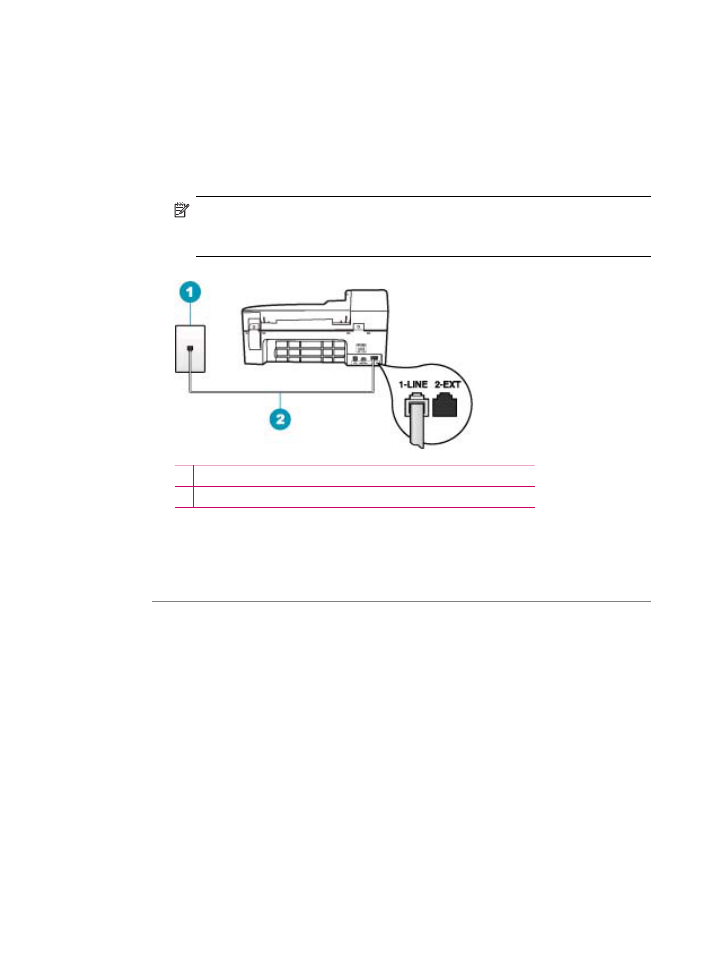
Cause: The "Phone Cord Connected to Correct Port on Fax" test failed.
Solution: Plug the phone cord into the correct port.
What to do
1.
Using the phone cord supplied in the box with the HP All-in-One, connect one end
to your telephone wall jack, then connect the other end to the port labeled 1-LINE
on the back of the HP All-in-One.
NOTE:
If you use the 2-EXT port to connect to the telephone wall jack, you
will not be able to send or receive faxes. The 2-EXT port should only be used
to connect other equipment, such as an answering machine or a telephone.
1 Telephone wall jack
2 Use the phone cord supplied in the box with the HP All-in-One
2.
After you have connected the phone cord to the port labeled 1-LINE, run the fax
test again to make sure it passes and the HP All-in-One is ready for faxing.
3.
Try to send or receive a test fax.
Cause: The "Using Correct Type of Phone Cord with Fax" test failed.
Solution:
•
Make sure you used the phone cord supplied in the box with the HP All-in-One to
connect to the telephone wall jack. One end of the phone cord should be
Fax troubleshooting
227
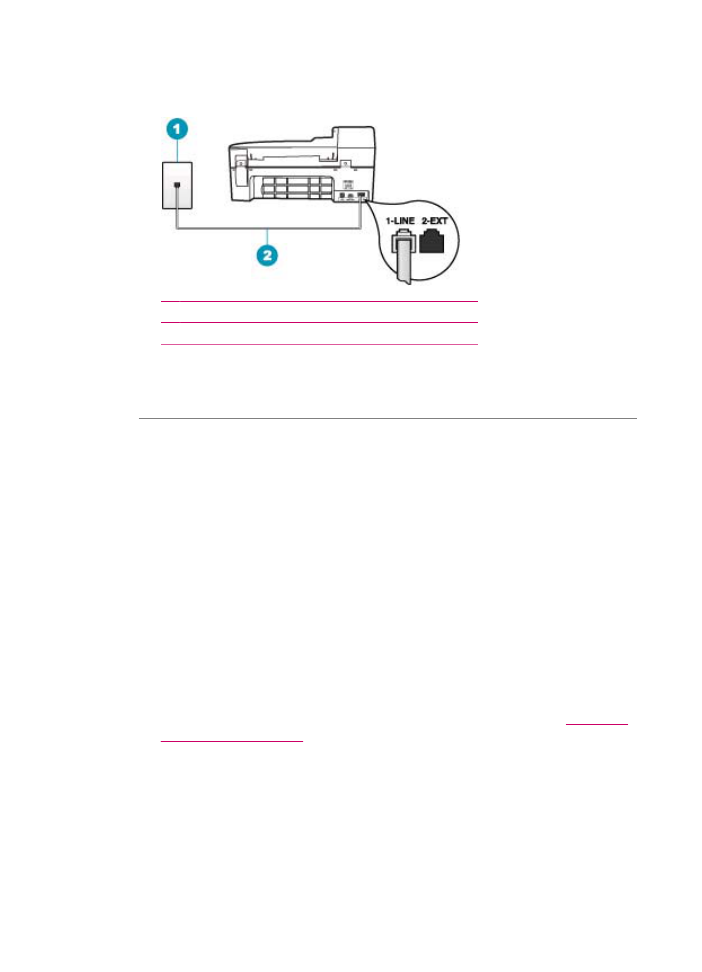
connected to the port labeled 1-LINE on the back of your HP All-in-One and the
other end to your telephone wall jack, as shown below.
1 Telephone wall jack
2 Phone cord supplied in the box with the HP All-in-One
•
Check the connection between the telephone wall jack and the HP All-in-One to
make sure the phone cord is secure.
Cause: The "Fax Line Condition" test failed.
Solution:
What to do
•
Make sure you connect the HP All-in-One to an analog phone line or you will not
be able to send or receive faxes. To check if your phone line is digital, connect a
regular analog phone to the line and listen for a dial tone. If you do not hear a
normal sounding dial tone, it might be a phone line set up for digital phones.
Connect the HP All-in-One to an analog phone line and try sending or receiving
a fax.
•
Check the connection between the telephone wall jack and the HP All-in-One to
make sure the phone cord is secure.
•
Make sure you have correctly connected the HP All-in-One to the telephone wall
jack. Using the phone cord supplied in the box with the HP All-in-One, connect
one end to your telephone wall jack, then connect the other end to the port labeled
1-LINE on the back of the HP All-in-One. For more information, see
Set up the
HP All-in-One for faxing
.
•
Other equipment, which uses the same phone line as the HP All-in-One, might
be causing the test to fail. To find out if other equipment is causing a problem,
Chapter 11
228
Troubleshooting

disconnect everything except the HP All-in-One from the phone line, and then run
the test again.
•
If the Fax Line Condition Test passes without the other equipment, then one
or more pieces of the equipment is causing problems; try adding them back
one at a time and rerunning the test each time, until you identify which piece
of equipment is causing the problem.
•
If the Fax Line Condition Test fails without the other equipment, connect the
HP All-in-One to a working phone line and continue reviewing the
troubleshooting information in this section.
•
If you are using a phone splitter, this can cause faxing problems. (A splitter is a
two-cord connector that plugs into a telephone wall jack.) Try removing the splitter
and connecting the HP All-in-One directly to the telephone wall jack.
After you resolve any problems found, run the fax test again to make sure it passes
and the HP All-in-One is ready for faxing. If the Fax Line Condition Test continues
to fail and you experience problems faxing, contact your telephone company and
have them check the phone line.
Cause: The "Dial Tone Detection" test failed.
Solution:
•
Other equipment, which uses the same phone line as the HP All-in-One, might
be causing the test to fail. To find out if other equipment is causing a problem,
disconnect everything except the HP All-in-One from the phone line, and then run
the test again. If the Dial Tone Detection Test passes without the other
equipment, then one or more pieces of the equipment is causing problems; try
adding them back one at a time and rerunning the test each time, until you identify
which piece of equipment is causing the problem.
•
Try connecting a working phone and phone cord to the telephone wall jack that
you are using for the HP All-in-One and check for a dial tone. If you do not hear
a dial tone, contact your telephone company and have them check the line.
•
Make sure you have correctly connected the HP All-in-One to the telephone wall
jack. Using the phone cord supplied in the box with the HP All-in-One, connect
one end to your telephone wall jack, then connect the other end to the port labeled
Fax troubleshooting
229
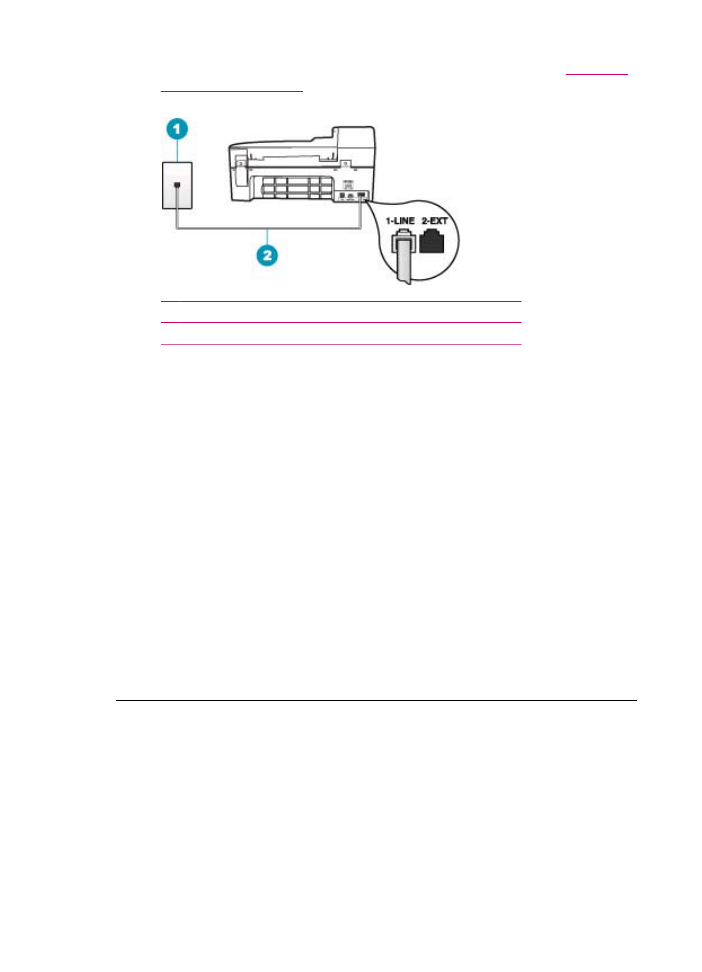
1-LINE on the back of the HP All-in-One. For more information, see
Set up the
HP All-in-One for faxing
.
1 Telephone wall jack
2 Use the phone cord supplied in the box with the HP All-in-One
•
If you are using a phone splitter, this can cause faxing problems. (A splitter is a
two-cord connector that plugs into a telephone wall jack.) Try removing the splitter
and connecting the HP All-in-One directly to the telephone wall jack.
•
If your telephone system is not using a standard dial tone, such as some PBX
systems, this might cause the test to fail. This will not cause a problem sending
or receiving faxes. Try sending or receiving a test fax.
•
Check to make sure the country/region setting is set appropriately for your
country/region. If the country/region setting is not set or is set incorrectly, the test
might fail and you might have problems sending and receiving faxes.
•
Make sure you connect the HP All-in-One to an analog phone line or you will not
be able to send or receive faxes. To check if your phone line is digital, connect a
regular analog phone to the line and listen for a dial tone. If you do not hear a
normal sounding dial tone, it might be a phone line set up for digital phones.
Connect the HP All-in-One to an analog phone line and try sending or receiving
a fax.
After you resolve any problems found, run the fax test again to make sure it passes
and the HP All-in-One is ready for faxing. If the Dial Tone Detection Test continues
to fail, contact your telephone company and have them check the phone line.
I am having problems faxing over the Internet using IP phone
Cause: The fax over Internet Protocol (FoIP) service might not work properly when
the HP All-in-One is sending and receiving faxes at high speed (33600 bps).
Chapter 11
230
Troubleshooting

Solution: If you experience problems sending and receiving faxes while using an
Internet fax service, use a slower fax speed. You can do this by changing the Fax
Speed setting from Fast (the default) to Medium or Slow.
To set the fax speed from the control panel
1.
Press Setup.
2.
Press 5, and then press 7.
This selects Advanced Fax Setup and then selects Fax Speed.
3.
Press to select one of the following settings, and then press OK.
Fax speed setting
Fax speed
Fast
v.34 (33600 baud)
Medium
v.17 (14400 baud)
Slow
v.29 (9600 baud)
Cause: The HP All-in-One is not set up properly for faxing.
Solution: You can only send and receive faxes by connecting a phone cord to the
port labeled 1-LINE on the HP All-in-One and not from the Ethernet port. This means
that your connection to the Internet must be done either through a converter box
(which supplies regular analog phone jacks for fax connections) or your telephone
company.
Cause: Your telephone company does not support faxing over the Internet.
Solution: Check with your telephone company to make sure their Internet phone
service supports faxing. If they do not support faxing, you will not be able to send and
receive faxes through the Internet.
The fax log report shows an error
Cause: If there is a problem or error encountered during sending or receiving a fax,
a Fax Log report will print.
Solution: Review the following table for information on the error codes in the Fax
Log report. This information can help you troubleshoot any problems you encounter
when using the fax features of the HP All-in-One. The table also indicates which codes
are specific to Error Correction Mode (ECM). If the same error appears repeatedly,
try turning off ECM.
To change the ECM setting from the control panel
1.
Press Setup.
2.
Press 5, and then press 6.
This selects Advanced Fax Setup and then selects Error Correction Mode.
3.
Press to select On or Off.
4.
Press OK.
Fax troubleshooting
231

Error code
Error definition
(223 Error Correction
Mode)
224
One or more received pages might not be readable.
225-231
There is a feature incompatibility with the sending fax machine.
232-234
(235-236 Error Correction
Mode)
237
The telephone connection was lost.
238
(239-241 Error Correction
Mode)
The sending fax machine sent an unexpected communication.
242
The sending fax machine is attempting to receive instead of
send.
243-244
(245-246 Error Correction
Mode)
The sending fax machine prematurely ended the session.
247-248
(249-251 Error Correction
Mode)
There was a communication error with the sending fax
machine.
252
Telephone line conditions were too poor to receive a fax.
253
The sending fax machine attempted to use an unsupported
page width.
281
(282 Error Correction
Mode)
283-284
(285 Error Correction
Mode)
286
The telephone connection was lost.
290
There was a communication error with the sending fax
machine.
291
The received fax could not be stored.
314-320
There is a feature incompatibility with the receiving fax
machine.
321
There was a communication error with the receiving fax
machine.
322-324
Telephone line conditions were too poor to send a fax.
(325-328 Error Correction
Mode)
329-331
The receiving fax machine indicated one or more pages might
not be readable.
Chapter 11
232
Troubleshooting

Error code
Error definition
332-337
(338-342 Error Correction
Mode)
343
The receiving fax machine sent an unexpected
communication.
344-348
(349-353 Error Correction
Mode)
354-355
The telephone connection was lost.
356-361
(362-366 Error Correction
Mode)
The receiving fax machine prematurely ended the session.
367-372
(373-377 Error Correction
Mode)
378-380
There was a communication error with the receiving fax
machine.
381
The telephone connection was lost.
382
The receiving fax machine stopped accepting pages.
383
The telephone connection was lost.
390-391
There was a communication error with the receiving fax
machine.