Copy troubleshooting
Use this section to solve these copy problems:
•
Copies are too light or too dark
•
Nothing happens when I try to copy
•
Parts of the original do not appear or are cut off
•
Fit to Page is not working as expected
•
The printout is blank
•
A borderless copy has white space around the edges
•
The image is cropped when I make a borderless copy
Copies are too light or too dark
Cause: The Lighter / Darker setting for the HP All-in-One is set too light or too dark.
(continued)
Copy troubleshooting
233
Solution: Adjust the lightness and darkness of the copies.
To adjust the copy contrast from the control panel
1.
Make sure you have paper loaded in the input tray.
2.
Load your original print side down on the right front corner of the glass or print
side up in the document feeder tray.
If you use the document feeder tray, place the pages so that the top edge of the
document goes in first.
3.
In the Copy area, press Menu repeatedly until Lighter / Darker appears.
4.
Do one of the following:
•
Press to darken the copy.
•
Press to lighten the copy.
5.
Press Start Copy Black or Start Copy Color.
Cause: Try using Enhancements improve an overexposed image.
Solution:
To copy an overexposed photo
1.
Make sure you have paper loaded in the input tray.
2.
Load your original photo print side down on the right front corner of the glass.
Position the photo on the glass so the long edge of the photo is along the front
edge of the glass.
3.
In the Copy area, press Menu repeatedly until Enhancements appears.
4.
Press until the Photo enhancement setting appears.
5.
Press Start Copy Color.
Nothing happens when I try to copy
Cause: The HP All-in-One is turned off.
Solution: Look on the HP All-in-One control panel to see if the display is blank, and
the Power button is not lit. If these two conditions exist, the HP All-in-One is turned
off. Make sure the power cord is connected and plugged into a power outlet. Press
the Power button to turn on the HP All-in-One.
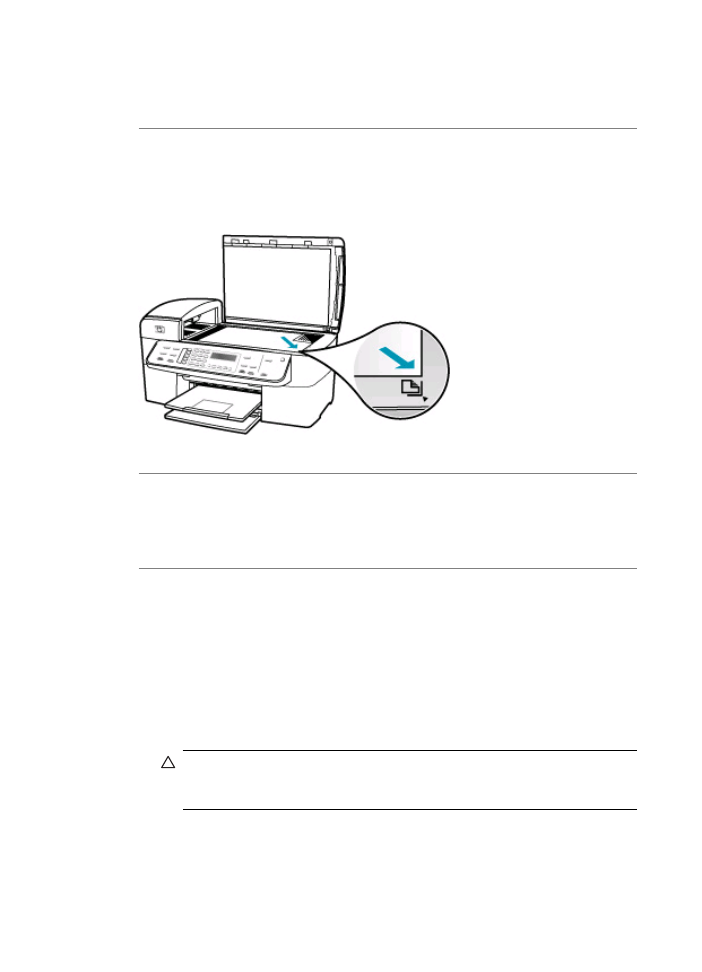
Cause: The original is placed incorrectly on the glass or in the document feeder
tray.
Chapter 11
234
Troubleshooting
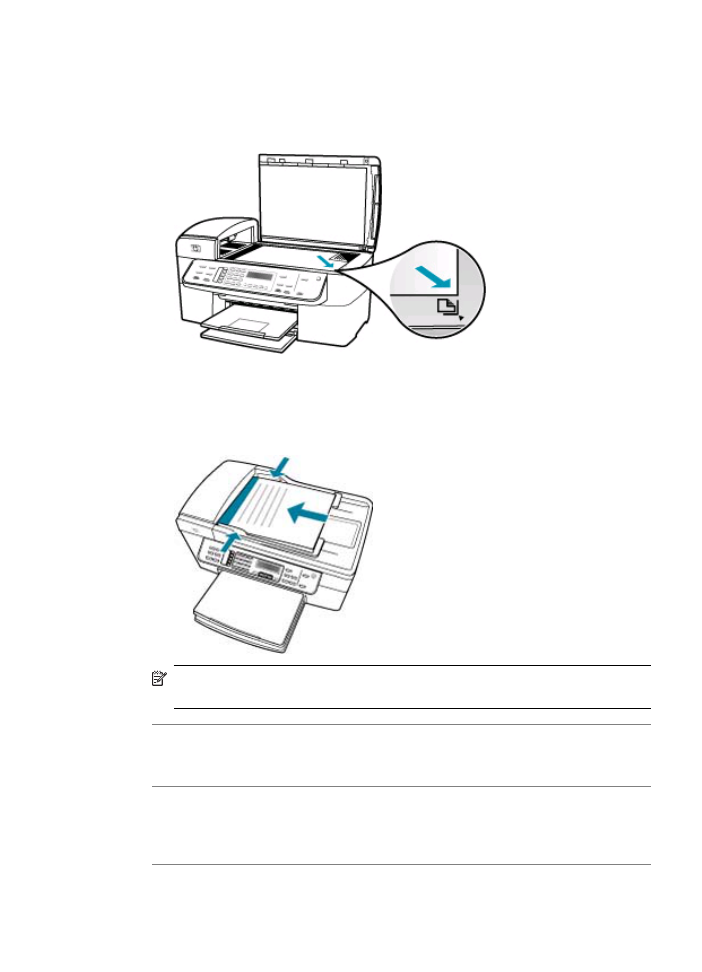
Solution: Load the original on the glass or in the document feeder tray.
•
If you are loading your original on the glass, place it print side down on the right
front corner as shown below. To copy a photo, position the photo so that the long
edge of the photo is along the front edge of the glass.
•
If you are loading your original in the document feeder tray, place the paper, with
the print side up, in the tray as shown below. Place the pages in the tray so that
the top of the document goes in first.
NOTE:
Do not load photos in the document feeder tray to copy. If you are copying
a photo, place it on the glass.
Cause: The HP All-in-One might be busy copying, printing, or receiving a fax.
Solution: Check the display to see if the HP All-in-One is busy.
Cause: The HP All-in-One does not recognize the paper type.
Solution: Do not use the HP All-in-One to copy onto envelopes or other papers the
HP All-in-One does not support.
Cause: The HP All-in-One has a paper jam.
Copy troubleshooting
235
Solution: For information on clearing paper jams, see
Clear paper jams
.
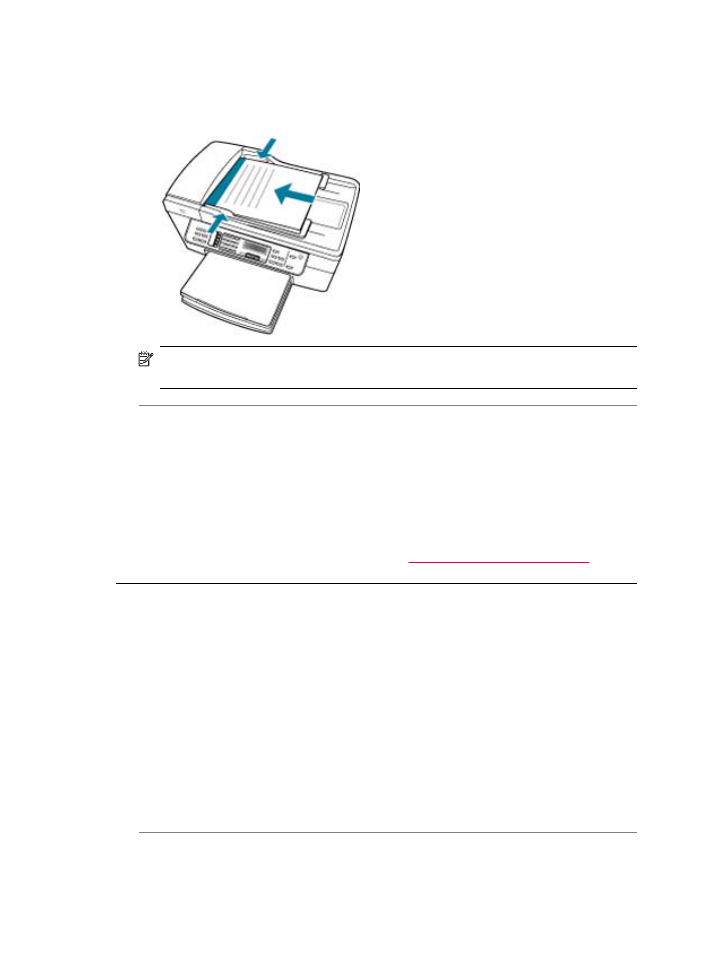
Parts of the original do not appear or are cut off
Cause: The original is placed incorrectly on the glass or in the document feeder
tray.
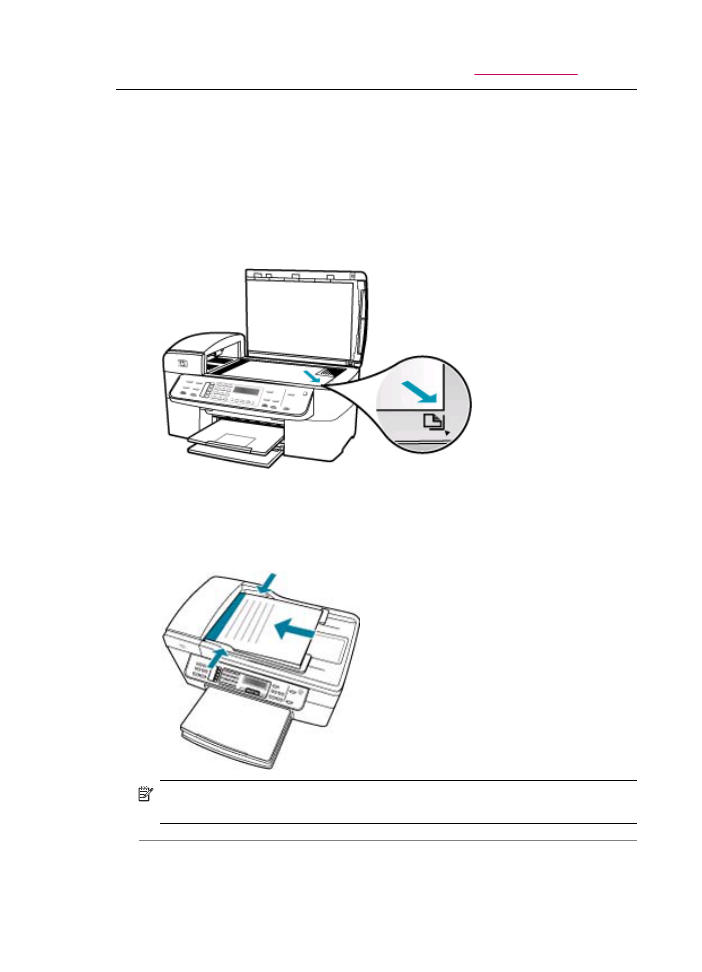
Solution: Load the original on the glass or in the document feeder tray.
•
If you are loading your original on the glass, place it print side down on the right
front corner as shown below. To copy a photo, position the photo so that the long
edge of the photo is along the front edge of the glass.
•
If you are loading your original in the document feeder tray, place the paper, print
side up, in the tray as shown below. Place the pages in the tray so that the top of
the document goes in first.
NOTE:
Do not load photos in the document feeder tray to copy. If you are copying
a photo, place it on the glass.
Cause: The original fills the entire sheet.
Chapter 11
236
Troubleshooting

Solution: If the image or text on your original fills the entire sheet with no margins,
use the Fit to Page feature to reduce your original and prevent unwanted cropping
of the text or images at the edges of the sheet.
To resize a document from the control panel
1.
Make sure you have paper loaded in the input tray.
2.
Load your original print side down on the right front corner of the glass or print
side up in the document feeder tray.
If you use the document feeder tray, place the pages so that the top edge of the
document goes in first.
3.
In the Copy area, press the Reduce/Enlarge button.
4.
Do one of the following:
•
If you loaded your original in the document feeder tray or on the glass, press
until Full Page 91% appears.
•
If you loaded a full- or small-size original on the glass, press until Fit to
Page appears.
5.
Press Start Copy Black or Start Copy Color.
Cause: The original is larger than the paper in the input tray.
Solution: If your original is larger than the paper in the input tray, use the Fit to
Page feature to reduce your original to fit on the paper in the input tray.
To resize a document from the control panel
1.
Make sure you have paper loaded in the input tray.
2.
Load your original print side down on the right front corner of the glass or print
side up in the document feeder tray.
If you use the document feeder tray, place the pages so that the top edge of the
document goes in first.
3.
In the Copy area, press the Reduce/Enlarge button.
4.
Do one of the following:
•
If you loaded your original in the document feeder tray or on the glass, press
until Full Page 91% appears.
•
If you loaded a full- or small-size original on the glass, press until Fit to
Page appears.
5.
Press Start Copy Black or Start Copy Color.
Fit to Page
is not working as expected
Cause: You are trying to increase the size of an original that is too small.
Solution: Fit to Page can only enlarge the original up to the maximum percentage
allowed by your model. (The maximum percentage varies by model.) For example,
200% might be the maximum enlargement percentage allowed by your model.
Enlarging a passport photo by 200% might not enlarge it enough for it to fit a full-size
page.
Copy troubleshooting
237
If you want to make a large copy of a small original, scan the original into the computer,
resize the image in the HP Scan Pro software, and then print a copy of the enlarged
image.
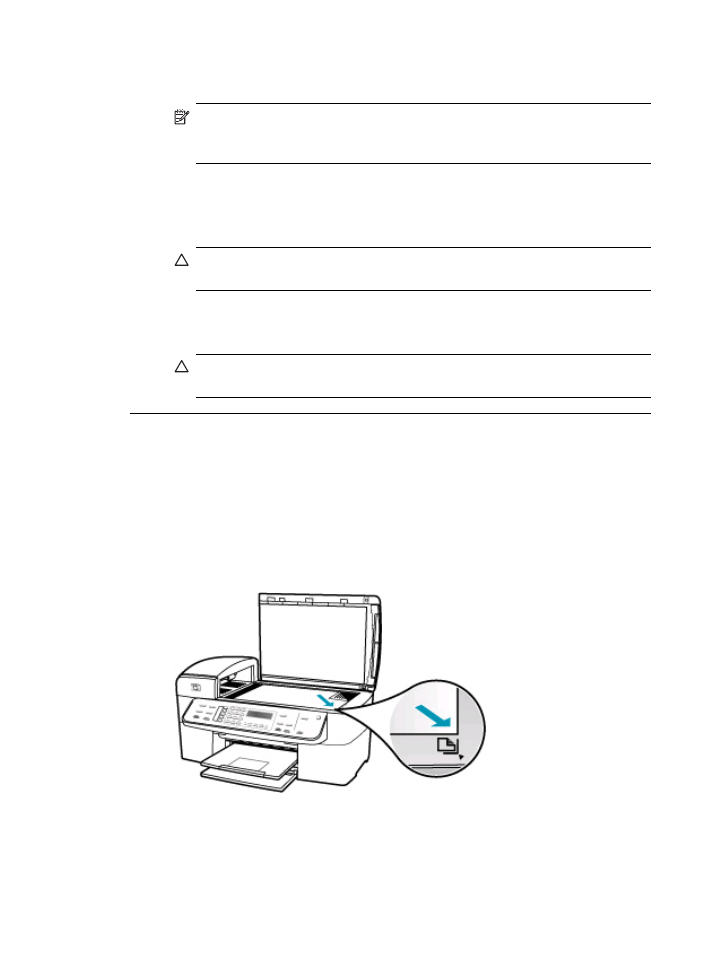
Cause: The original is placed incorrectly on the glass.
Solution: Load the original print side down on the right front corner of the glass as
shown below. To copy a photo, position the photo on the glass so that the long edge
of the photo is along the front edge of the glass.
Cause: The original is placed in the document feeder tray.
Solution: You cannot use the document feeder tray with the Fit to Page feature.
To use the Fit to Page feature, the original must be placed print side down on the
right front corner of the glass.
Cause: Debris might be stuck on the glass or on the back of the document lid. The
HP All-in-One interprets anything it detects on the glass as part of the image.
Solution: Turn off the HP All-in-One, unplug the power cord, and then use a soft
cloth to wipe the glass and the back of the document lid.
To clean the glass
1.
Turn off the HP All-in-One, and raise the lid.
2.
Clean the glass with a soft cloth or sponge slightly moistened with a nonabrasive
glass cleaner.
CAUTION:
Do not use abrasives, acetone, benzene, or carbon tetrachloride
on the glass, since they can damage it. Do not place or spray liquid directly
on the glass. The liquid might seep under the glass and damage the device.
3.
Dry the glass with a dry, soft, lint-free cloth to prevent spotting.
4.
Turn on the HP All-in-One.
Chapter 11
238
Troubleshooting
To clean the lid backing
1.
Turn off the HP All-in-One, unplug the power cord, and raise the lid.
NOTE:
Depending how long the HP All-in-One is unplugged, the date and
time might be erased. You might need to reset the date and time later, when
you plug the power cord back in.
2.
Clean the white document backing with a soft cloth or sponge slightly moistened
with a mild soap and warm water.
Wash the backing gently to loosen debris. Do not scrub the backing.
3.
Dry the backing with a dry, soft, lint-free cloth.
CAUTION:
Do not use paper-based wipes, as these might scratch the
backing.
4.
If further cleaning is needed, repeat the previous steps using isopropyl (rubbing)
alcohol, and wipe the backing thoroughly with a damp cloth to remove any residual
alcohol.
CAUTION:
Be careful not to spill alcohol on the glass or exterior of the HP All-
in-One, as this might damage the device.
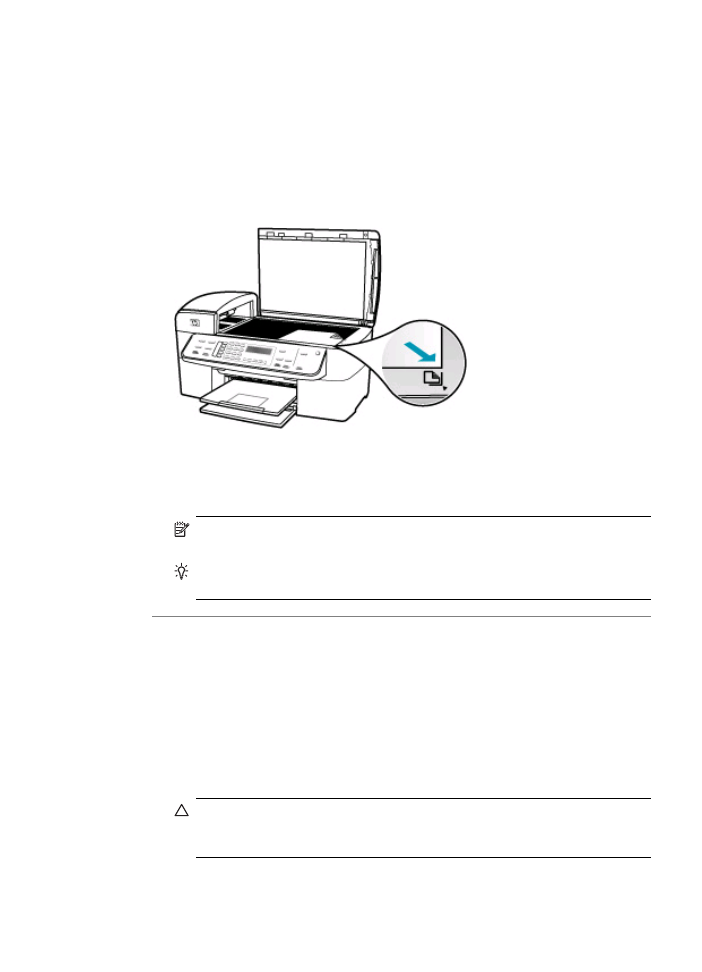
The printout is blank
Cause: The original is placed incorrectly on the glass or in the document feeder
tray.
Solution: Load the original on the glass or in the document feeder tray.
•
If you are loading your original on the glass, place it print side down on the right
front corner as shown below. To copy a photo, position the photo so that the long
edge of the photo is along the front edge of the glass.
Copy troubleshooting
239
•
If you are loading your original in the document feeder tray, place the paper, with
print side up, in the tray as shown below. Place the pages in the tray so that the
top of the document goes in first.
NOTE:
Do not load photos in the document feeder tray to copy. If you are copying
a photo, place it on the glass.
Cause: The print cartridges need to be cleaned or might be out of ink.
Solution: Check the estimated ink levels remaining in the print cartridges. If the
print cartridges are low or out of ink, you might need to replace the print cartridges.
If there is ink remaining in the print cartridges, but you are still noticing a problem,
print a self-test report to determine if there is a problem with the print cartridges. If the
self-test report shows a problem, clean the print cartridges. If the problem persists,
you might need to replace the print cartridges.
For more information on print cartridges, see
Print cartridge troubleshooting
.
A borderless copy has white space around the edges
Cause: You are trying to make a borderless copy of an original that is too small.
Solution: When you make a borderless copy of a small original, the HP All-in-One
enlarges the original up to a maximum percentage. This might leave white space
around the edges. (The maximum percentage varies by model.)
Depending on the size of the borderless copy you are trying to make, the minimum
size of the original varies. For example, you cannot enlarge a passport photo to create
a letter-size borderless copy.
If you want to make a borderless copy of a very small original, scan the original into
the computer, resize the image in the HP scanning software, and then print a
borderless copy of the enlarged image.
Cause: You are trying to make a borderless copy without using photo paper.
Chapter 11
240
Troubleshooting
Solution: Use photo paper to make borderless copies.
To make a borderless copy of a photo from the control panel
1.
Load 10 x 15 cm (4 x 6 inch) photo paper in the input tray.
2.
Load your original photo print side down on the right front corner of the glass.
Position the photo on the glass so the long edge of the photo is along the front
edge of the glass, as indicated by the engraved guides along the edge of the
glass.
3.
Press Start Copy Black or Start Copy Color.
The HP All-in-One makes a 10 x 15 cm (4 x 6 inch) borderless copy of your original
photo.
NOTE:
If you loaded tabbed paper in the photo tray, you can remove the tab
from the copy of your photo once the ink has completely dried.
TIP:
If the output is not borderless set the paper type to Premium Photo,
and then try making the copy again.
Cause: Debris might be stuck on the glass or on the back of the document lid. The
HP All-in-One interprets anything it detects on the glass as part of the image.
Solution: Turn off the HP All-in-One, unplug the power cord, and then use a soft
cloth to wipe the glass and the back of the document lid.
To clean the glass
1.
Turn off the HP All-in-One, and raise the lid.
2.
Clean the glass with a soft cloth or sponge slightly moistened with a nonabrasive
glass cleaner.
CAUTION:
Do not use abrasives, acetone, benzene, or carbon tetrachloride
on the glass, since they can damage it. Do not place or spray liquid directly
on the glass. The liquid might seep under the glass and damage the device.
Copy troubleshooting
241
3.
Dry the glass with a dry, soft, lint-free cloth to prevent spotting.
4.
Turn on the HP All-in-One.
To clean the lid backing
1.
Turn off the HP All-in-One, unplug the power cord, and raise the lid.
NOTE:
Depending how long the HP All-in-One is unplugged, the date and
time might be erased. You might need to reset the date and time later, when
you plug the power cord back in.
2.
Clean the white document backing with a soft cloth or sponge slightly moistened
with a mild soap and warm water.
Wash the backing gently to loosen debris. Do not scrub the backing.
3.
Dry the backing with a dry, soft, lint-free cloth.
CAUTION:
Do not use paper-based wipes, as these might scratch the
backing.
4.
If further cleaning is needed, repeat the previous steps using isopropyl (rubbing)
alcohol, and wipe the backing thoroughly with a damp cloth to remove any residual
alcohol.
CAUTION:
Be careful not to spill alcohol on the glass or exterior of the HP All-
in-One, as this might damage the device.
The image is cropped when I make a borderless copy
Cause: The HP All-in-One cropped some of the image around the margins of the
copy to achieve a borderless print without changing the proportions of the original.
Solution: If you want to enlarge a photo to fit a full-size page without cropping the
edges, use Fit to Page or Full Page 91% .
To set a custom size from the control panel
1.
Make sure you have paper loaded in the input tray.
2.
Load your original print side down on the right front corner of the glass.
If you use the document feeder tray, place the pages so that the top edge of the
document goes in first.
3.
In the Copy area, press the Reduce/Enlarge button.
4.
Press until Custom 100% appears.
5.
Press OK.
6.
Press or use the keypad to enter a percentage to reduce or enlarge the copy.
(The minimum and maximum percentage to resize a copy varies by model.)
7.
Press Start Copy Black or Start Copy Color.
Chapter 11
242
Troubleshooting

To resize a document from the control panel
1.
Make sure you have paper loaded in the input tray.
2.
Load your original print side down on the right front corner of the glass or print
side up in the document feeder tray.
If you use the document feeder tray, place the pages so that the top edge of the
document goes in first.
3.
In the Copy area, press the Reduce/Enlarge button.
4.
Do one of the following:
•
If you loaded your original in the document feeder tray or on the glass, press
until Full Page 91% appears.
•
If you loaded a full- or small-size original on the glass, press until Fit to
Page appears.
5.
Press Start Copy Black or Start Copy Color.
Cause: The original is larger than the paper in the input tray.
Solution: If your original is larger than the paper in the input tray, use the Fit to
Page feature to reduce your original to fit on the paper in the input tray.
To resize a document from the control panel
1.
Make sure you have paper loaded in the input tray.
2.
Load your original print side down on the right front corner of the glass or print
side up in the document feeder tray.
If you use the document feeder tray, place the pages so that the top edge of the
document goes in first.
3.
In the Copy area, press the Reduce/Enlarge button.
4.
Do one of the following:
•
If you loaded your original in the document feeder tray or on the glass, press
until Full Page 91% appears.
•
If you loaded a full- or small-size original on the glass, press until Fit to
Page appears.
5.
Press Start Copy Black or Start Copy Color.